LINE Developers and LINE front-end framework (LIFF) let you open a service space for LINE app users. As it runs as a web service inside the LINE app webview, a LINE Official Account (LINE OA) can become a platform that connects directly with customers rather than just a notification channel (reference).
We, a product manager and an Android engineer on the LINE Planet team, confirmed this possibility directly. We created a group video call service that runs on LINE OA without a web engineer.
This article documents the overall structure and key implementation points so you can follow along.
What services can you build by combining LINE OA and LIFF?
LINE OA handles the user entry point and LIFF handles the webview that runs inside it. If you already operate a LINE OA or are considering a new service for LINE app users, you can start services such as the following inside the LINE app.
- Professional counseling: Lawyers, financial planners, and counselors can conduct one-to-one video consultations through LINE OA. Users can join the consultation from inside the LINE app without having to install another app.
- Remote education: Tutors and students can book classes through LINE OA and join the video class at a scheduled time. Multiple teachers using the same LINE OA can run separate calls simultaneously. Adding screen sharing lets participants view documents or solve problems together.
- Live interactive broadcasts: You can run live broadcasts for LINE OA followers inside the LINE app. From about 500 up to 10,000 concurrent participants can join, so the same setup works for small fan meetings and large live events. Like Clubhouse, the audience can be promoted to panelists and talk with the host in real time, creating a community-centered conversation rather than a one-way broadcast.
- In-app voice chat for games: Team members can voice chat in real time during gameplay. Players can chat without switching apps while playing with LINE friends.
Overview of building a group video call service with LINE OA and LIFF
A group video call service may sound complex, but in practice you only need to build two things.
- Web app: A group video call web app that runs in LIFF and uses the LINE Planet SDK
- App server: An endpoint to issue LINE Planet access tokens
LINE OA, LIFF, and LINE Planet each handle the hardest parts: LINE authentication, WebRTC media processing, and global network infrastructure. Our job is to connect them. The app server can be built quickly without server infrastructure if you use Firebase cloud functions (see the LINE Planet docs post Building an app server with Firebase for details).
Each component has the following role.
| Component | Role |
|---|---|
| LINE OA | Handles user entry point, launches LIFF app from a tab |
| LIFF | Handles the webview inside the LINE app and passes LINE login token and user profile |
| Web app (React and Vite) | Handles UI and business logic, creating and joining rooms, and media control |
| App server | Endpoint for issuing LINE Planet access tokens |
| LINE Planet | WebRTC based real time communication infrastructure |
The reason to use LIFF is clear. LIFF lets the LINE app manage the webview and automatically passes LINE login information such as userId and displayName. You can identify LINE users without a separate authentication server. Think of it like using a webview on Android to display a web page inside an app.
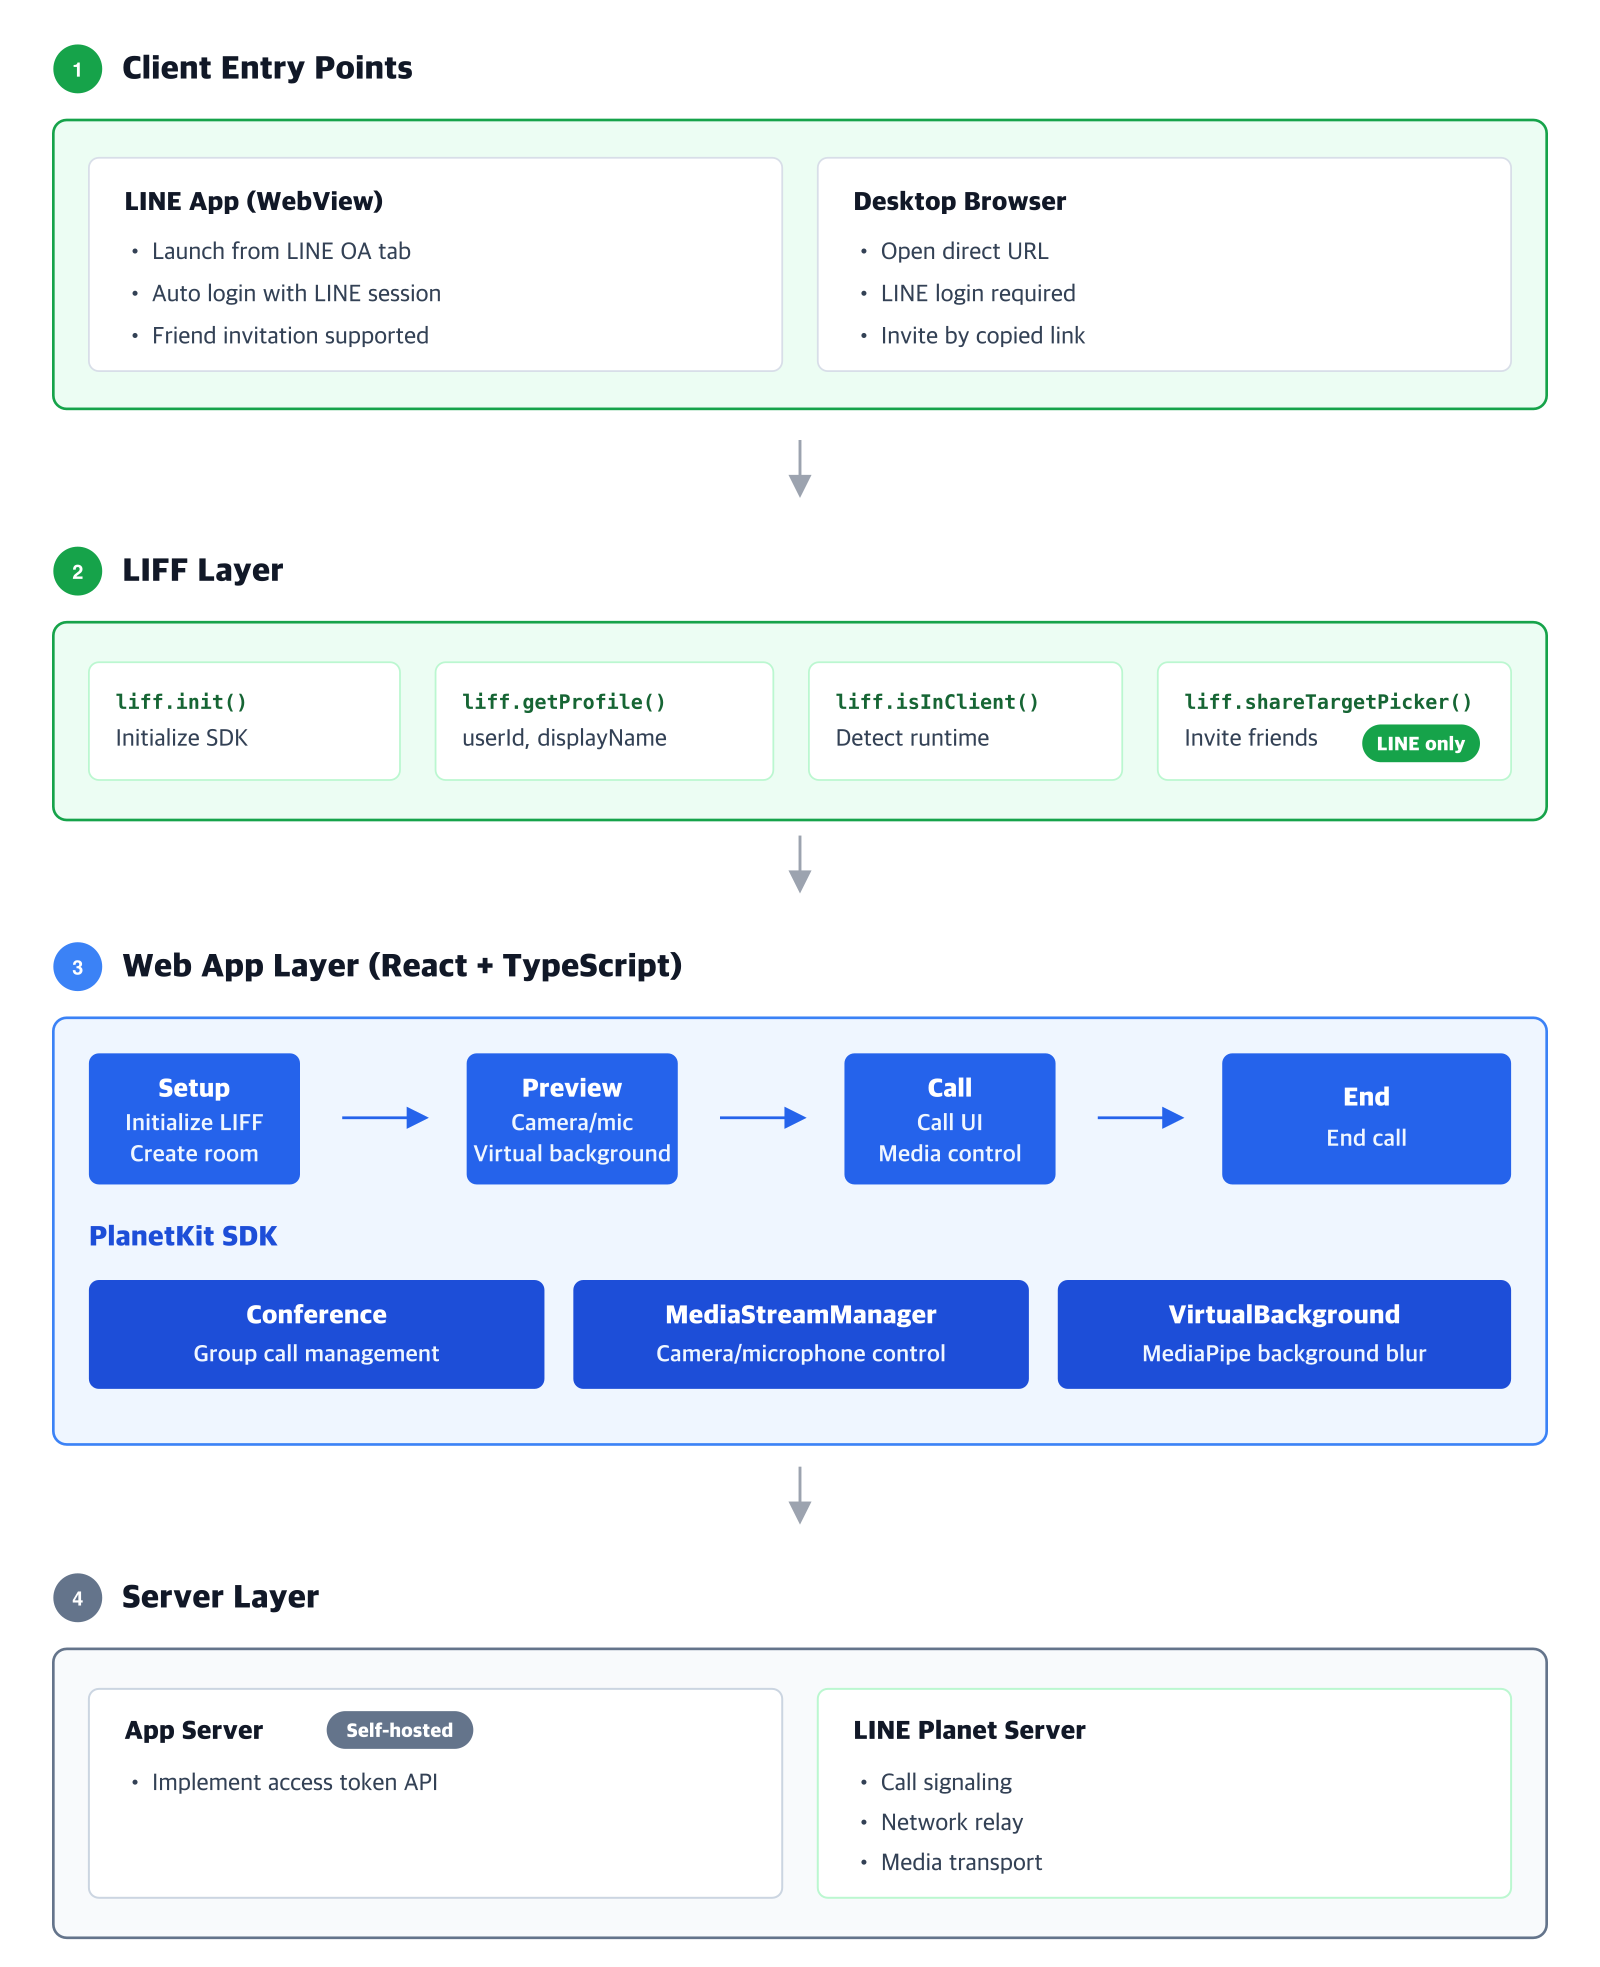
The full structure of the group video call service is shown below. In that structure you must build the web app layer and the app server in the server layer yourself. We will look at the web app layer in a later section of this post. The app server is referenced but not covered in detail here; it will be explained later.
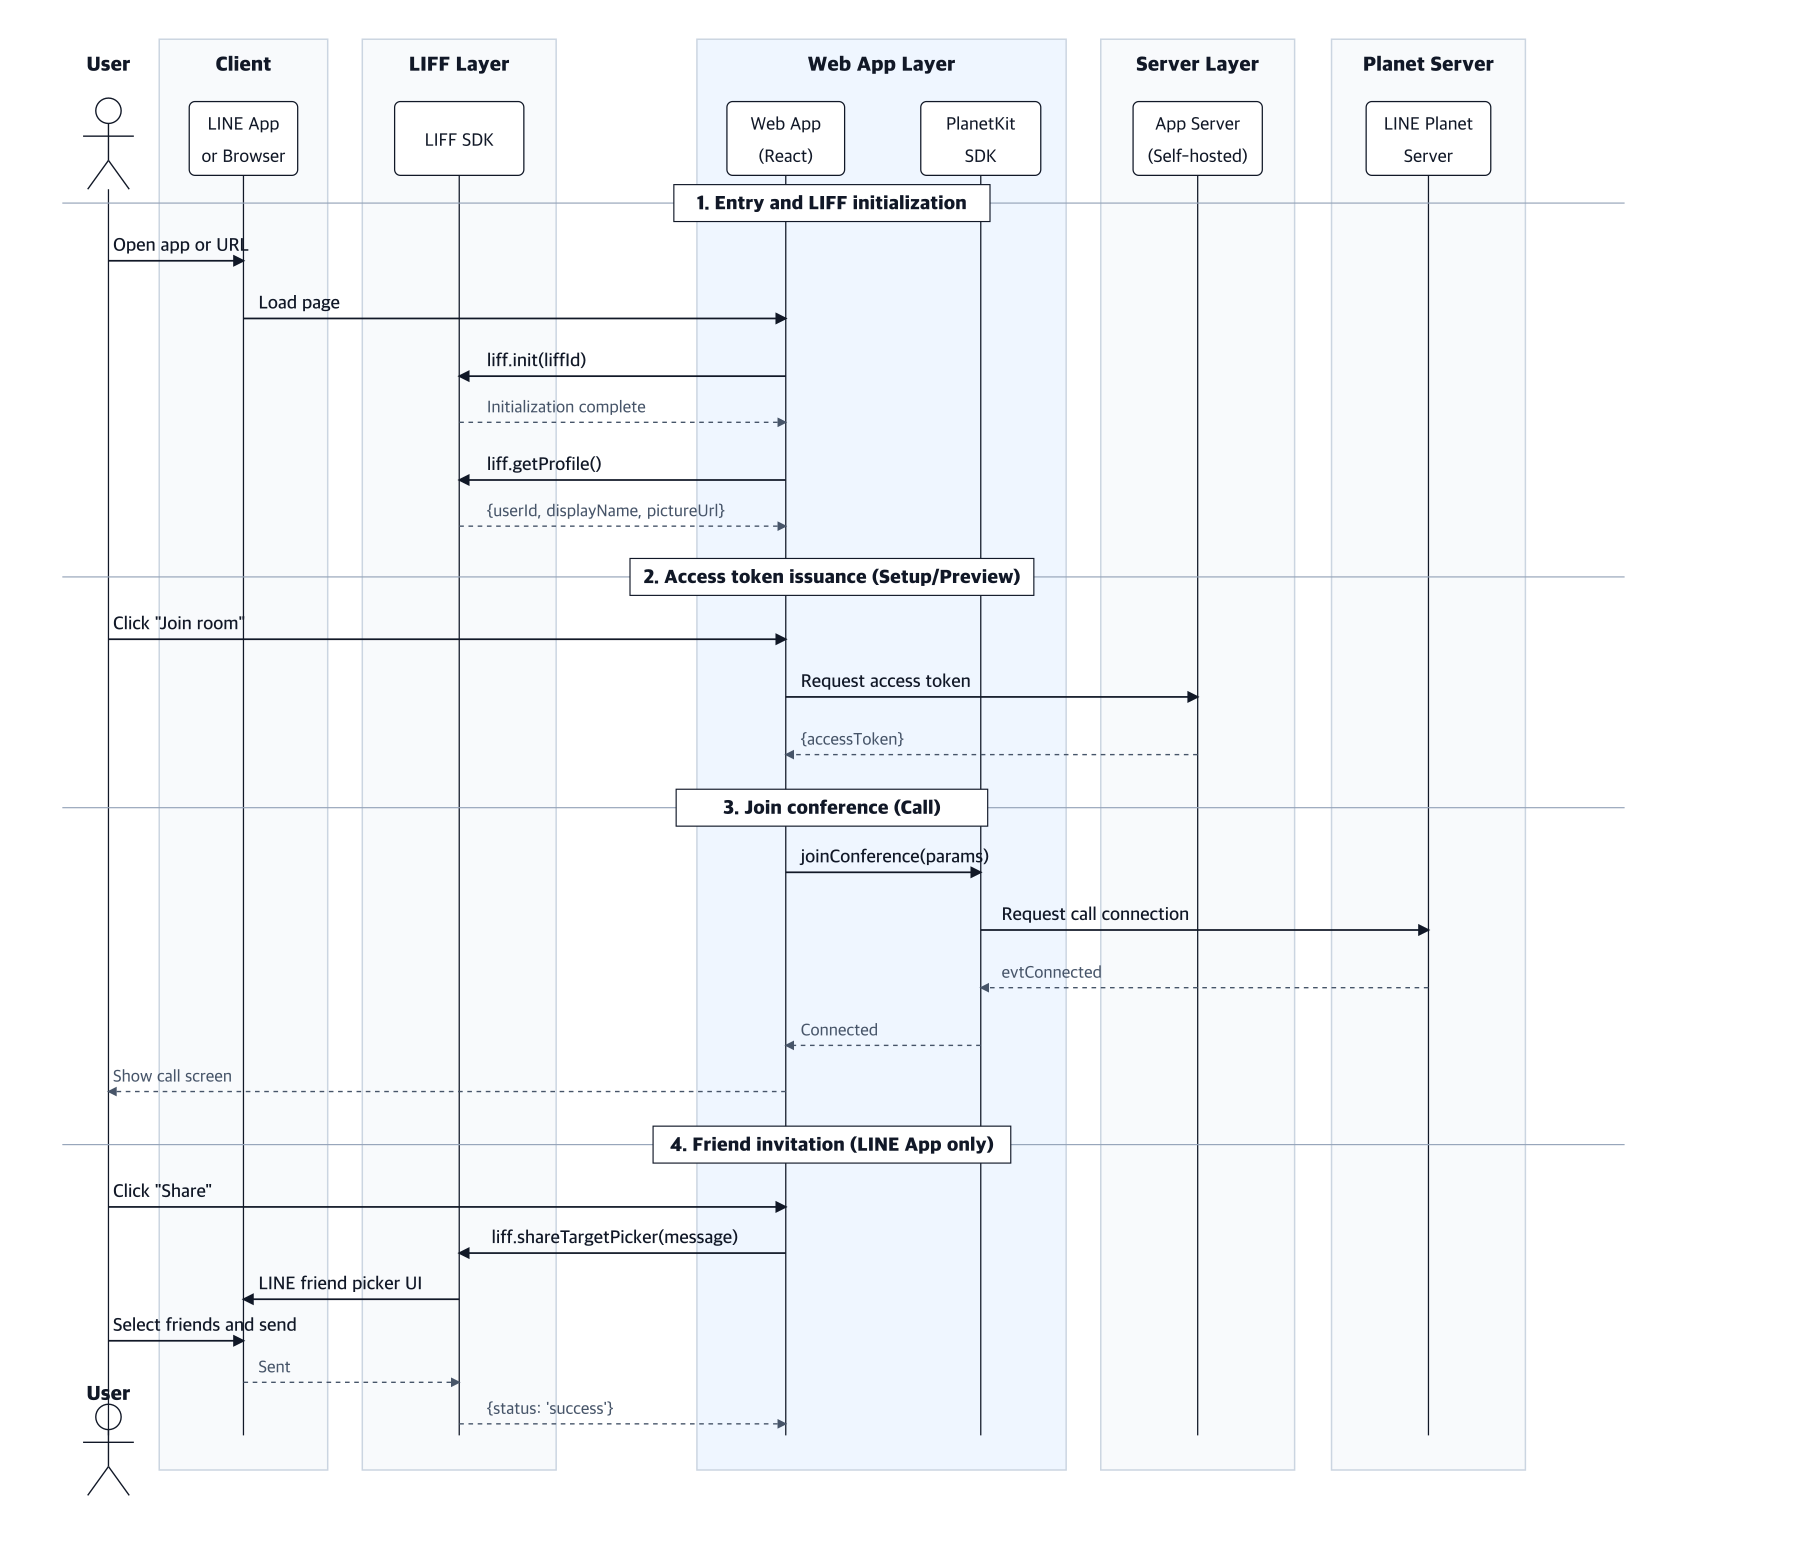
The sequence diagram is shown below.
Preparation before development
There are a few things to prepare before you start development.
Items you must prepare
Check the development environment
The example code in this article assumes Node.js 20 LTS or later and npm. LIFF requires an HTTPS deployment environment, and for local development you can substitute with ngrok.
Prepare items in the LINE Developers Console and LINE OA
To use LINE OA and LIFF together you need to prepare some items in the LINE Developers Console and the LINE OA Manager (this article only briefly introduces the process; see the LINE Developers documentation for details).
First, prepare a Business ID to sign in to the LINE Developers Console, register a developer account, and create a provider for this work.
Next create a LINE OA and enable the messaging API in LINE OA Manager. Choose the provider you created. Enabling messaging API will create a messaging API channel associated with the LINE OA under that provider.
Then create a LINE Login channel under the same provider and register an app in the LIFF tab of that channel with the following values.
| Item | Value |
|---|---|
| LIFF app name | LIFF Call |
| Size | Full |
| Endpoint URL | https://your-app.example.com (temporary, update to the actual URL after web deployment) |
| Scope | profile, openid |
| Share Target Picker | ON |
Pay attention to the following two points in the steps above.
- Make a note of the issued LIFF ID (for example 1234567890-abcdefgh) because it is used for all initialization.
- To enable LINE friend invites using the
shareTargetPickerAPI during development, the LINE Login channel you created earlier must be in Published status.
Items to request from the LINE Planet team
You also need a LINE Planet Console account and a service ID. Request these from the LINE Planet team at dl_planet_help@linecorp.com.
Development
Once the preparations are complete, start developing the web app layer. This article doesn't cover all full screen implementation code. It presents and explains the essential flows and precautions you must check when building a group video call web app with LIFF and the LINE Planet SDK. You must implement details such as call setup, preview, and call screen UI yourself.
The attached code is for demo purposes. For production, you should additionally review security, error handling, and performance optimizations.
Step 1: Design and generate room IDs required for call setup
Typical setups require registering user IDs and other information on the app server. A LIFF app can collect the information needed for call setup in LIFF and register it to the app server from inside the app, which simplifies the pre-setup process. Users can join a call by entering a room ID without extra setup.
You can design room IDs in various ways. This demo uses a random string as shown in the code below, but you can extend it to provide fixed rooms based on interests or automatically create rooms per user group depending on what's required for your service.
    // Example of generating a 16 character alphanumeric room id
    const generateRoomId = (): string =>
        crypto.randomUUID().replace(/-/g, '').slice(0, 16);

    // Restore roomId from query string when coming from an invite link
    const params = new URLSearchParams(window.location.search);
    const roomId = params.get('roomId') ?? generateRoomId();
Step 2: Implement the preview screen
The preview screen lets users check camera and microphone state before joining the room.
Core implementation of the preview page
Ordinary web media uses getUserMedia, but this example uses PlanetKit SDK's MediaStreamManager (MSM). One MSM instance continues from preview to group call, so camera and microphone permissions aren't requested again when navigating pages. Toggling the microphone only adjusts the existing audio track's enabled flag, preventing permission prompts in mobile webviews (the useIsMobileDevice and resolveFacingModeDeviceId utilities are explained in the next section). For clarity this snippet keeps the MSM in a component-local ref; to actually reuse one instance across pages, hold it in a singleton as shown later in the Media stream management API section.
import { useEffect, useRef, useState } from 'react';
import * as PlanetKit from '@line/planet-kit';
import { useIsMobileDevice } from '../hooks/useIsMobileDevice';
import { resolveFacingModeDeviceId } from '../utils/resolveFacingModeDeviceId';

export default function Preview({ onEnter }: { onEnter: () => void }) {
        const videoRef = useRef<HTMLVideoElement>(null);
        const msmRef = useRef<PlanetKit.MediaStreamManager | null>(null);
        const [isReady, setIsReady] = useState(false);
        const [isVideoOn, setIsVideoOn] = useState(true);
        const [isMicOn, setIsMicOn] = useState(true);
        const [facingMode, setFacingMode] = useState<'front' | 'back'>('front');
        const isMobileDevice = useIsMobileDevice();

        // Create MediaStreamManager once on mount
        useEffect(() => {
            msmRef.current = new PlanetKit.MediaStreamManager();
            setIsReady(true);
        }, []);

        // Update stream through MSM when video is on or camera is switched
        useEffect(() => {
                if (!isReady || !isVideoOn) return;
                const msm = msmRef.current!;

                (async () => {
                        const videoInputDeviceId = isMobileDevice
                                ? await resolveFacingModeDeviceId(facingMode)
                                : undefined;

                        // If a stream exists replace only the video track, otherwise create a new stream
                        const stream = msm.hasVideoStream()
                                ? await msm.changeVideoInputDevice(videoInputDeviceId!)
                                : await msm.createMediaStream({
                                        videoInputDeviceId,
                                        videoElement: videoRef.current ?? undefined,
                                    });

                        if (videoRef.current) videoRef.current.srcObject = stream;
                })();
        }, [isReady, isVideoOn, facingMode, isMobileDevice]);

        // Mic toggle only adjusts track enabled to avoid permission re-request
        useEffect(() => {
                const stream = msmRef.current?.getMediaStream();
                stream?.getAudioTracks().forEach((t) => (t.enabled = isMicOn));
        }, [isMicOn]);

        const flipCamera = () =>
                setFacingMode((f) => (f === 'front' ? 'back' : 'front'));

        return (
                <div className="preview">
                        <video ref={videoRef} autoPlay playsInline muted />

                        <div className="controls">
                                <button onClick={() => setIsVideoOn((v) => !v)}>
                                        {isVideoOn ? "Camera off" : "Camera on"}
                                </button>
                                <button onClick={() => setIsMicOn((m) => !m)}>
                                        {isMicOn ? "Microphone off" : "Microphone on"}
                                </button>

                                {/* show front/back switch button only on mobile devices */}
                                {isMobileDevice && (
                                        <button onClick={flipCamera} disabled={!isVideoOn}>
                                                switch front and back
                                        </button>
                                )}
                                <button onClick={onEnter}>enter</button>
                        </div>
                </div>
        );
}
Show the front and back camera switch button only on mobile devices
On mobile we provide a front and back camera switch button. If detection relies on viewport size to determine if the user is on a mobile device, it can display the button in unwanted situations, such as a narrow desktop window. Instead, detect mobile devices using the user agent (UA).
import { useState, useEffect } from 'react';

export function useIsMobileDevice() {
        const [isMobileDevice, setIsMobileDevice] = useState(false);

        useEffect(() => {
                const ua = navigator.userAgent;
                setIsMobileDevice(/Android|iPhone|iPad|iPod/i.test(ua));
        }, []);

        return isMobileDevice;
}
Find camera deviceId for front or back facing modes
The PlanetKit SDK's MediaStreamManager accepts only a videoInputDeviceId, not a facingMode constraint, so we reverse engineer the deviceId by matching the label from enumerateDevices(). Labels are populated only after camera permission is granted, so return undefined on the first call and let the SDK use the default camera (usually front).
export async function resolveFacingModeDeviceId(
        facingMode: 'front' | 'back'
    ): Promise<string | undefined> {
        const devices = await navigator.mediaDevices.enumerateDevices();
        const videoInputs = devices.filter((d) => d.kind === 'videoinput');

        const backPattern = /back|rear|environment/i;
        const frontPattern = /front|user|facetime/i;

        // Match back first to avoid misclassifying labels like "back user facing" as front
        const matched =
            facingMode === 'back'
                ? videoInputs.find((d) => backPattern.test(d.label))
                : videoInputs.find(
                        (d) => !backPattern.test(d.label) && frontPattern.test(d.label)
                    );

        return matched?.deviceId;
}
Step 3: Integrate the LINE Planet SDK
This is the core. The LINE Planet SDK abstracts WebRTC, so developers don't need to implement media processing or network address translation traversal themselves.
This step divides into three substeps.
- Get user information from LIFF
- Issue an access token from the app server
- Join the group call using the LINE Planet SDK
Get user information from LIFF
When you initialize the LIFF SDK you can get the LINE user identifier userId and display name displayName. Use these values as myId and displayName for PlanetKit call participation.
    import liff from '@line/liff';

    interface LiffUser {
        userId: string;
        displayName: string;
    }

    export async function initializeAndLogin(liffId: string): Promise<LiffUser | null> {
        await liff.init({ liffId });

        // If not running inside the LINE app, redirect to LINE login
        if (!liff.isLoggedIn()) {
            liff.login();
            return null; // Caller should retry after redirect
        }

        const profile = await liff.getProfile();
        return {
            userId: profile.userId,
            displayName: profile.displayName,
        };
    }
Issue an access token from the app server
An access token is required to join a LINE Planet call. You obtain this token from your app server.
You must build your own app server. Use Firebase cloud functions to configure the server quickly without server infrastructure. See the LINE Planet documentation post Building an app server with Firebase and the Firebase guide for details.
The client flow to obtain an access token looks like this.
// Example flow to get an access token from the app server
// Actual implementation depends on your app server setup

const getAccessToken = async (userId: string, serviceId: string) => {
    // Request access token from app server
    const response = await fetch('/api/access_token', {

        method: 'POST',
        headers: { 'Content-Type': 'application/json' },
        body: JSON.stringify({ userId, serviceId })
    });
    const { accessToken } = await response.json();

    return accessToken;
};
Join a group call using the LINE Planet SDK
With user information and an access token ready, create a Conference instance and call joinConference. Passing the same MediaStreamManager created in step 2 continues the preview camera and microphone stream into the call without permission prompts.
    import * as PlanetKit from '@line/planet-kit';
    interface JoinParams {
        roomId: string;
        serviceId: string;            // Issued in LINE Planet Console
        user: { userId: string; displayName: string };
        accessToken: string;
        mediaStreamManager: PlanetKit.MediaStreamManager;
        myVideoElement: HTMLVideoElement;
        roomAudioElement: HTMLAudioElement;
    }

    export async function joinConference(p: JoinParams) {
        const conference = new PlanetKit.Conference({ logLevel: 'info' });

        await conference.joinConference({
            roomId: p.roomId,
            myId: p.user.userId,
            displayName: p.user.displayName,
            myServiceId: p.serviceId,
            roomServiceId: p.serviceId,
            accessToken: p.accessToken,
            mediaType: 'audiovideo',
            mediaStreamManager: p.mediaStreamManager,
            mediaHtmlElement: {
                myVideo: p.myVideoElement,
                roomAudio: p.roomAudioElement,
            },
            delegate: {
                evtConnected: () => console.log('[Conference] connected'),
                evtDisconnected: (reason) => console.log('[Conference] disconnected', reason),
                evtPeerListUpdated: (peers) => console.log('[Conference] peers updated', peers),
                // Add other event handlers as needed
            },
        });

        return conference;
    }
The calling flow becomes simple as follows.
    // 1. Identify user with LIFF
    const user = await initializeAndLogin(LIFF_ID);
    if (!user) return; // Redirecting to login

    // 2. Request token from app server
    const accessToken = await getAccessToken(user.userId, PLANET_SERVICE_ID);

    // 3. Join PlanetKit conference
    const conference = await joinConference({
        roomId,
        serviceId: PLANET_SERVICE_ID,
        user,
        accessToken,
        mediaStreamManager: msm,        // Instance created in step 2
        myVideoElement: myVideoRef.current!,
        roomAudioElement: roomAudioRef.current!,
    });
You can receive call events through callbacks registered on delegate. The example registers only evtConnected (connected), evtDisconnected (disconnected), and evtPeerListUpdated (called when other participants join or leave). The ConferenceDelegate defines many events such as mic and camera state changes or speaking state changes; register the ones your service needs. In particular evtPeerListUpdated is used in the next step to dynamically construct the grid.
Step 4: Compose the call screen as a dynamic grid
In group calls the number of grid cells changes as participants join or leave. WebPlanetKit notifies such changes by callback, so adjust layout and video resolution whenever an event arrives. The evtPeerListUpdated callback registered during joinConference in step 3 handles this. It is called whenever the participant list changes; typically you rearrange the grid based on current participant count and request each participant's video resolution again.
Because mobile screens are narrow you may prefer to show recent speakers when participants exceed a certain number. For example you can configure layouts like the following.
| Participant count | Layout example | Video resolution |
|---|---|---|
| 1 | full screen | N/A |
| 2 | split 2 | vga |
| 3 | two on top, one below spanning full width | vga |
| 4 | 2 × 2 grid | vga |
| 5 or more | keep a 2 × 2 grid (prioritize two recent speakers, yourself, and rotate other participants) | vga |
Lowering resolution to match cell size reduces bandwidth and decoding load. See the WebPlanetKit documentation for recommended resolutions and detailed usage: peer video resolution in group call. The table above is an example for typical video meetings; design the UI to match your service's characteristics.
Step 5: Use LINE friend invite
You can send invites so others can join the room directly. Clicking an invite link opens the LIFF app and enters the room using the room ID. The shareTargetPicker API requires the LINE Login channel you created earlier to be Published.
The following code shows inviting LINE friends to a room created for a call.
const inviteFriends = async (roomId: string, liffId: string, displayName: string) => {
    // Check if ShareTargetPicker API is available
    if (!liff.isApiAvailable('shareTargetPicker')) {
        alert('Friend invite is not available in this environment.');
        return;
    }

    // Create LIFF URL including roomId
    const shareUrl = `https://liff.line.me/${liffId}?roomId=${encodeURIComponent(roomId)}`;
    const shareMessage = `🎥 ${displayName} invited you to a video call!\n\nRoom: ${roomId}\n\nTap the link to join:\n${shareUrl}`;

    // Run ShareTargetPicker
    const result = await liff.shareTargetPicker(
        [{ type: 'text', text: shareMessage }],
        { isMultiple: true }  // Allow sending to multiple people at once
    );

    if (result) {
        console.log('invite message sent');
    } else {
        console.log('user cancelled');
    }
};
Key PlanetKit APIs
Here is a brief summary of the PlanetKit APIs used earlier and APIs frequently used when extending the call UI. See the LINE Planet documentation for more details: LINE Planet Documentation.
Media control API
Common media control APIs used during calls are below. Note the conference instance in the examples is created with new PlanetKit.Conference() and joined with joinConference().
- Mute and unmute audio
await conference.muteMyAudio(true);   // Mute
await conference.muteMyAudio(false);  // Unmute
- Pause and resume video
await conference.pauseMyVideo();   // Pause video
await conference.resumeMyVideo();  // Resume video
- Request peer video (used in grid view): as participants increase, the pixels per cell decrease. Request a lower resolution to save bandwidth and processing.
// Example: 1:1 use 'hd', 2 × 2 use 'vga', otherwise 'qvga'
await conference.requestPeerVideo({
    userId: peerId,
    resolution: 'hd',
    videoViewElement: peerVideoElement
});
- End call:
leaveConferenceis a synchronous method (returns void). Unlike other media control APIs don't await it.
conference.leaveConference();
Virtual background API
This MediaPipe-based background blur isn't supported in mobile webviews, so show it only in desktop browsers or the desktop LINE environment: MediaPipe.
Example code to initialize virtual background:
import type VirtualBackground from '@line/planet-kit-virtual-background';

// Virtual background singleton instance (inside PlanetKitService)
private static virtualBackgroundInstance: VirtualBackground
 | null = null;

// Get singleton instance
public static async getVirtualBackgroundInstance(): Promise<VirtualBackground> {
    if (!this.virtualBackgroundInstance) {
        // Dynamically import the VirtualBackground module
        const VirtualBackgroundModule = await import('@line/planet-kit-virtual-background');
        const VirtualBackground = VirtualBackgroundModule.default;

        // Create singleton instance and specify mediapipe resource path
        this.virtualBackgroundInstance = new VirtualBackground({
            locateFile: '/mediapipe-resource'
        });
    }
    return this.virtualBackgroundInstance;
}

// Initialize virtual background for MediaStreamManager or Conference
// Target: 'msm' (preview) or 'conference' (in call)
public async initializeVirtualBackground(target: 'msm' | 'conference'): Promise<void> {
    const vbInstance = await PlanetKitService.getVirtualBackgroundInstance();

    if (target === 'msm') {
        await this.mediaStreamManager.registerVirtualBackground(vbInstance);
        await this.mediaStreamManager.waitForVirtualBackgroundInitialization();
    } else {
        await this.conference.registerVirtualBackground(vbInstance);
        await this.conference.waitForVirtualBackgroundInitialization();
    }
}
Example code to enable or disable background blur:
// Enable background blur (target: 'msm' or 'conference')
public async enableVirtualBackgroundBlur(
    target: 'msm' | 'conference',
    canvasElement?: HTMLCanvasElement,
    blurRadius: number = 10
): Promise<boolean> {
    try {
        if (target === 'msm') {
            await this.mediaStreamManager.startVirtualBackgroundBlur(canvasElement, blurRadius);
        } else {
            await this.conference.startVirtualBackgroundBlur(canvasElement, blurRadius);
        }
        return true;
    } catch (error) {
        console.warn('virtual background enable failed:', error);
        return false;  // Allow UI to gracefully fall back
    }
}

    // Disable background blur
public async disableVirtualBackground(target: 'msm' | 'conference'): Promise<boolean> {
    try {
        if (target === 'msm') {
            await this.mediaStreamManager.stopVirtualBackground();
        } else {
            await this.conference.stopVirtualBackground();
        }
        return true;
    } catch (error) {
        console.warn('virtual background disable failed:', error);
        return false;
    }
}
Example usage:
const handleVBToggle = async () => {
    if (virtualBGEnabled) {
        await planetKitService.disableVirtualBackground('msm');
    } else {
        const success = await planetKitService.enableVirtualBackgroundBlur('msm', canvasRef.current, 15);
        if (!success) {
            console.warn('VB enable failed, proceeding without VB');
        }
    }
};
Media stream management API
To reuse the MediaStreamManager created on the preview page in the group call page, preserve the instance as a singleton. The PlanetKit MediaStreamManager integrates stream creation, device changes and virtual background handling. Passing this instance to Conference lets the SDK reuse the existing stream automatically.
An implementation pattern looks like this.
// Singleton service example (maintain one instance across the app)
class MediaService {
    private mediaStreamManager: MediaStreamManager | null = null;

    async initMediaStreamManager() {
        if (!this.mediaStreamManager) {
            this.mediaStreamManager = new PlanetKit.MediaStreamManager();
        }
        return this.mediaStreamManager;
    }

    getMediaStreamManager() {
        return this.mediaStreamManager;
    }

    releaseMediaStream() {
        if (this.mediaStreamManager) {
            this.mediaStreamManager.releaseMediaStream();
            this.mediaStreamManager = null;
        }
    }
}

const mediaService = new MediaService(); // Singleton
Typical usage flow per page:
// 1. Preview page: Initialize MediaStreamManager and create stream
const msm = await mediaService.initMediaStreamManager();
await msm.createMediaStream({
    audioInputDeviceId: selectedMic,
    videoInputDeviceId: selectedCamera,
    videoElement: videoRef.current
});

// 2. Conference page: Pass the same MediaStreamManager
const msm = mediaService.getMediaStreamManager();
await conference.joinConference({
    // ... Other params
    mediaStreamManager: msm,  // SDK reuses existing stream automatically
    micOn: true,
    cameraOn: true
});

// 3. Clean up when the call ends
mediaService.releaseMediaStream();
Key LIFF integration APIs
Example code to initialize LIFF SDK and obtain LINE login information.
import liff from '@line/liff';

const initializeLiff = async (liffId: string) => {
    // Initialize the LIFF SDK
    await liff.init({ liffId });

    // Check if running inside the LINE client
    const isInClient = liff.isInClient();

    // Detect language automatically
    const userLanguage = liff.getLanguage();

    // Check login status and get profile
    if (liff.isLoggedIn()) {
        const profile = await liff.getProfile();

        // Profile includes:
        // - userId: Unique LINE user id
        // - displayName: User display name
        // - pictureUrl: Profile picture url
        // - statusMessage: Status message

        return profile;
    }

    return null;
};
Troubleshooting
Q. LIFF doesn't work in the local environment.
A. LIFF works only on HTTPS. For local development tunnel your local server with ngrok.
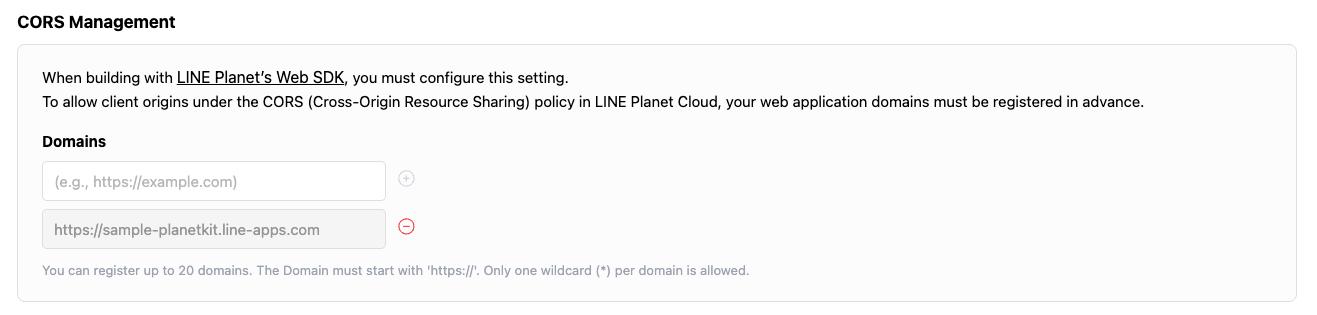
Q. I get a CORS error when connecting to LINE Planet calls.
A. Register the domain in the CORS allow list on LINE Planet Console (Project > Project Settings > Configuration).
Q. I have CORS issues when communicating with the app server locally.
A. Use your build tool's dev server proxy feature (for example Vite's server.proxy or Next.js rewrites) to proxy requests to the app server in development only.
Q. Camera switching fails on some mobile devices.
A. Some devices don't include the keywords "front" or "back" in camera labels and the enumerateDevices() label matching can fail. In that case let resolveFacingModeDeviceId return undefined so the SDK falls back to the default camera, or match the back pattern first so labels like "back user facing" aren't misclassified as front (see step 2 code).
Conclusion
This project was done by a product manager and an Android engineer without a web engineer. Two factors made it possible. First, LIFF and LINE Planet already handle the most difficult parts. Implementing LINE authentication, WebRTC media, and global network infrastructure ourselves would have taken much longer. Second, the component model of TypeScript and React is more similar to Android's View and ViewModel patterns than expected.
I hope this article is a good starting point for teams that want to add real time call features to their services on the LINE ecosystem. For inquiries about adopting LINE Planet, send us an email.