LINE Developers 與 LINE front-end framework (LIFF) 讓你為 LINE App 使用者開啟服務空間。因為它作為 web 服務在 LINE App 的 webview 中執行,LINE Official Account(LINE OA)可以成為直接連結顧客的平台,而不只是一個通知頻道 (參考)。
我們是 LINE Planet 團隊的一位產品經理與一位 Android 工程師,親自驗證了這個可能性。我們在沒有 Web 工程師的情況下,建立了一個在 LINE OA 上運行的群組視訊通話服務。
本文記錄整體架構與實作要點,方便你跟著做。
結合 LINE OA 與 LIFF 可以建置哪些服務?
LINE OA 處理使用者的進入點,LIFF 處理在其中運行的 webview。如果你已經在經營 LINE OA,或在規劃為 LINE 使用者提供新服務,可以在 LINE App 裡啟動像下面這類的服務。
- 專業諮詢:律師、財務規劃師與諮商師可以透過 LINE OA 提供一對一視訊諮詢。使用者可在 LINE App 裡直接加入,不需安裝其他應用程式。
- 遠距教學:家教與學生可以透過 LINE OA 預約課程,並於排定時間加入視訊課程。多位教師使用同一 LINE OA 時,可同時進行各自的通話。加入螢幕共享功能可讓參與者一起檢視文件或解題。
- 互動直播:你可以在 LINE App 內為追蹤 LINE OA 的粉絲舉辦直播。大約從 500 到 10,000 名同時參與者都能加入,從小型粉絲見面會到大型直播活動都適用。像 Clubhouse 一樣,觀眾可以被升為討論者,與主辦方即時對話,形成以社群為中心的互動,而非單向直播。
- 遊戲內語音聊天:隊友在遊戲過程中能即時語音通話。玩家可以在與 LINE 好友一起遊玩時不切換應用程式就進行語音聊天。
使用 LINE OA 與 LIFF 建置群組視訊通話服務的概覽
群組視訊通話服務聽起來很複雜,但實務上你只需建置兩項東西。
- Web 應用:在 LIFF 中運行、並使用 LINE Planet SDK 的群組視訊通話 Web 應用
- App server:用來簽發 LINE Planet 存取權杖的端點
LINE OA、LIFF 與 LINE Planet 各自處理最困難的部分:LINE 認證、WebRTC 媒體處理與全球網路基礎設施。我們要做的就是把它們串起來。如果使用 Firebase cloud functions,App server 可以很快在沒有伺服器基礎建設的情況下完成(詳見 LINE Planet 文件文章 Building an app server with Firebase)。
各個元件的角色如下。
| 元件 | 角色 |
|---|---|
| LINE OA | 處理使用者進入點,從分頁啟動 LIFF 應用程式 |
| LIFF | 處理 LINE App 內的 webview 並傳遞 LINE 登入 token 與使用者資訊 |
| Web 應用 (React 與 Vite) | 處理 UI 與商業邏輯,建立與加入房間,以及媒體控制 |
| App server | 用於簽發 LINE Planet 存取權杖的端點 |
| LINE Planet | 基於 WebRTC 的即時通訊基礎設施 |
使用 LIFF 的理由很明顯。LIFF 讓 LINE App 管理 webview,並自動傳遞 LINE 登入資訊(例如 userId 與 displayName)。你可以在不建立額外認證伺服器的情況下識別 LINE 使用者。把它想像成在 Android 裡用一個 webview 在應用程式內顯示網頁即可。
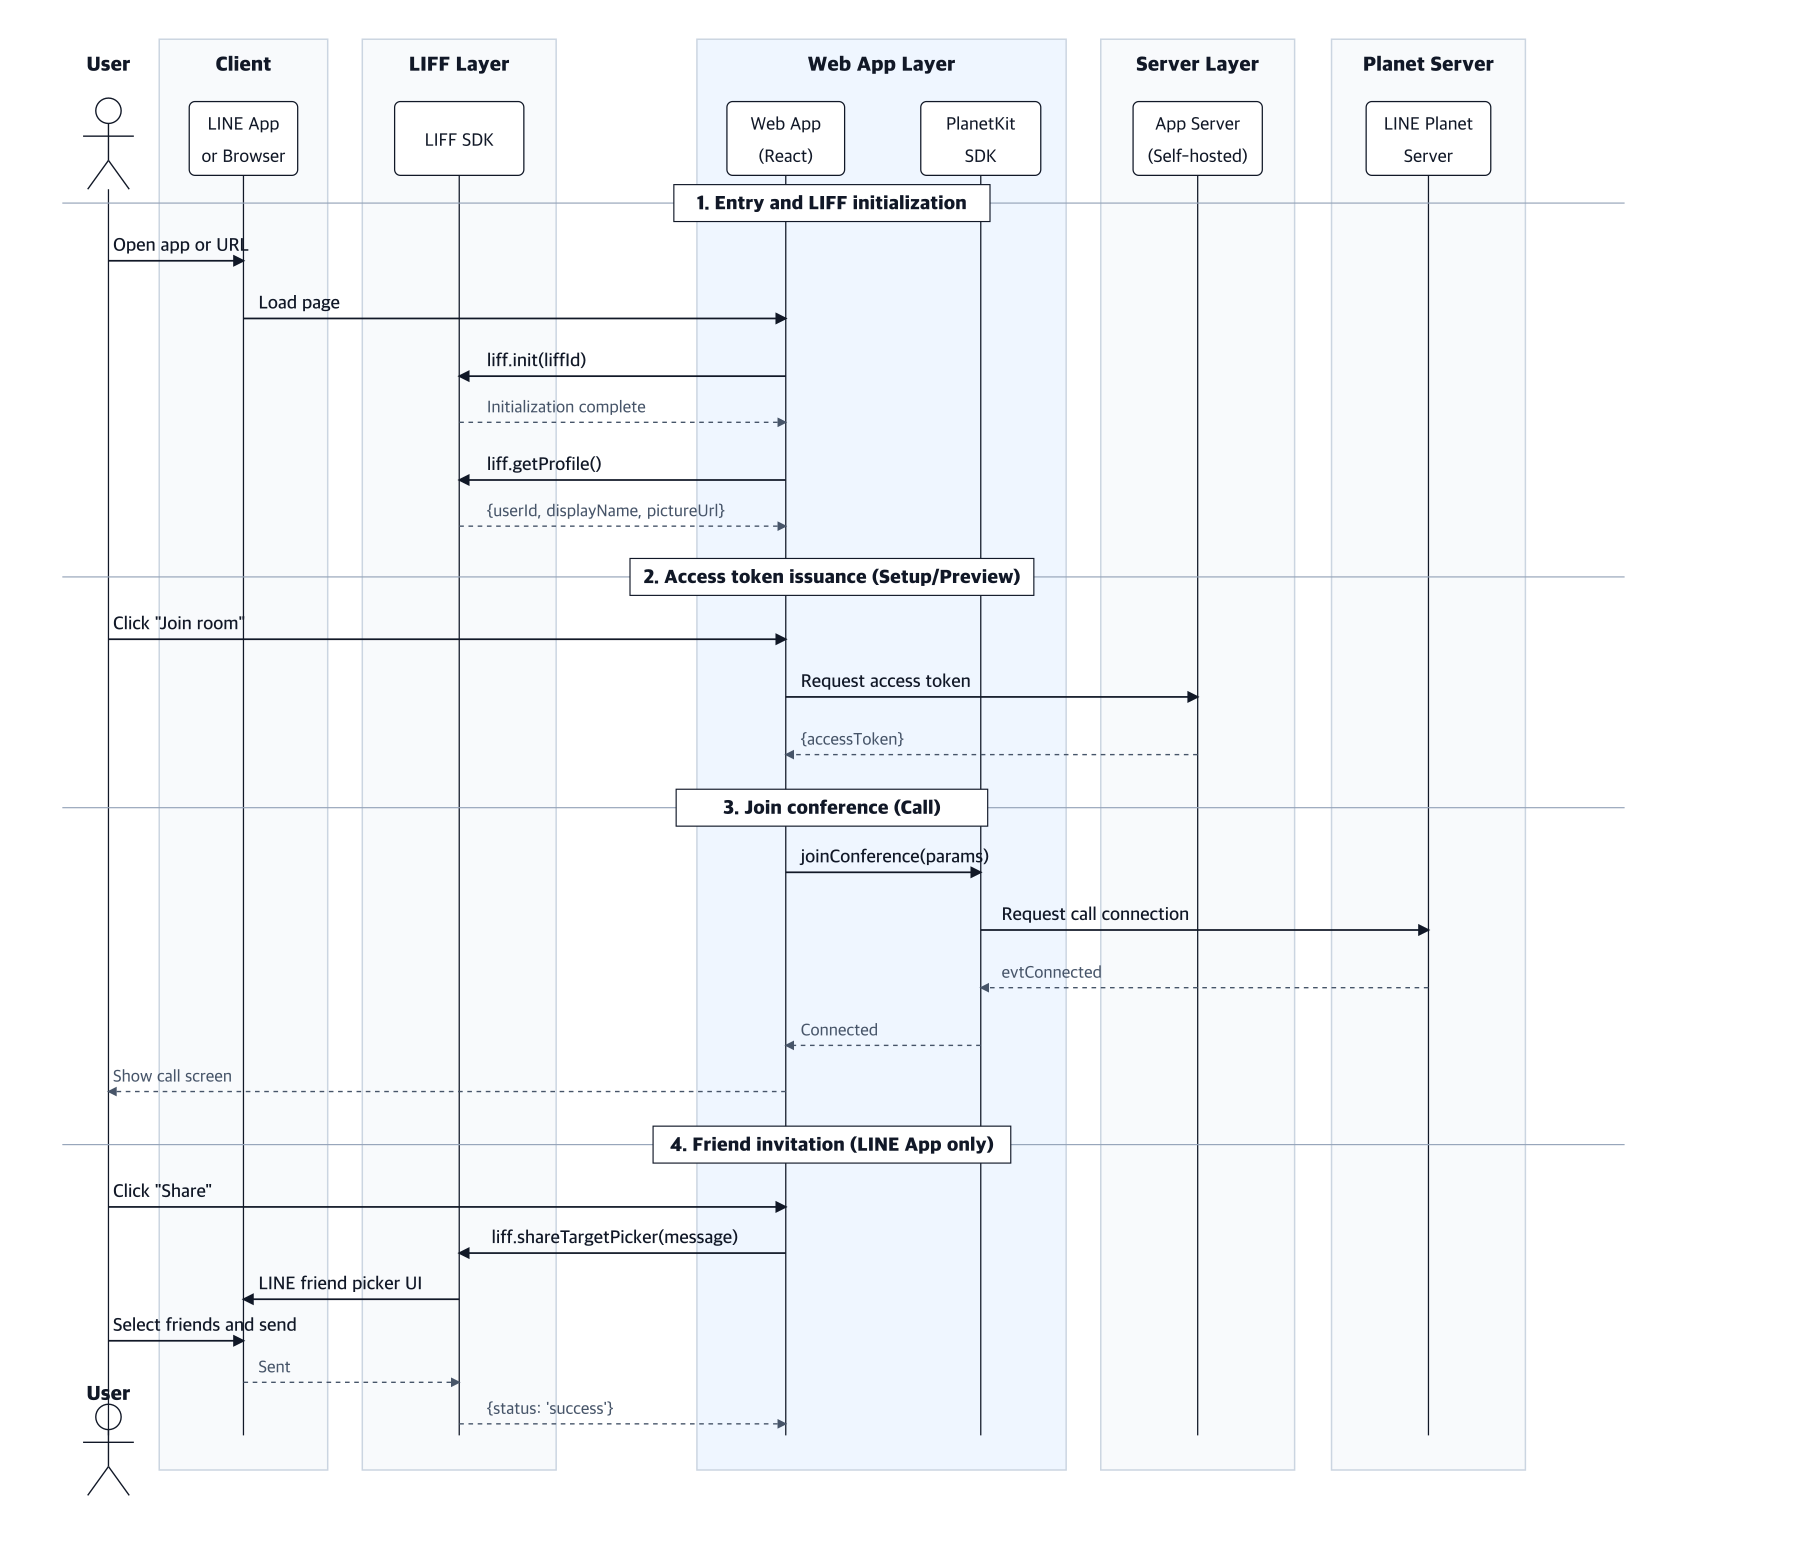
群組視訊通話服務的完整結構如下面所示。在該結構中你需要自行實作 web 應用層與伺服器層的 App server。我們會在後面章節檢視 web 應用層。App server 在本文中會以參考方式提到,但不會詳細說明;之後會再講解。
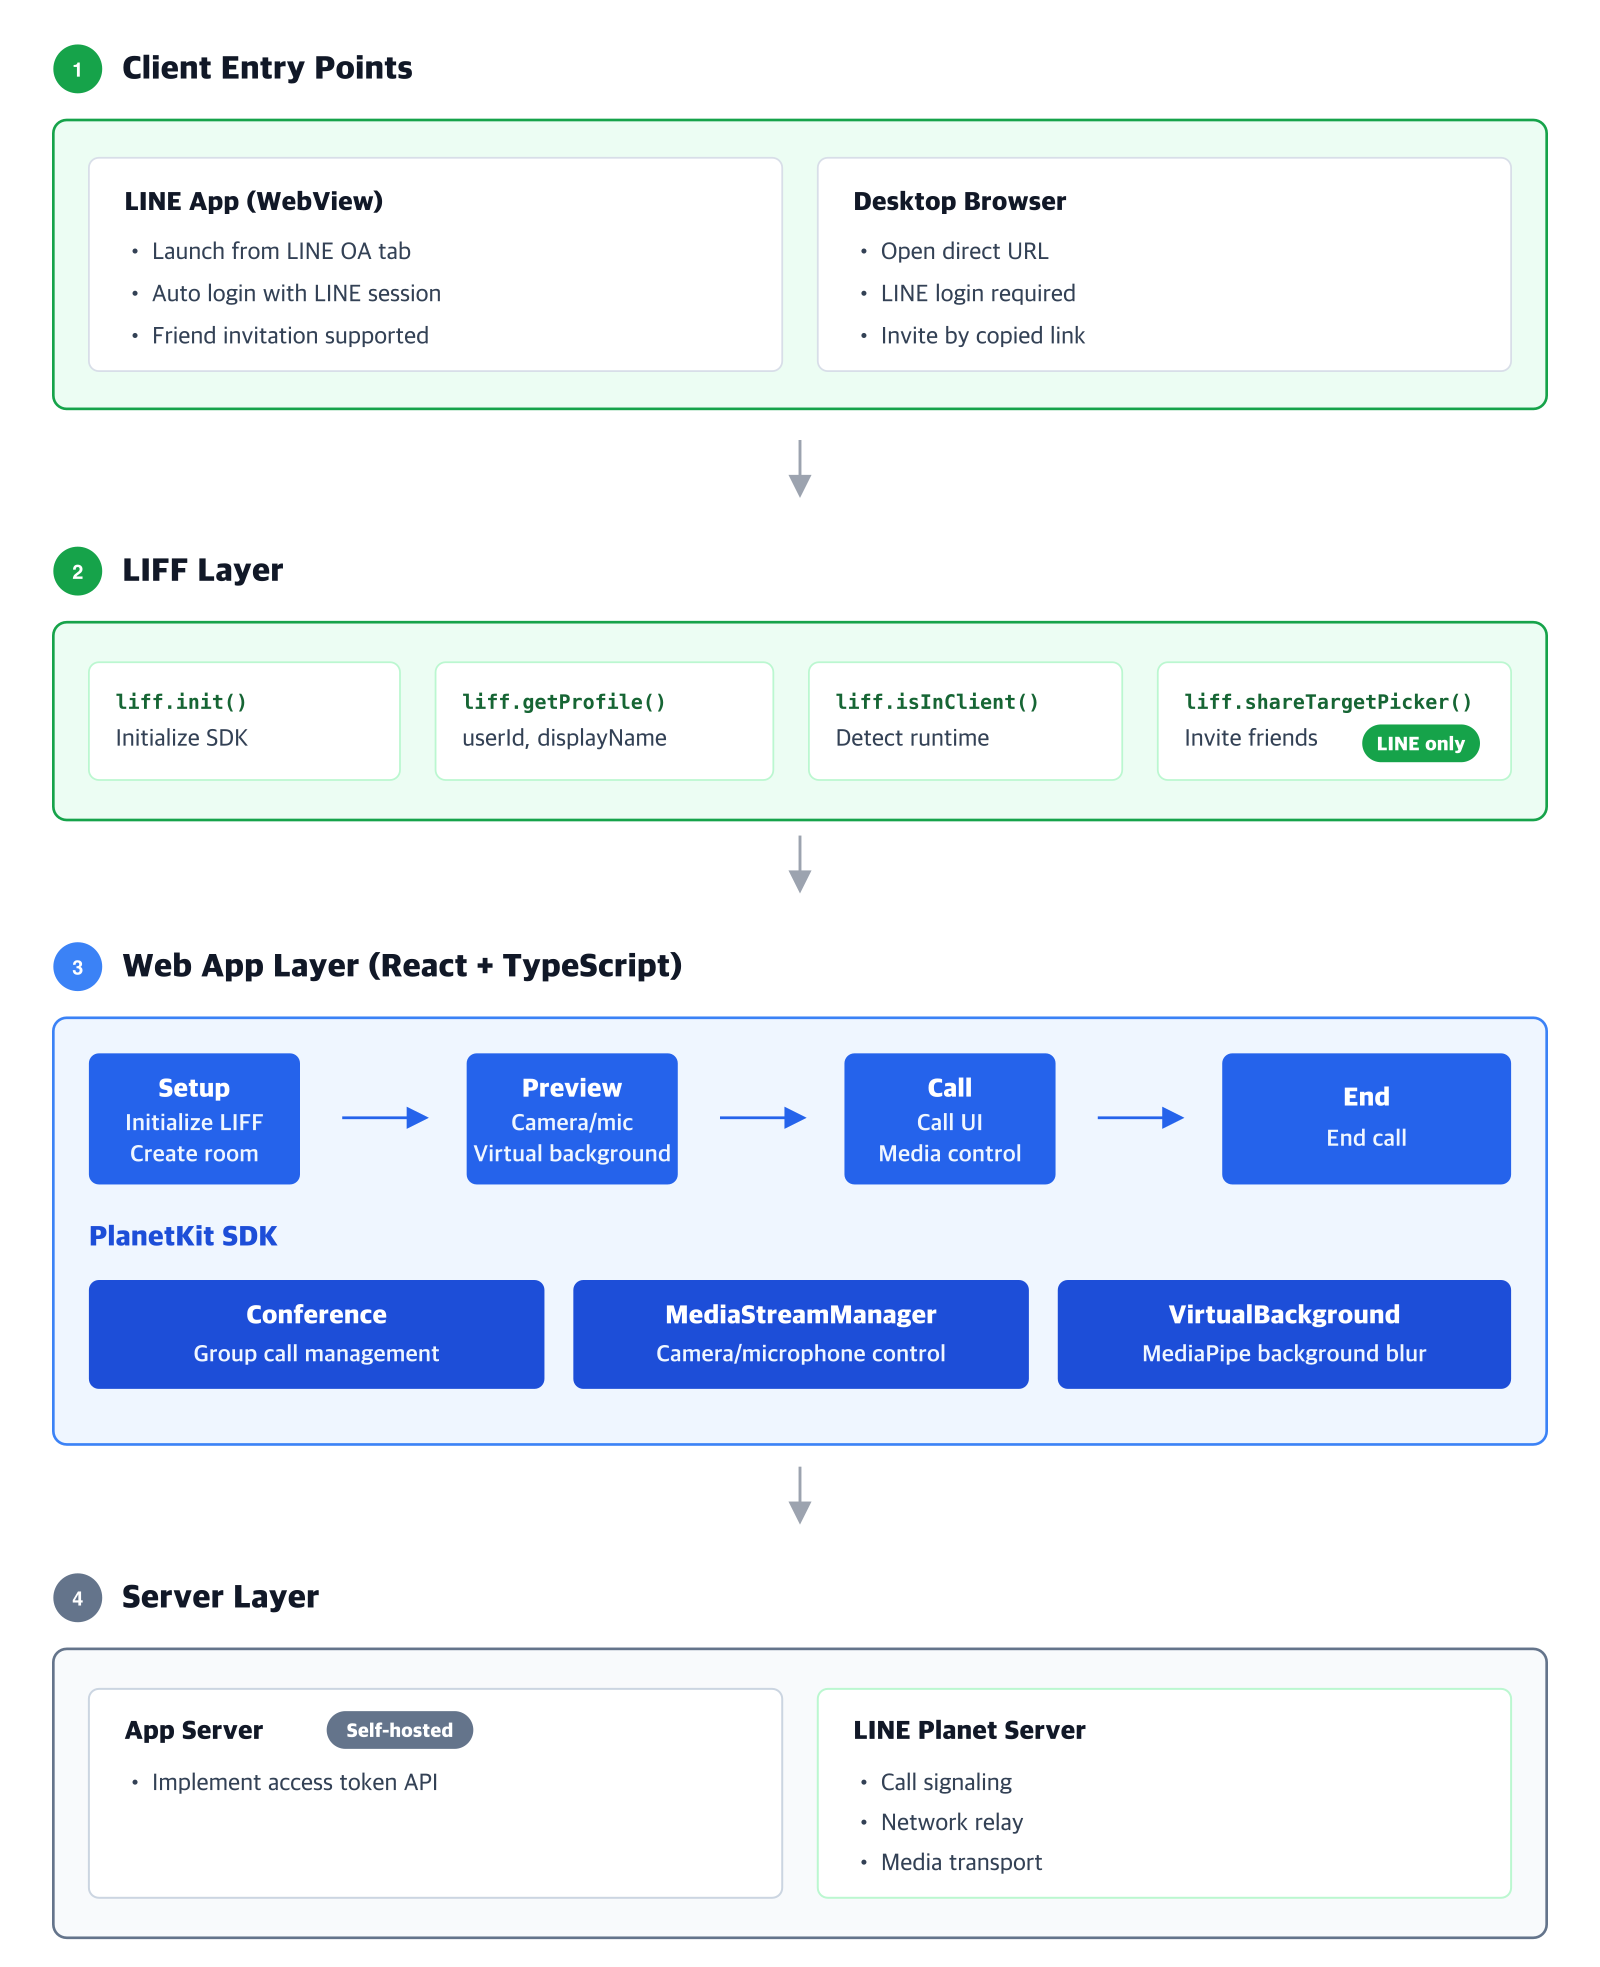
時序圖如下所示。
開發前的準備
開始開發前,有幾件事要準備。
你必須準備的項目
檢查開發環境
本文的範例程式碼假設 Node.js 20 LTS 或更新版本與 npm。LIFF 需要 HTTPS 部署環境,若在本機開發可以用 ngrok 做替代。
在 LINE Developers Console 與 LINE OA 要準備的項目
要同時使用 LINE OA 與 LIFF,需要在 LINE Developers Console 與 LINE OA Manager 準備一些項目(本文僅簡介流程;詳情請參考 LINE Developers 文件)。
首先,準備一個 Business ID 用以登入 LINE Developers Console,註冊開發者帳號,並為此專案建立 provider。
接著在 LINE OA Manager 建立 LINE OA 並啟用 messaging API,選擇你剛建立的 provider。啟用 messaging API 會在該 provider 底下建立一個與 LINE OA 關聯的 messaging API channel。
然後在同一個 provider 下建立一個 LINE Login channel,並在該 channel 的 LIFF 分頁註冊一個應用,其欄位值如下。
| 項目 | 數值 |
|---|---|
| LIFF app name | LIFF Call |
| Size | Full |
| Endpoint URL | https://your-app.example.com(暫時填寫,網頁部署後再更新為實際 URL) |
| Scope | profile, openid |
| Share Target Picker | ON |
以上步驟請注意以下兩點。
- 記下發行的 LIFF ID(例如 1234567890-abcdefgh),因為它會用於所有初始化流程。
- 若要在開發時啟用透過
shareTargetPickerAPI 的 LINE 好友邀請功能,先前建立的 LINE Login channel 必須處於 Published 狀態。
向 LINE Planet 團隊申請的項目
你還需要一個 LINE Planet Console 帳號與一個 service ID,請向 LINE Planet 團隊申請,聯絡信箱為 dl_planet_help@linecorp.com。
開發
完成準備後,就開始開發 web 應用層。本文不會涵蓋全部畫面實作程式碼,而是呈現並說明在使用 LIFF 與 LINE Planet SDK 建置群組視訊通話 Web 應用時,你必須確認的核心流程與注意事項。像是通話建立、預覽與通話畫面 UI 等細節需由你自行實作。
附帶的程式碼以示範為主。若要投入正式環境,還需額外檢視安全性、錯誤處理與效能優化等面向。
步驟 1:設計並產生通話建立所需的 room ID
一般的做法會需要在 App server 註冊使用者 ID 與其他資訊。LIFF 應用可以在 LIFF 中收集通話建立所需的資訊,並從應用程式內向 App server 註冊,簡化預先設定流程。使用者可只輸入 room ID 即可加入通話而無需額外設定。
room ID 的設計可以有很多方式。此示範使用隨機字串(如下面程式碼),但你也可以擴充為基於興趣的固定房間,或根據服務需求自動為使用者群組建立房間等。
    // Example of generating a 16 character alphanumeric room id
    const generateRoomId = (): string =>
        crypto.randomUUID().replace(/-/g, '').slice(0, 16);

    // Restore roomId from query string when coming from an invite link
    const params = new URLSearchParams(window.location.search);
    const roomId = params.get('roomId') ?? generateRoomId();
步驟 2:實作預覽畫面(preview screen)
預覽畫面讓使用者在加入房間前確認相機與麥克風狀態。
預覽頁面的核心實作
一般的網頁媒體會使用 getUserMedia,但本範例使用 PlanetKit SDK 的 MediaStreamManager(MSM)。一個 MSM 實例會從預覽延續至群組通話,因此在切換頁面時不用再次請求相機與麥克風權限。切換麥克風只調整現有音軌的 enabled 標記,以避免在行動 webview 中觸發權限提示(useIsMobileDevice 與 resolveFacingModeDeviceId 工具會在下一節說明)。為了清楚說明,此段程式碼把 MSM 保存在元件本地的 ref;若要在頁面間真正重用同一個實例,請像稍後的「Media stream management API」一節示範那樣把它放在 singleton 中保存。
import { useEffect, useRef, useState } from 'react';
import * as PlanetKit from '@line/planet-kit';
import { useIsMobileDevice } from '../hooks/useIsMobileDevice';
import { resolveFacingModeDeviceId } from '../utils/resolveFacingModeDeviceId';

export default function Preview({ onEnter }: { onEnter: () => void }) {
        const videoRef = useRef<HTMLVideoElement>(null);
        const msmRef = useRef<PlanetKit.MediaStreamManager | null>(null);
        const [isReady, setIsReady] = useState(false);
        const [isVideoOn, setIsVideoOn] = useState(true);
        const [isMicOn, setIsMicOn] = useState(true);
        const [facingMode, setFacingMode] = useState<'front' | 'back'>('front');
        const isMobileDevice = useIsMobileDevice();

        // Create MediaStreamManager once on mount
        useEffect(() => {
            msmRef.current = new PlanetKit.MediaStreamManager();
            setIsReady(true);
        }, []);

        // Update stream through MSM when video is on or camera is switched
        useEffect(() => {
                if (!isReady || !isVideoOn) return;
                const msm = msmRef.current!;

                (async () => {
                        const videoInputDeviceId = isMobileDevice
                                ? await resolveFacingModeDeviceId(facingMode)
                                : undefined;

                        // If a stream exists replace only the video track, otherwise create a new stream
                        const stream = msm.hasVideoStream()
                                ? await msm.changeVideoInputDevice(videoInputDeviceId!)
                                : await msm.createMediaStream({
                                        videoInputDeviceId,
                                        videoElement: videoRef.current ?? undefined,
                                    });

                        if (videoRef.current) videoRef.current.srcObject = stream;
                })();
        }, [isReady, isVideoOn, facingMode, isMobileDevice]);

        // Mic toggle only adjusts track enabled to avoid permission re-request
        useEffect(() => {
                const stream = msmRef.current?.getMediaStream();
                stream?.getAudioTracks().forEach((t) => (t.enabled = isMicOn));
        }, [isMicOn]);

        const flipCamera = () =>
                setFacingMode((f) => (f === 'front' ? 'back' : 'front'));

        return (
                <div className="preview">
                        <video ref={videoRef} autoPlay playsInline muted />

                        <div className="controls">
                                <button onClick={() => setIsVideoOn((v) => !v)}>
                                        {isVideoOn ? "Camera off" : "Camera on"}
                                </button>
                                <button onClick={() => setIsMicOn((m) => !m)}>
                                        {isMicOn ? "Microphone off" : "Microphone on"}
                                </button>

                                {/* show front/back switch button only on mobile devices */}
                                {isMobileDevice && (
                                        <button onClick={flipCamera} disabled={!isVideoOn}>
                                                switch front and back
                                        </button>
                                )}
                                <button onClick={onEnter}>enter</button>
                        </div>
                </div>
        );
}
僅在行動裝置顯示前後鏡頭切換按鈕
在行動裝置上我們會提供前/後鏡頭切換按鈕。如果用 viewport 大小判斷是否為行動裝置,可能在窄的桌面視窗中誤顯示按鈕。建議用 user agent(UA)來偵測是否為行動裝置。
import { useState, useEffect } from 'react';

export function useIsMobileDevice() {
        const [isMobileDevice, setIsMobileDevice] = useState(false);

        useEffect(() => {
                const ua = navigator.userAgent;
                setIsMobileDevice(/Android|iPhone|iPad|iPod/i.test(ua));
        }, []);

        return isMobileDevice;
}
取得前/後鏡頭對應的 deviceId
PlanetKit 的 MediaStreamManager 只接受 videoInputDeviceId,不接受 facingMode 約束,因此我們透過比對 enumerateDevices() 的 label 反推 deviceId。注意 labels 只有在取得相機權限後才會填入,所以第一次呼叫時應回傳 undefined,讓 SDK 使用預設相機(通常為前鏡頭)。
export async function resolveFacingModeDeviceId(
        facingMode: 'front' | 'back'
    ): Promise<string | undefined> {
        const devices = await navigator.mediaDevices.enumerateDevices();
        const videoInputs = devices.filter((d) => d.kind === 'videoinput');

        const backPattern = /back|rear|environment/i;
        const frontPattern = /front|user|facetime/i;

        // Match back first to avoid misclassifying labels like "back user facing" as front
        const matched =
            facingMode === 'back'
                ? videoInputs.find((d) => backPattern.test(d.label))
                : videoInputs.find(
                        (d) => !backPattern.test(d.label) && frontPattern.test(d.label)
                    );

        return matched?.deviceId;
}
步驟 3:整合 LINE Planet SDK
這是核心。LINE Planet SDK 抽象化了 WebRTC,開發者不需要自己實作媒體處理或 NAT traversal。
本步驟分成三個子步驟。
- 從 LIFF 取得使用者資訊
- 從 App server 簽發 access token
- 使用 LINE Planet SDK 加入群組通話
從 LIFF 取得使用者資訊
初始化 LIFF SDK 時可以取得 LINE 使用者識別資訊 userId 與顯示名稱 displayName。把這些值作為 PlanetKit 通話參與時的 myId 與 displayName 使用。
    import liff from '@line/liff';

    interface LiffUser {
        userId: string;
        displayName: string;
    }

    export async function initializeAndLogin(liffId: string): Promise<LiffUser | null> {
        await liff.init({ liffId });

        // If not running inside the LINE app, redirect to LINE login
        if (!liff.isLoggedIn()) {
            liff.login();
            return null; // Caller should retry after redirect
        }

        const profile = await liff.getProfile();
        return {
            userId: profile.userId,
            displayName: profile.displayName,
        };
    }
從 App server 簽發 access token
加入 LINE Planet 通話需要存取權杖(access token),此 token 由你的 App server 簽發。
你必須自行建置 App server。若要快速在沒有伺服器基礎建設的情況下完成,可使用 Firebase cloud functions。詳情請參考 LINE Planet 文件文章 Building an app server with Firebase 與 Firebase 指南。
客戶端取得 access token 的流程如下。
// Example flow to get an access token from the app server
// Actual implementation depends on your app server setup

const getAccessToken = async (userId: string, serviceId: string) => {
    // Request access token from app server
    const response = await fetch('/api/access_token', {

        method: 'POST',
        headers: { 'Content-Type': 'application/json' },
        body: JSON.stringify({ userId, serviceId })
    });
    const { accessToken } = await response.json();

    return accessToken;
};
使用 LINE Planet SDK 加入群組通話
當使用者資訊與 access token 準備好後,建立一個 Conference 實例並呼叫 joinConference。將在步驟 2 建立的相同 MediaStreamManager 傳入,可讓預覽的相機與麥克風串流在通話中延續,而不會再出現權限提示。
    import * as PlanetKit from '@line/planet-kit';
    interface JoinParams {
        roomId: string;
        serviceId: string;            // Issued in LINE Planet Console
        user: { userId: string; displayName: string };
        accessToken: string;
        mediaStreamManager: PlanetKit.MediaStreamManager;
        myVideoElement: HTMLVideoElement;
        roomAudioElement: HTMLAudioElement;
    }

    export async function joinConference(p: JoinParams) {
        const conference = new PlanetKit.Conference({ logLevel: 'info' });

        await conference.joinConference({
            roomId: p.roomId,
            myId: p.user.userId,
            displayName: p.user.displayName,
            myServiceId: p.serviceId,
            roomServiceId: p.serviceId,
            accessToken: p.accessToken,
            mediaType: 'audiovideo',
            mediaStreamManager: p.mediaStreamManager,
            mediaHtmlElement: {
                myVideo: p.myVideoElement,
                roomAudio: p.roomAudioElement,
            },
            delegate: {
                evtConnected: () => console.log('[Conference] connected'),
                evtDisconnected: (reason) => console.log('[Conference] disconnected', reason),
                evtPeerListUpdated: (peers) => console.log('[Conference] peers updated', peers),
                // Add other event handlers as needed
            },
        });

        return conference;
    }
呼叫流程會變得很簡單,如下所示。
    // 1. Identify user with LIFF
    const user = await initializeAndLogin(LIFF_ID);
    if (!user) return; // Redirecting to login

    // 2. Request token from app server
    const accessToken = await getAccessToken(user.userId, PLANET_SERVICE_ID);

    // 3. Join PlanetKit conference
    const conference = await joinConference({
        roomId,
        serviceId: PLANET_SERVICE_ID,
        user,
        accessToken,
        mediaStreamManager: msm,        // Instance created in step 2
        myVideoElement: myVideoRef.current!,
        roomAudioElement: roomAudioRef.current!,
    });
你可以透過在 delegate 上註冊的 callback 接收通話事件。範例只註冊了 evtConnected(已連線)、evtDisconnected(已斷線)與 evtPeerListUpdated(當其他參與者加入或離開時呼叫)。ConferenceDelegate 定義了許多事件,例如麥克風與相機狀態變更、發言狀態變化等;請根據你的服務註冊所需的事件。特別是 evtPeerListUpdated 將在下一步用來動態構建畫格(grid)。
步驟 4:把通話畫面組成動態的格狀佈局(grid)
在群組通話中,隨著參與者的加入與離開,格子數量會改變。WebPlanetKit 會透過 callback 通知這類改變,所以在每次事件到達時調整版面與影片解析度。你在步驟 3 的 joinConference 中註冊的 evtPeerListUpdated callback 會處理這件事。當參與者清單變更時該 callback 會被呼叫;通常你會根據目前參與者數量重新排列格子,並重新請求每位參與者的影片解析度。
由於行動裝置螢幕較窄,當參與者超過某個數量時,你可能傾向只顯示近期發言者。範例如下可以配置這些版面。
| 參與者數量 | 版面範例 | 影片解析度 |
|---|---|---|
| 1 | 全螢幕 | N/A |
| 2 | 二分割 | vga |
| 3 | 上兩格,下方一格橫跨全寬 | vga |
| 4 | 2 × 2 格子 | vga |
| 5 或以上 | 維持 2 × 2 格子(優先兩位近期發言者、你自己,其他參與者輪播) | vga |
根據格子大小降低解析度可以減少頻寬與解碼負擔。請參考 WebPlanetKit 文件以取得建議解析度與詳細用法:peer video resolution in group call。上表為一般視訊會議的範例;請依你服務的特性設計 UI。
步驟 5:使用 LINE 好友邀請(friend invite)
你可以傳送邀請讓其他人直接加入房間。點選邀請連結會打開 LIFF 應用並使用 room ID 進入房間。shareTargetPicker API 需要你先前建立的 LINE Login channel 處於 Published。
下面程式碼示範邀請 LINE 好友加入為通話建立的房間。
const inviteFriends = async (roomId: string, liffId: string, displayName: string) => {
    // Check if ShareTargetPicker API is available
    if (!liff.isApiAvailable('shareTargetPicker')) {
        alert('Friend invite is not available in this environment.');
        return;
    }

    // Create LIFF URL including roomId
    const shareUrl = `https://liff.line.me/${liffId}?roomId=${encodeURIComponent(roomId)}`;
    const shareMessage = `🎥 ${displayName} invited you to a video call!\n
Room: ${roomId}\n
Tap the link to join:\n${shareUrl}`;

    // Run ShareTargetPicker
    const result = await liff.shareTargetPicker(
        [{ type: 'text', text: shareMessage }],
        { isMultiple: true }  // Allow sending to multiple people at once
    );

    if (result) {
        console.log('invite message sent');
    } else {
        console.log('user cancelled');
    }
};
重要的 PlanetKit API
下面簡要彙整先前使用到的 PlanetKit API 與在擴充通話 UI 時常會用到的 API。更多細節請參考 LINE Planet 文件:LINE Planet Documentation。
媒體控制 API(Media control API)
通話中常見的媒體控制 API 如下。注意範例中的 conference 實例是用 new PlanetKit.Conference() 建立並用 joinConference() 加入。
- 靜音與取消靜音
await conference.muteMyAudio(true);   // Mute
await conference.muteMyAudio(false);  // Unmute
- 暫停與恢復影像
await conference.pauseMyVideo();   // Pause video
await conference.resumeMyVideo();  // Resume video
- 請求對方影片(用於格狀檢視):當參與者增加時,每格的像素會變少,可請求較低解析度以節省頻寬與處理量。
// Example: 1:1 use 'hd', 2 × 2 use 'vga', otherwise 'qvga'
await conference.requestPeerVideo({
    userId: peerId,
    resolution: 'hd',
    videoViewElement: peerVideoElement
});
- 結束通話:
leaveConference是同步方法(回傳 void)。和其他媒體控制 API 不同,不要 await 它。
conference.leaveConference();
虛擬背景 API(Virtual background API)
基於 MediaPipe 的背景模糊在行動 webview 上不支援,因此僅在桌面瀏覽器或桌面版 LINE 環境顯示:MediaPipe。
初始化虛擬背景的範例程式碼:
import type VirtualBackground from '@line/planet-kit-virtual-background';

// Virtual background singleton instance (inside PlanetKitService)
private static virtualBackgroundInstance: VirtualBackground
 | null = null;

// Get singleton instance
public static async getVirtualBackgroundInstance(): Promise<VirtualBackground> {
    if (!this.virtualBackgroundInstance) {
        // Dynamically import the VirtualBackground module
        const VirtualBackgroundModule = await import('@line/planet-kit-virtual-background');
        const VirtualBackground = VirtualBackgroundModule.default;

        // Create singleton instance and specify mediapipe resource path
        this.virtualBackgroundInstance = new VirtualBackground({
            locateFile: '/mediapipe-resource'
        });
    }
    return this.virtualBackgroundInstance;
}

// Initialize virtual background for MediaStreamManager or Conference
// Target: 'msm' (preview) or 'conference' (in call)
public async initializeVirtualBackground(target: 'msm' | 'conference'): Promise<void> {
    const vbInstance = await PlanetKitService.getVirtualBackgroundInstance();

    if (target === 'msm') {
        await this.mediaStreamManager.registerVirtualBackground(vbInstance);
        await this.mediaStreamManager.waitForVirtualBackgroundInitialization();
    } else {
        await this.conference.registerVirtualBackground(vbInstance);
        await this.conference.waitForVirtualBackgroundInitialization();
    }
}
啟用或停用背景模糊的範例程式碼:
// Enable background blur (target: 'msm' or 'conference')
public async enableVirtualBackgroundBlur(
    target: 'msm' | 'conference',
    canvasElement?: HTMLCanvasElement,
    blurRadius: number = 10
): Promise<boolean> {
    try {
        if (target === 'msm') {
            await this.mediaStreamManager.startVirtualBackgroundBlur(canvasElement, blurRadius);
        } else {
            await this.conference.startVirtualBackgroundBlur(canvasElement, blurRadius);
        }
        return true;
    } catch (error) {
        console.warn('virtual background enable failed:', error);
        return false;  // Allow UI to gracefully fall back
    }
}

    // Disable background blur
public async disableVirtualBackground(target: 'msm' | 'conference'): Promise<boolean> {
    try {
        if (target === 'msm') {
            await this.mediaStreamManager.stopVirtualBackground();
        } else {
            await this.conference.stopVirtualBackground();
        }
        return true;
    } catch (error) {
        console.warn('virtual background disable failed:', error);
        return false;
    }
}
範例用法:
const handleVBToggle = async () => {
    if (virtualBGEnabled) {
        await planetKitService.disableVirtualBackground('msm');
    } else {
        const success = await planetKitService.enableVirtualBackgroundBlur('msm', canvasRef.current, 15);
        if (!success) {
            console.warn('VB enable failed, proceeding without VB');
        }
    }
};
媒體串流管理 API(Media stream management API)
若要在預覽頁面建立的 MediaStreamManager 在群組通話頁面重用,請把該實例以 singleton 方式保存。PlanetKit 的 MediaStreamManager 整合了串流建立、裝置切換與虛擬背景處理。把此實例傳入 Conference,SDK 會自動重用既有的串流。
一個實作範式如下:
// Singleton service example (maintain one instance across the app)
class MediaService {
    private mediaStreamManager: MediaStreamManager | null = null;

    async initMediaStreamManager() {
        if (!this.mediaStreamManager) {
            this.mediaStreamManager = new PlanetKit.MediaStreamManager();
        }
        return this.mediaStreamManager;
    }

    getMediaStreamManager() {
        return this.mediaStreamManager;
    }

    releaseMediaStream() {
        if (this.mediaStreamManager) {
            this.mediaStreamManager.releaseMediaStream();
            this.mediaStreamManager = null;
        }
    }
}

const mediaService = new MediaService(); // Singleton
每個頁面的典型使用流程:
// 1. Preview page: Initialize MediaStreamManager and create stream
const msm = await mediaService.initMediaStreamManager();
await msm.createMediaStream({
    audioInputDeviceId: selectedMic,
    videoInputDeviceId: selectedCamera,
    videoElement: videoRef.current
});

// 2. Conference page: Pass the same MediaStreamManager
const msm = mediaService.getMediaStreamManager();
await conference.joinConference({
    // ... Other params
    mediaStreamManager: msm,  // SDK reuses existing stream automatically
    micOn: true,
    cameraOn: true
});

// 3. Clean up when the call ends
mediaService.releaseMediaStream();
重要的 LIFF 整合 API
初始化 LIFF SDK 並取得 LINE 登入資訊的範例程式碼。
import liff from '@line/liff';

const initializeLiff = async (liffId: string) => {
    // Initialize the LIFF SDK
    await liff.init({ liffId });

    // Check if running inside the LINE client
    const isInClient = liff.isInClient();

    // Detect language automatically
    const userLanguage = liff.getLanguage();

    // Check login status and get profile
    if (liff.isLoggedIn()) {
        const profile = await liff.getProfile();

        // Profile includes:
        // - userId: Unique LINE user id
        // - displayName: User display name
        // - pictureUrl: Profile picture url
        // - statusMessage: Status message

        return profile;
    }

    return null;
};
除錯(Troubleshooting)
Q. LIFF 在本機環境無法運作。
A. LIFF 只能在 HTTPS 下運作。開發時請用 ngrok 將本機伺服器做 tunnel。
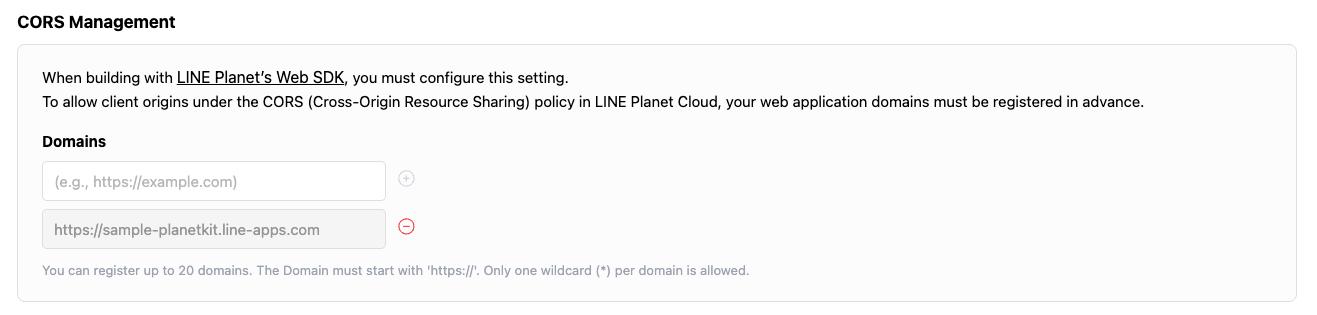
Q. 連線到 LINE Planet 通話時出現 CORS 錯誤。
A. 在 LINE Planet Console(Project > Project Settings > Configuration)將網域登錄到 CORS 允許清單。
Q. 在本機與 App server 通訊時遇到 CORS 問題。
A. 在開發時使用你的打包工具的 dev server proxy 功能(例如 Vite 的 server.proxy 或 Next.js 的 rewrites)把請求 proxy 到 App server,以解決本機開發的 CORS 問題。
Q. 某些行動裝置上相機切換失敗。
A. 有些裝置的相機 label 內沒有包含「front」或「back」等關鍵字,導致 enumerateDevices() 的 label 比對失敗。此情況可讓 resolveFacingModeDeviceId 回傳 undefined,讓 SDK 回退到預設相機,或優先比對後鏡頭的 pattern,以避免像「back user facing」這類標籤被誤判為前鏡頭(見步驟 2 的程式碼)。
結論
這個專案由一位產品經理與一位 Android 工程師在沒有 Web 工程師的情況下完成。能成功的兩個原因:首先,LIFF 與 LINE Planet 已經處理了最困難的部分。如果要自己實作 LINE 認證、WebRTC 媒體與全球網路基礎設施,會花費更多時間。其次,TypeScript 與 React 的元件模型與 Android 的 View / ViewModel 模式其實比預期相似。
希望本文能成為想要在 LINE 生態系中為服務加入即時通話功能的團隊的良好起點。如需採用 LINE Planet 的相關詢問,請寄信至 dl_planet_help@linecorp.com。