Hello, I'm Yuhan Chen, an iOS developer from the Messenger Product App Dev 2 Team.
Introduction
The LINE iOS application uses Core Data for local data persistence. Core Data provides four store types by default: SQLite, Binary, XML, and In-Memory (the XML store is not available on iOS). In 2021, our team began developing a library that introduces a new Core Data store type -- an encrypted SQLite store based on SQLCipher (Please refer to the presentation delivered by my colleagues at LINE Developer Day 2021).
Throughout the development process, we've gained valuable experience about using Core Data correctly and efficiently, especially from the SQLite perspective.
If you're using Core Data and want to learn more about how to maximize the underlying SQLite database, this post is for you.
1. Properly storing BLOB
1.1 SQLite Team's perspective
When I first started learning about relational databases, I wondered whether the BLOB (Binary Large OBject) should be stored in the database, as an external file, or in a hybrid way? This is a common question, and the SQLite documentation provides two insightful discussions on this topic: Internal Versus External BLOBs in SQLite and 35% Faster Than The Filesystem.
What surprised me the most is the following comparison:
SQLite reads and writes small blobs (for example, thumbnail images) 35% faster than the same blobs can be read from or written to individual files on disk using fread() or fwrite(). Furthermore, a single SQLite database holding 10-kilobyte blobs uses about 20% less disk space than storing the blobs in individual files.
Additionally, the SQLite team shared an interesting benchmark result of BLOBs' reading performance with different page sizes (Just for your information: the default page size of SQLite used in Core Data is 4096).
The matrix below shows the time needed to read BLOBs stored in separate files divided by the time needed to read BLOBs stored entirely in the database

In their test environments, storing BLOBs up to 20k always have better reading performance, on the other hand, for the BLOBs over 200k, storing them as external files would be more efficient.
While these benchmark results may not be directly applicable to us, we can still glean some important insights from them:
- As a rule of thumb, it's wise to store small BLOBs in the database and large BLOBs as external files.
- When it's difficult to choose between internal and external storage, conducting a benchmark could be helpful.
1.2 Returning to our Core Data world
Now, let's apply our SQLite knowledge to the world of Core Data!
You may already be familiar with a property called allowsExternalBinaryDataStorage, which can be used to let Core Data decide how to store binary objects. When the BLOBs are stored as external files, they're placed in a hidden subdirectory within the same directory as the database files. In the database fields, only the filenames (UUID) corresponding to the external files are stored.
Database/
├─ {sqlite-file-name}_SUPPORT/
│  ├─ _EXTERNAL_DATA/
│  │  ├─ file1
│  │  ├─ file2
├─ {sqlite-file-name}.sqlite
├─ {sqlite-file-name}.wal
├─ {sqlite-file-name}.shm
Obviously, the Core Data team provides a way for us to avoid making this difficult decision.
I have roughly tested allowsExternalBinaryDataStorage on an iOS 16.4 simulator. Based on my tests, the data size threshold for determining how to store binary objects is between 100k~150k. Changing the number of attributes and rows didn't affect the result. However, please note that this is just a reference. I believe the Core Data team conducted a lot of benchmark tests to define a "large object". In general, considering binary objects smaller than 100k as small seems reasonable.
Now we have three options to manage our binary objects:
- Store them in the database.
- Store them as external files.
- Enable
allowsExternalBinaryDataStorageor implement a custom hybrid approach.
Another thing to consider is that when your tables are small, even if you store very large BLOBs in the database, the performance degradation is subtle and negligible. However, if a table has a large number of attributes and rows, storing small binary objects may significantly worsen the performance. In this case, storing small objects in the database may not be a good idea anymore.
In conclusion, there's no absolute best answer. We should make a decision based on the specific use case and consider the trade-offs between performance, storage, and convenience.
2. Copying the underlying SQLite database
Copying a SQLite database is not as simple as it seems. Especially after Apple changed the default journal mode for Core Data SQLite stores to Write-Ahead Logging (WAL) in iOS 7 and OS X Mavericks 10.9. Compared with the original default journal mode DELETE, two temporary files are added. Simply put, the .wal file can be considered as a transactions container, where all changes are eventually transferred back into the original .sqlite file when a checkpoint operation is triggered. The .shm file is used as part of the mechanism that allows multiple database connections to SQLite databases.
When attempting to copy a SQLite database that uses the default WAL mode, a common mistake is only copying the .sqlite file. As you can guess, the result is that transactions that were previously committed to the database might be lost. Even worse, the database file could become corrupted.
Therefore, using reliable methods to copy SQLite databases is very important. Fortunately, the following solutions should help:
2.1 Using the Backup API provided by Core Data
migratePersistentStore(_:to:options:type:) is a powerful and straightforward API. Remember the allowsExternalBinaryDataStorage we discussed in the previous section? If this value is set to true, BLOBs may be stored as external files on disk. The good news is this method takes the responsibility of copying the external files during the migration as well.
However, as mentioned in this wonderful article, the data copying is actually reading stored data into memory and then storing them to the new database (no changes on latest OSes). So, you have to ensure that your application won't stop working due to memory overload during the data copying.
func migratePersistentStore(
    _ store: NSPersistentStore,
    to storeURL: URL,
    options: [AnyHashable : Any]? = nil,
    type storeType: NSPersistentStore.StoreType
) throws -> NSPersistentStore
Another point that makes me think this API can be further improved is that, as far as I know, there's no built-in mechanism to track the progress of data copying. This can be troublesome, especially when dealing with large databases or time-consuming operations.
Although the API has room for improvement, I believe it should still be your first choice in most cases.
2.2 Using SQLite approaches to backup
If you want more control over the copying process, using SQLite's methods to copy files is also an option. There are mainly two ways to achieve your goal, but keep in mind that you will need to handle other parts besides SQLite files yourself, such as external files created by Core Data.
2.2.1 SQLite Online Backup API
As mentioned in the SQLite documentation, the Online Backup API was created to address the concerns that arise from copying SQLite files with external tools like the file system. Since SQLite3 can be imported on iOS by default, we can easily perform the copy operation like the following:
/// Copies the content of one database into another.
///
/// - Parameters:
///   - pageCount: The page count to copy in each step. If the count is negative, all remaining source pages are copied.
///   - progress: A closure can be used to track the progress of the copy.
func backup(pageCount: Int32 = -1,progress: ((Int, Int) -> Void)? = nil) {
    var statusCode = // ...

    // Initialize backup
    guard let backup = sqlite3_backup_init(sourceDatabase, "main", destinationDatabase, "main") else {
        // Handle the error
    }

    repeat {
        // Transfer the data between two databases
        statusCode = sqlite3_backup_step(backup, pageCount)
        progress?(sqlite3_backup_remaining(backup), sqlite3_backup_pagecount(backup))
        if statusCode == SQLITE_BUSY || statusCode == SQLITE_LOCKED {
            sqlite3_sleep(250)
        }
    } while statusCode == SQLITE_OK || statusCode == SQLITE_BUSY || statusCode == SQLITE_LOCKED

    // Release all resources
    statusCode = sqlite3_backup_finish(backup)
}
2.2.2 The VACUUM INTO command
In SQLite, you use the VACUUM command to optimize and reduce the size of the database file.
Starting with SQLite version 3.27.0 (released on 2019-02-07), the INTO clause was introduced. With INTO, the original database file remains unchanged, and a new database is created in a file named by the argument to the INTO clause. When comparing this to the backup API, SQLite explains:
The advantage of using
VACUUM INTOis that the resulting backup database is minimal in size and hence the amount of filesystem I/O may be reduced. Also, all deleted content is purged from the backup, leaving behind no forensic traces. On the other hand, the backup API uses fewer CPU cycles and can be executed incrementally.
var statusCode = // ...
// Execute the VACUUM INTO command to create a new compacted database
statusCode = sqlite3_exec(database, "VACUUM INTO \(destinationURL)", nil, nil, nil)
2.3 Did I forget anything?
Finally, let's talk about why it's best to avoid copying files with File System APIs as much as possible, unless you're sure about what you're doing and are confident in your decision.
Consider this scenario: you start copying files while a transaction is in progress. What could go wrong? There's a real risk of creating data inconsistency, which could corrupt the new database.
Although we could prevent this problem by making sure no other connections are modifying the original database, this method is still risky. Furthermore, copying only files with certain extensions could weaken your code. We can't predict if a new journal mode will be introduced in the future, possibly bringing new files with different extensions.
To lessen these risks, I suggest using suitable database-specific APIs to manage the complexities of copying databases.
3. Designing indexes
In our everyday development work, we frequently use indexes to speed up searches in Core Data. It's true that indexes can sometimes greatly enhance search and sort performance.
However, there's one thing you shouldn't ignore: adding indexes incurs a cost. First, because indexes are stored in a separate table, the size of the database file increases. Second, operations like inserting, updating, and deleting become more costly. This is due to the fact that not only does the data in the original table need to be updated, but the data in the index table also needs to be modified. If you don't use indexes correctly, it could lead to poorer performance, despite having more indexes.
Therefore, it's vital to understand how indexes function. This knowledge will help you make informed decisions about when and where to use indexes.
3.1 How can an index improve search performance?
Before we start, I must admit that the SQLite document was a great help in understanding the mechanism of indexing. The following content in this section is all based on this document.
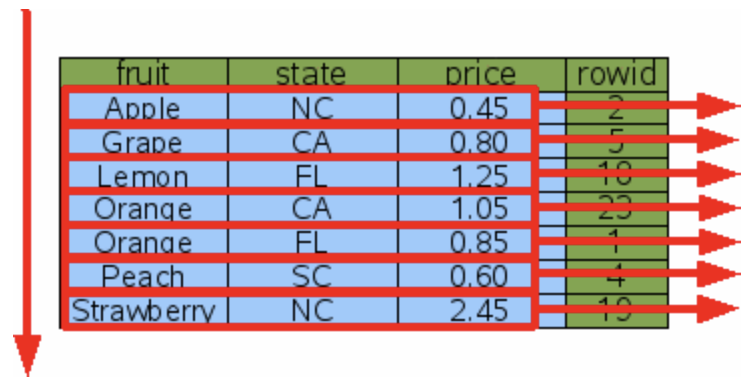
Let's say we have an entity called FruitForSale. There are three attributes defined on FruitForSale: fruit, state, and price.
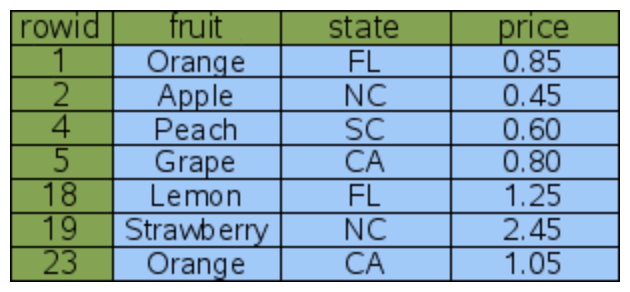
3.1.1 Table without an index
When you run the following fetch request without an index, a full table scan will take place. The database will scan the rows one by one until it finds the desired item, in this case, the "Peach". The performance of a full table scan heavily depends on the amount of data. As the data volume increases, the search can become significantly slower.
let fetchRequest = FruitForSale.fetchRequest()
fetchRequest.predicate = NSPredicate(format: "fruit == %@", "Peach")
3.1.2 Adding a single-column index
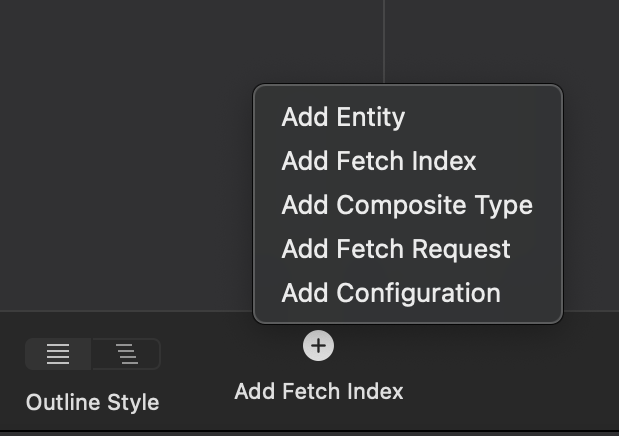
In the latest Xcode version (15.0 Beta), we can easily add indexes using the Model Editor, as shown below:
After adding an index on the fruit attribute, a corresponding index table is created behind the scenes. This index table contains a fruit column with the same contents as the original table, but sorted in a specific order, followed by an id column.

Under the hood, SQLite uses B-trees to store indexes, which allows for efficient searches using binary search. This is a significant improvement over linear search, which has a time complexity of O(N). Binary search, on the other hand, offers significantly better performance with a time complexity of O(log N). As the amount of data increases, this performance difference becomes more noticeable.
There's another performance improvement to note. For instance, when searching for "Orange" in SQLite, instead of performing two separate binary searches, SQLite optimizes the process by advancing to the next row of the index after the first binary search is completed, to repeat the search for the next fruit = "Orange". This operation is much less costly than performing a binary search each time.
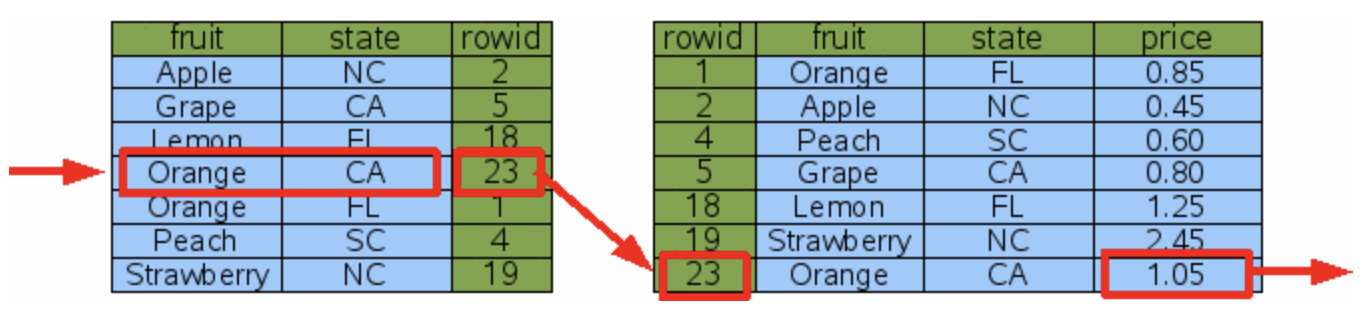
3.1.3 Adding multi-column indexes
Let's consider another scenario. Say we modify our fetch request to find all oranges grown in California:
let fetchRequest = FruitForSale.fetchRequest()
fetchRequest.predicate = NSPredicate(format: "fruit == %@ AND state == %@", "Orange", "CA")
In this situation, we have two potential solutions. I'll illustrate the differences using code that programmatically creates the indexes. This approach might be easier to understand than using the Model Editor:
// Solution 1: Mutiple Single-Column Indexes
indexes = [
    .init(name: "byFruitIndex", elements: [.init(property: fruit, collationType: .binary)])
    .init(name: "byStateIndex", elements: [.init(property: state, collationType: .binary)])
]

// Solution 2: Multi-Column Index
indexes = [
    .init(
        name: "byFruitAndStateIndex",
        elements: [
            .init(property: fruit, collationType: .binary),
            .init(property: state, collationType: .binary)
        ]
    )
]- In the first solution, two index tables will be created: one for the
fruitcolumn and another for thestatecolumn. Since only one index can be used in a single lookup, SQLite will internally decide which index to use (there are some rules governing this, but I won't delve into them here). In this case, regardless of which index is used, the time required is the same. Both indexes will perform a binary search three times: once in the index table and twice in the data table.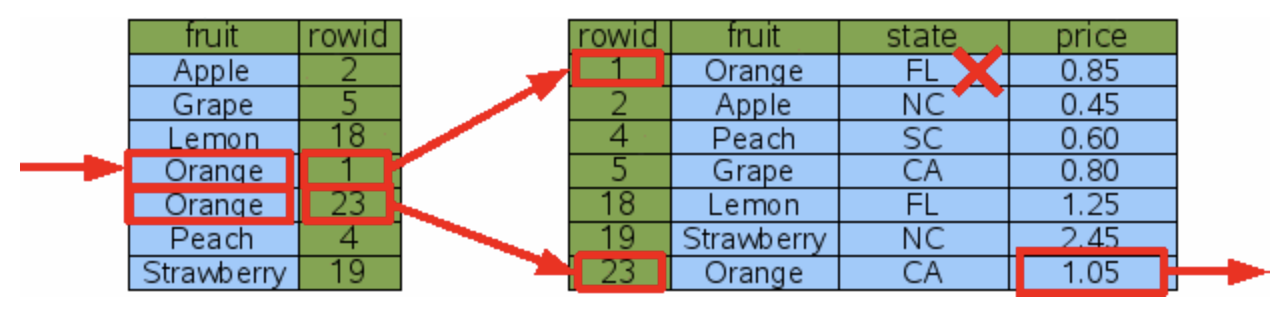
- In the second solution, only one index table is created. Clearly, in this scenario, it will have better search performance than the first solution. Here, only two binary searches are needed: once in the index table and once in the data table.
In conclusion, both solutions can enhance lookup performance. However, note that applying both solutions simultaneously will only result in wasted space without providing any additional performance benefits.
3.2 Sorting
Having understood searching, you'll find that sorting isn't much different. Consider a fetch request that retrieves all items sorted by the fruit attribute:
let fetchRequest = FruitForSale.fetchRequest()
fetchRequest.sortDescriptors = [NSSortDescriptor(key: "fruit", ascending: true)]
3.2.1 Adding a single-column index
In this scenario, even if the fruit column is sorted, SQLite would need to perform multiple binary searches to fetch the data for the state and price columns. This results in a time complexity of O (Nlog N).
The performance isn't bad, but it's quite similar to some sorting algorithms, right? Let's consider a situation where there is no index. In this case, SQLite uses a sorting algorithm called "internal merge sort", which also has a time complexity of around O (Nlog N).
Therefore, in my opinion, if this index is created solely for sorting purposes, it might not be the best idea. However, if you're already using the index for searching, it could provide some benefits, as mentioned in the SQLite documentation:
Generally speaking, the indexed sort would probably be chosen, if for no other reason, because it does not need to accumulate the entire result set in temporary storage before sorting and thus uses much less temporary storage.

3.2.2. Adding a covering index
In some cases, if a covering index can be used for sorting, it can help avoid multiple binary searches and significantly improve performance. A covering index is an index that includes all the columns needed for a specific query or operation.
However, it's important to weigh whether the performance improvement is worth the trade-off of doubling the size of the database.
3.3 Experience and tips
Based on the discussion above, I strongly suggest keeping the following tips in mind when working with indexes:
- Consider the size of your data: If you're dealing with a small amount of data, an index might not be very helpful.
- Find the balance: If your application primarily focuses on insertions, updates, and deletion operations rather than searching, adding indexes might not be the best approach.
- Avoid misuse of indexes: For example, the same attributes shouldn't be used as primary keys in multiple index tables.
- Benchmark and analyze: It's highly recommended to perform benchmarking and analysis before and after optimizing your database, especially if you're unsure about the potential benefits (related content will be covered in the "Debugging SQLite in Core Data" section).
4. Using predicates wisely
Using NSPredicate with Core Data allows us to perform efficient queries on SQLite stores, making it easier to fetch objects that meet specific criteria. However, this also results in some details being hidden beneath the surface implementation when using predicates.
In this section, we won't be able to cover everything related to predicates, but I hope to share some ways to understand how SQLite works behind the scenes with predicates by exploring a few questions.
4.1 Using BEGINSWITH instead of CONTAINS when possible
Let's consider the following example: if there are some titles stored in the database, and we want to fetch all strings that begin with "_", what kind of predicate are you going to use?
// Data
let titles = ["_a", "_b", "c", "_d", "e"]

// BEGINSWITH
NSPredicate(format: "title BEGINSWITH %@", "_")

// CONTAINS
NSPredicate(format: "title CONTAINS %@", "_")
In this case, both BEGINSWITH and CONTAINS can help you achieve your goal. However, when the dataset is large and the title column has a valid index, BEGINSWITH performs much better than CONTAINS. The reason for this is that even if an index exists on the title column, SQLite still needs to scan the whole table to check all of the data to find records containing _. But with BEGINSWITH, all titles that begin with _ are in consecutive rows, which obviously results in better performance.
Not only CONTAINS, but also ENDSWITH, LIKE, and some other operators can't benefit from the index for the same reason.
4.2 BEGINSWITH[cd] may not perform as well as we expect
When using the BEGINSWITH[cd] operator, which is case (c) and diacritic (d) insensitive, the performance may not be as good as we might expect. Let's assume we have the following data stored in the database:
let titles = ["abc", "ABC", "Abc", "ábć", "Ábc"]If we want to fetch all titles that begin with "ab", ignoring case and diacritics, we can use the BEGINSWITH[cd] operator in our predicate:
NSPredicate(format: "title BEGINSWITH[cd] %@", "ab")Earlier, I mentioned that BEGINSWITH performs relatively well. You might be wondering why BEGINSWITH[cd] performs so differently?
SQLite compares string data byte-by-byte with memcmp(), which means it's case and diacritic sensitive by default. As SQLite doesn't even support diacritic insensitive lookup, the functionality to perform case and diacritic insensitive searches is provided by Core Data. Therefore, data needs to be fetched into memory for comparison, which could impact performance.
While it's true that not knowing the underlying implementation can sometimes lead to misuse and overuse, these features provided by Core Data are still incredibly valuable and helpful.
My take on this is that we should enjoy the power that Core Data provides. If it does have a serious impact on performance, we could find some solution to mitigate the problem, such as storing normalized strings in a new column for quicker searches.
4.3 Aggregate operations
There are several available aggregate operations that can be used in Core Data: @avg, @count, @sum, @max, and @min. They can be very useful.
Let's consider a case with two entities: Department and Employee. The Department entity has a one-to-many relationship called employees to represent all the employees in that department. Now, suppose we want to calculate the average salary of employees in a specific department.
Using the @avg operator, we can write the predicate as follows:
let departmentName = "Development"
let predicate = NSPredicate(format: "name == %@.@avg.employees.salary", departmentName)
In the above case, the @avg operator is very useful, but it's not a low-cost operation, and Core Data doesn't cache the results of calculations. So, when we're working with a large dataset and the need for searching is much greater than updating, it's worth considering calculating the average salary and storing it in the database.
4.4 Compound predicate
If you're familiar with basic predicates, using compound predicates will be a breeze. The most important points you need to remember are:
- Try to narrow the search results dataset as much as possible.
- Perform the efficient predicate first.
Suppose we have a very large book information table where most books cost less than 5,000 yen, and company Z is the largest publisher, holding over 80% of the market.
| Title | Price | Publisher |
|---|---|---|
| abc | 8800 | Z |
| ABC | 2200 | X |
| ábć | 3000 | Y |
| def | 3500 | Z |
When we want to find all books that cost more than 5,000 yen and are published by company Z, the following predicate is relatively the most efficient. This is because the most expensive condition (BEGINSWITH[cd]) is placed last, and price > 5000 narrows down the search scope more than publisher == "Z".
let predicate = NSPredicate(format: "price > %@ AND publisher == %@ AND title BEGINSWITH[cd] %@", 5000, "Z", "ab")Optimizing a single predicate may only have a negligible impact, however, it's definitely worth trying to use more predicates wisely.
5. Subentities may not always be the ideal choice
5.1 Pros and cons of subentities
Core Data uses a strategy called "single table inheritance" (STI) to store subentities. This means all of the subentities and their superentity are stored in a single table. For example:
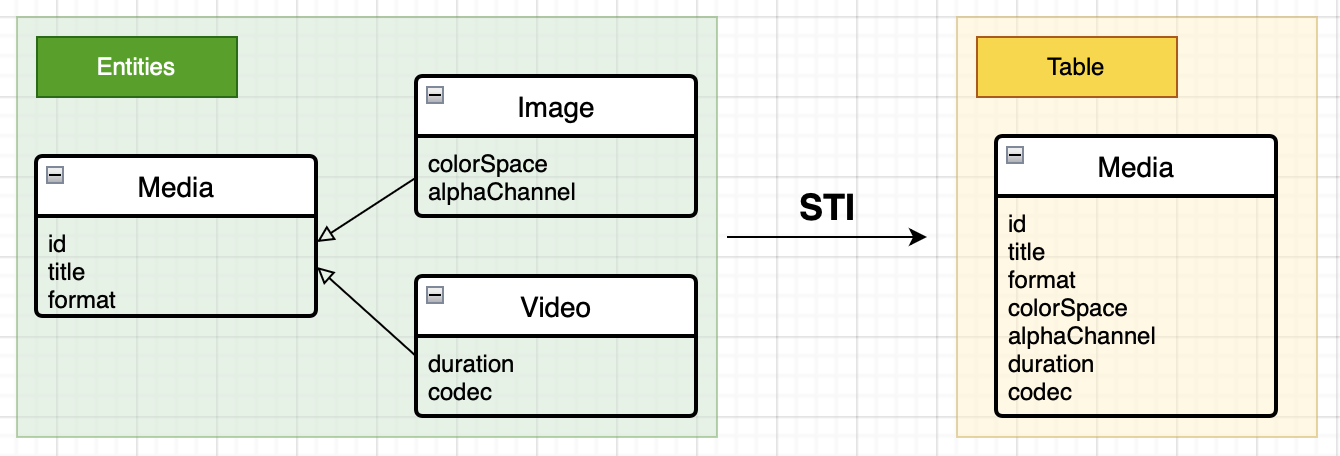
As shown in the diagram above, in the end, only one table is created, and all attributes of Image and Video are stored in the Media table. The pros and cons of using STI in Core Data are very clear:
Pros:
- Good fetch performance: It's possible to fetch all subentities with a single fetch request:
let fetchRequest = Entity.fetchRequest() fetchRequestA.includesSubentities = true // Default is true - Simplicity: When subentities have very few different attributes, STI is straightforward enough.
Cons:
- Limited scalability: As the number of entities or attributes grows, performance can be heavily impacted due to the increased size and complexity of the table.
- Space waste: When subentities have a large number of different attributes, there will be a lot of
nullfields in the database, which can be considered as a waste of storage space.
After understanding the pros and cons, we can choose to use subentities or not depending on the specific scenario.
5.2 Alternative approach
If your actual use case doesn't fit the use of subentities, but you still want to create a parent-child relationship between entities, a good solution would be to keep the entities defined in the data model separate and use inheritance on NSManagedObject classes instead.
// Generated by Xcode
@objc(Media)
public class Media: NSManagedObject {}

extension Media {
    @nonobjc public class func fetchRequest() -> NSFetchRequest<Media> {
        return NSFetchRequest<Media>(entityName: "Media")
    }
    @NSManaged public var title: String?
}

// Make Image inherit from Media manually
@objc(Image)
public class Image: Media {}

extension Image {
    @nonobjc public class func fetchRequest() -> NSFetchRequest<Image> {
        return NSFetchRequest<Image>(entityName: "Image")
    }
    @NSManaged public var alphaChannel: Bool
}
6. Debugging SQLite in Core Data
If you ask me which part of this post is the most useful, I'd probably say this section! This is because understanding how to analyze the use of SQLite in Core Data can bring numerous benefits, such as:
- Gaining a deeper understanding of how data is stored and retrieved
- Determining whether performance needs to be optimized based on the data
- Gaining useful information when investigating complex Core Data-related issues
There are a lot of useful tools provided by Core Data itself and Instruments.
6.1 Using launch arguments
For most Core Data users, the launch argument SQLDebug may already be a familiar tool, but today I want to dig a little deeper into its usage.
-com.apple.CoreData.SQLDebug <log-level> // supported values: 1/2/3/4SQLiteDebug offers four log levels. The higher the log level, the more detailed the logs you'll receive. Once you've enabled SQLiteDebug, logs similar to the ones below will be printed based on the log level:
- For log level 1 and above, you'll see:
- SQL statements executed by SQLite
- Fetch time (Note: Core Data doesn't display save time.)
- For log level 2 and above, you'll see:
- Parameter values set using the
sqlite3_bind_*()method - Entity name
- Parameter values set using the
- For log level 3 and above, you'll see:
- Returned values
- For log level 4 and above, you'll see:
- The result of the
EXPLAIN QUERY PLANcommand
- The result of the
In most situations, setting the log level to 3 is sufficient. It lets you review SQL statements, parameters, and returned values. We'll discuss the query plan in greater detail in the next section.
6.2 Understanding how to read a query plan
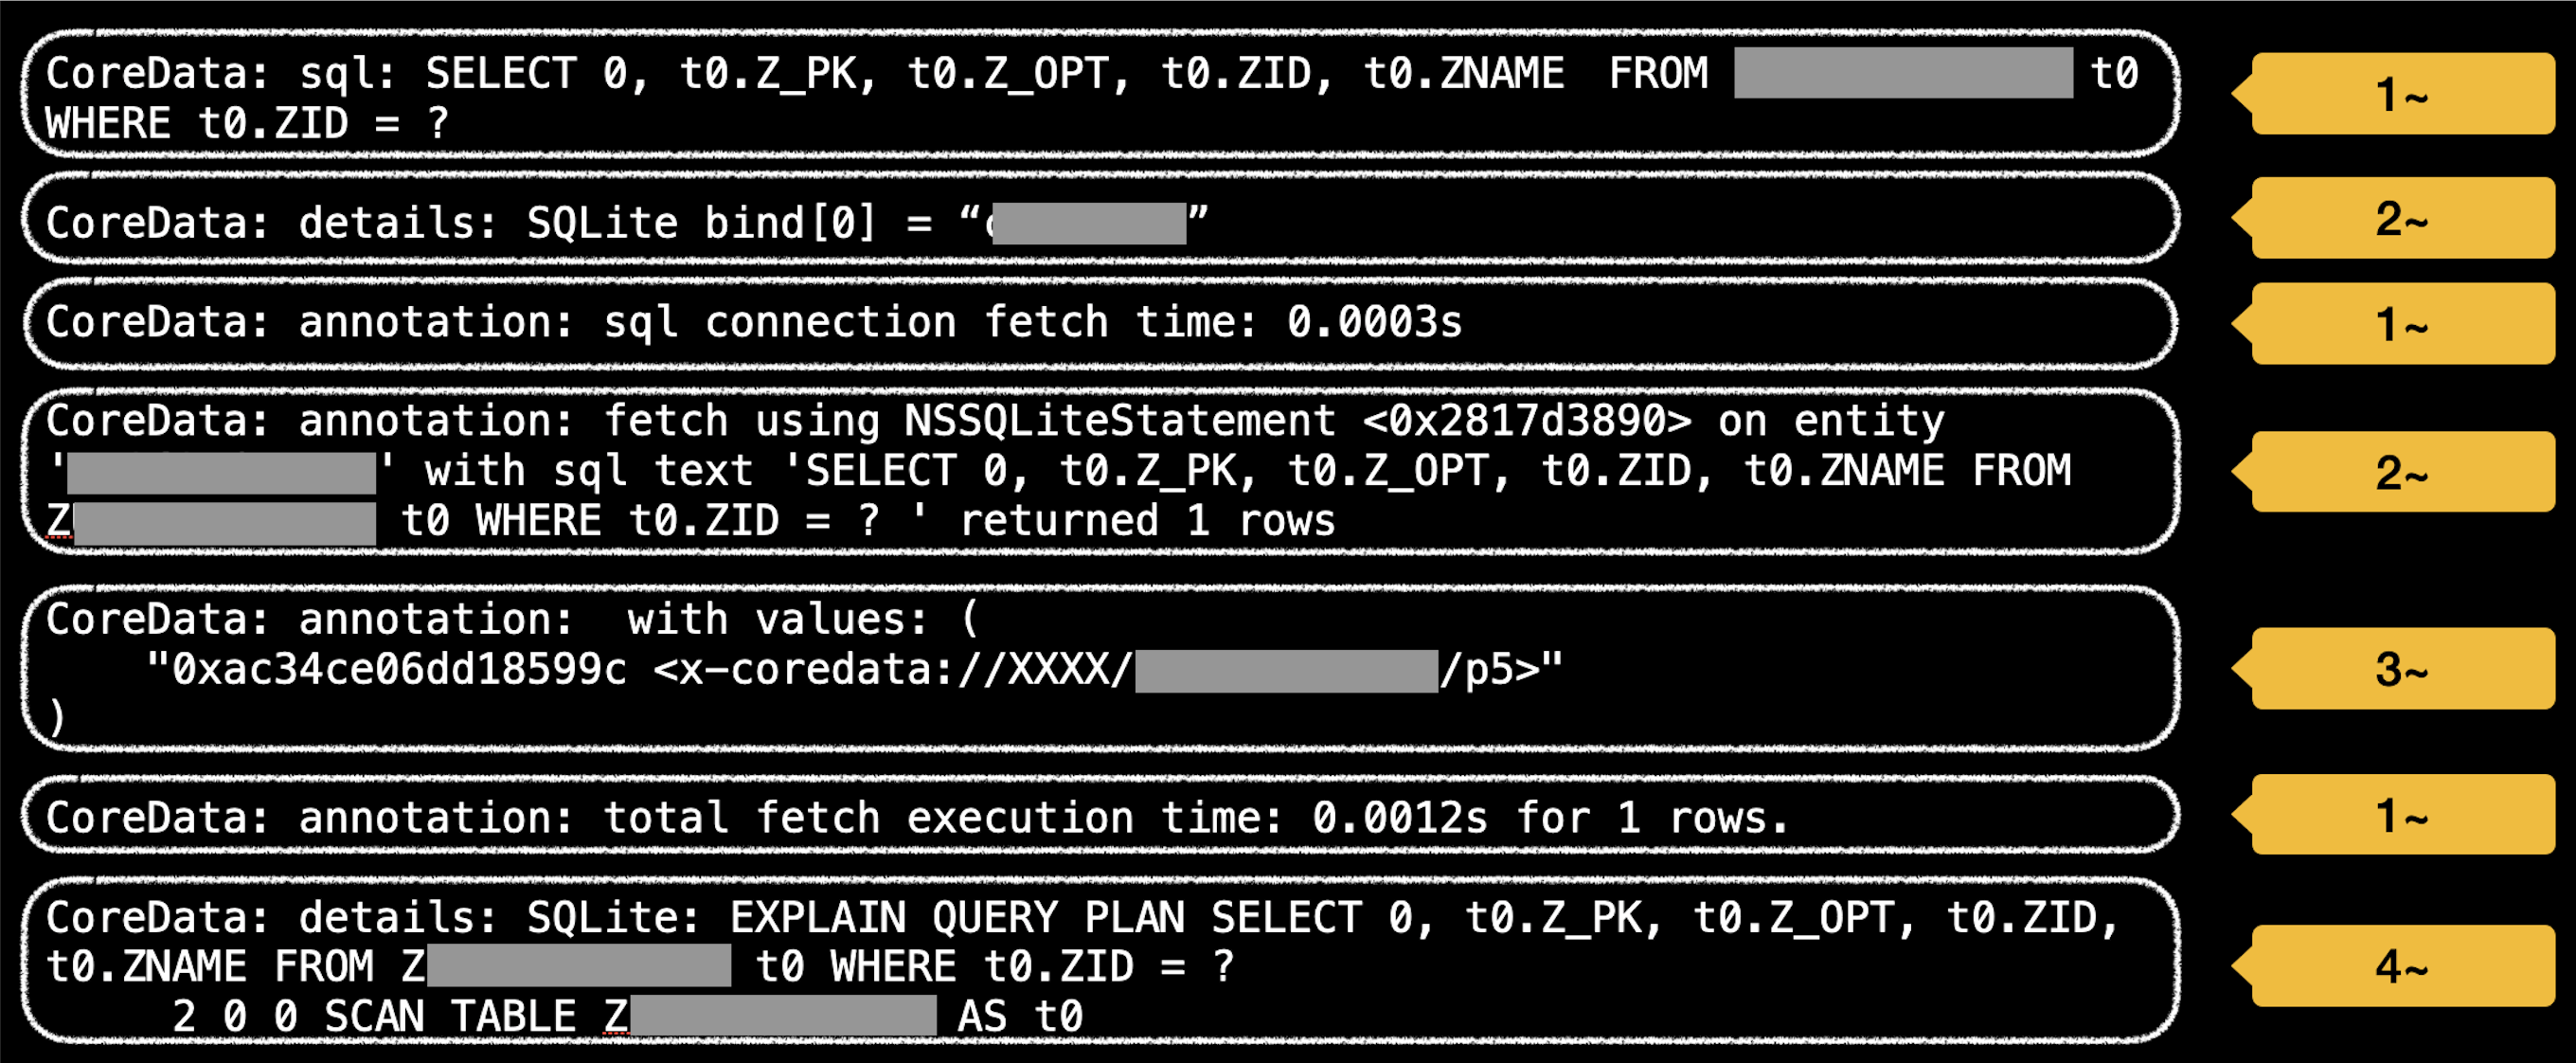
The EXPLAIN QUERY PLAN command is used to determine the strategy or plan that SQLite employs to execute a specific SQL query. In the previous section, we looked at a level 4 log that appeared as follows:
CoreData: details: SQLite: EXPLAIN QUERY PLAN SELECT 0, t0.Z_PK, t0.Z_OPT, t0.ZID, t0.ZNAME FROM ZXXX t0 WHERE t0.ZID = ?
     2 0 0 SCAN TABLE ZXXX AS t0
In this log, the first line is straightforward and represents the SQLite statement. However, the second line contains additional information that might be more difficult to understand. The 2 0 0 represents identifiers such as node id and parent id, which are used internally. These aren't particularly important, so we can skip over them. The SCAN signifies a full table scan, in other words, no index was used in the current search.
For reference, when various types of indexes are used to retrieve data, the result of the EXPLAIN QUERY PLAN command will appear as follows:
-- Index applied
 3 0 0 SEARCH t0 USING INDEX Z_XXX_byIDIndex (ZID=?)

-- Covering Index applied
0 0 0 SCAN TABLE ZXXX AS t0 USING COVERING INDEX Z_XXX_byIDIndex
This way, we can determine which index is actually being used in a fetch request, which is incredibly useful. The query plan can contain valuable information beyond just the use of indexes. You can explore its other uses in the future.
6.3 Utilizing Instruments
Instruments is a powerful profiling and performance analysis tool provided by Apple. Although it's not directly related to the topic of debugging SQLite, it's worth mentioning. Instruments integrates a default template for Core Data, which we can use:
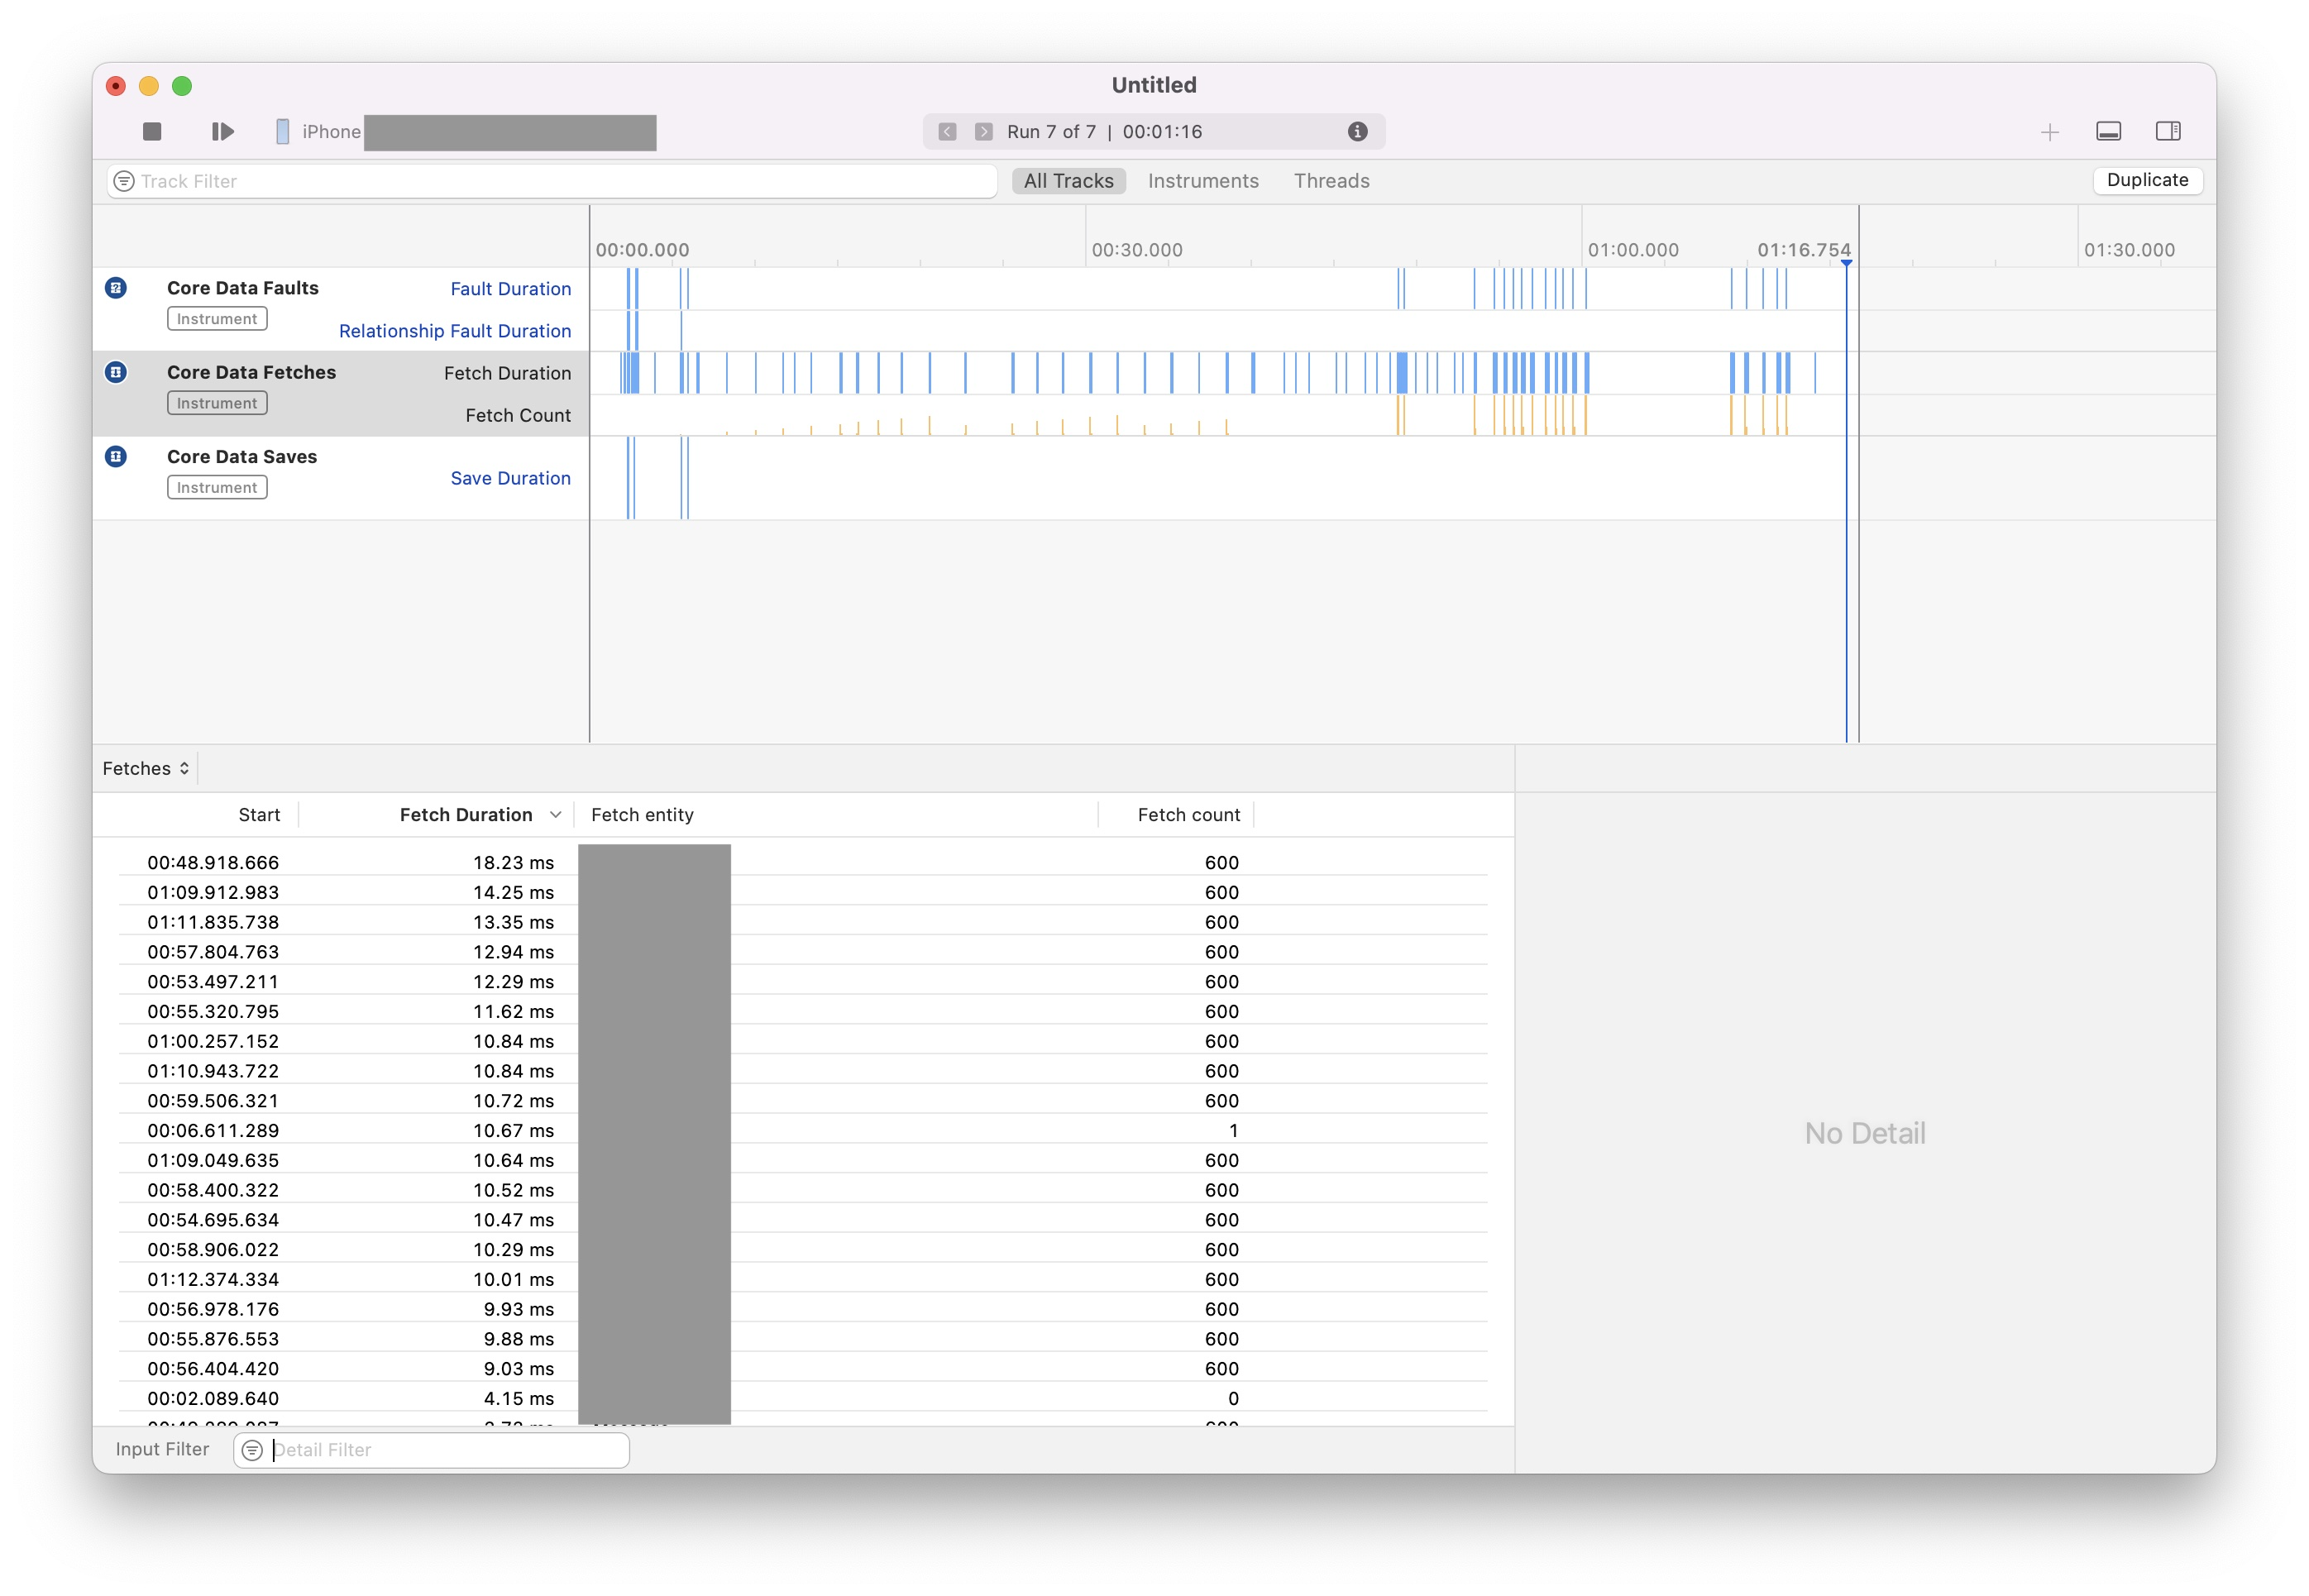
You might argue that the "Fetch Duration" shown in the screenshot includes not just the SQLite fetch duration but also other parts of the entire Core Data stack. You're absolutely right. However, we can still glean valuable information from the Instruments results. For instance, you can compare the frequency of fetch and save operations, which can assist in designing entities and indexes more effectively.
In conclusion
In short, exploring best practices for Core Data from a SQLite perspective can help us understand what's happening behind the scenes. This can be incredibly useful when creating high-performing, scalable, and reliable applications.
Additionally, monitoring and analyzing performance using tools like the SQLDebug launch argument and Instruments when necessary can help us identify bottlenecks and optimize implementations.
The content covered in this post is just the tip of the iceberg. There's so much more to explore.