In the ever-evolving landscape of iOS development, a myriad of database libraries have emerged, each offering efficient ways to store and retrieve data. Among these, SQLite, Realm, and CoreData have become particularly prominent. Each of these libraries has its own unique advantages, but CoreData stands out as one of the most powerful and well-known database frameworks in iOS development.
However, CoreData is not just a typical database facilitating create, read, update, delete (CRUD) operations. It's a comprehensive database framework that provides a host of intriguing features such as concurrency, fetch faulting, fetch diffing, and relationships. Among these, relationships in CoreData are especially compelling. They come with straightforward APIs, are easy to configure, and are extremely optimized for performance.
However, to truly leverage the power of CoreData relationships, a deep understanding is essential. That's why in this article, we'll dive deep into CoreData relationships, exploring every aspect to help you fully comprehend their potential and achieve the best performance in your iOS applications. Let's get started!
I. CoreData relationships: An overview
CoreData relationships allow you to model associations between entities in your data model. They are integral to creating a coherent and connected object graph, and they reflect how you would naturally envision the connections between different types of objects in the real world.
Here are some common relationship types in CoreData. Developers working with databases should be familiar with these. However, if you're not, don't worry. We'll delve into each relationship type in more detail in Section II.
| One-to-one | Many-to-one | Many-to-many |
 |  |  |
What are attributes of a relationship?
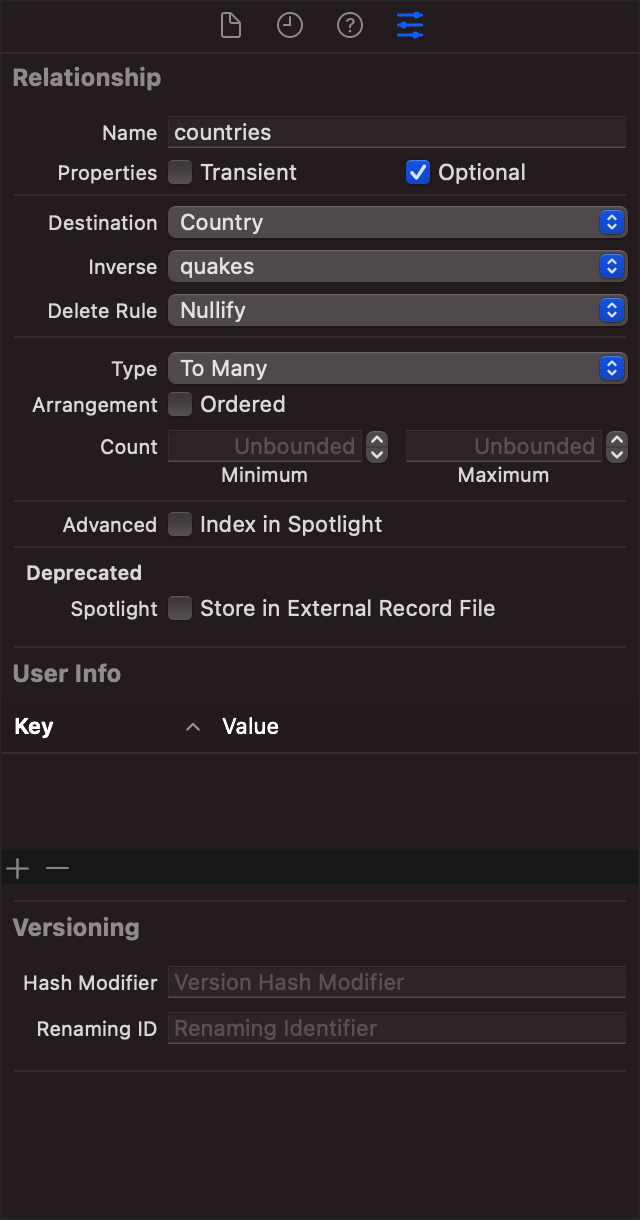
CoreData relationships are implemented similarly to relational database relationships. Each entity in CoreData is represented by a table, and we can create relationships between entities just as we do with tables. However, these are not just normal relational database relationships. Apple provides a variety of cool features for each relationship. According to Apple's documentation, here are the attributes that a relationship will have.
|
Attribute |
Definition |
|
Transient |
Transient relationships aren't saved to the persistent storage. So transient |
|
Optional |
Optional relationships aren't required to have any instances of their destination |
|
Destination |
Each relationship points from a source entity (the entity whose relationships |
|
Inverse |
Inverse relationships enable CoreData to propagate change in both directions
|
|
Delete rule |
A relationship's delete rule specifies how changes propagate across relationships
|
|
Cardinality type |
Specify a relationship as being to-one or to-many, which is known as its cardinality.
|
|
Index in Spotlight |
Includes the field in the Spotlight index. For more information, see Core Spotlight. |
While it's not officially described in Apple's documentation, if we don't set inverses for relationships, we will end up with two relationship types: one-to-nil and many-to-nil. These are somewhat different from relational database relationships. Importantly, any updates in these relationships will not reflect in other places because they lack inverses. An interesting aspect of the many-to-nil relationship is that it can lead to data loss if not clearly understood. We'll discuss this further when we delve into each relationship type in more detail in Section II.B.
We've covered some basic parts about CoreData relationships, in the next section we'll take deeper look into each relationship type to understand how to use them and how they are implemented.
II. CoreData relationships: A closer look
A. The to-one relationships
We typically use these relationship types to store additional data for an entity that is difficult to represent with a single property. Let's consider this example:
| One-to-one | One-to-nil |
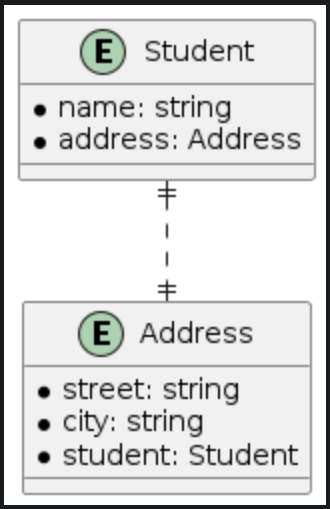 | 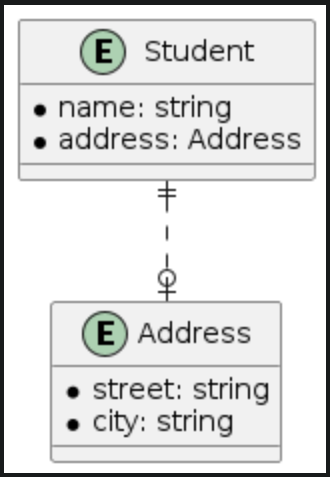 |
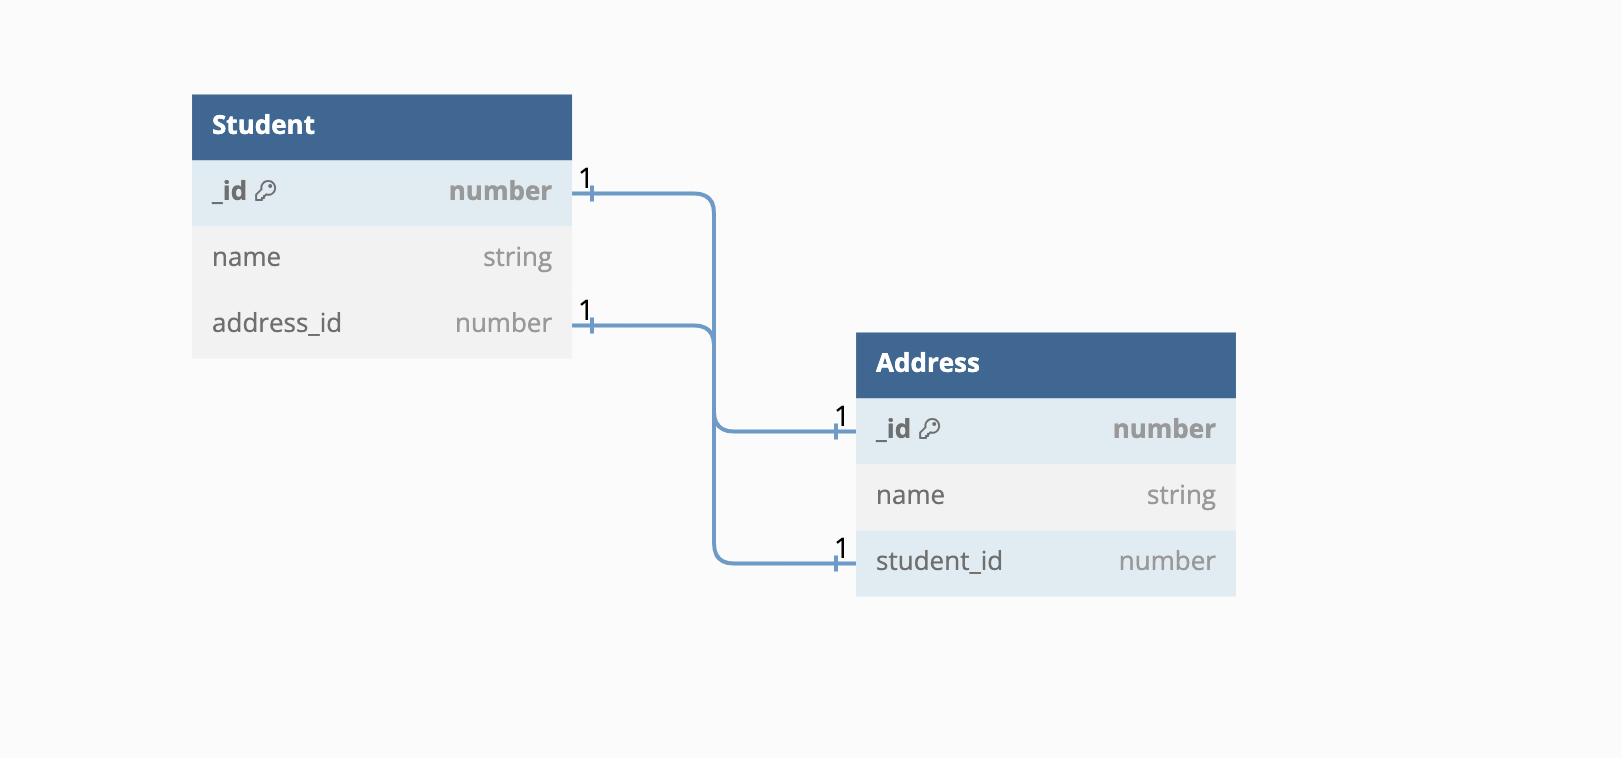
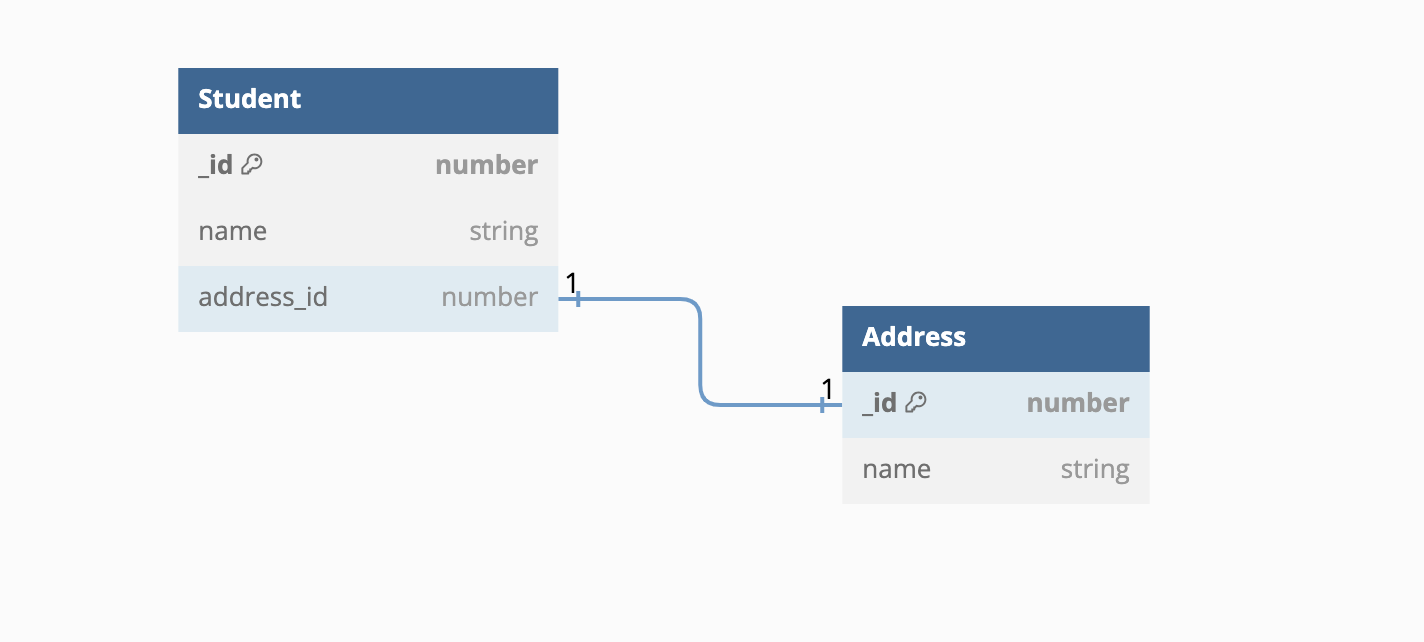
The differences between one-to-one and one-to-nil relationships are clear. In a one-to-one relationship, both the student and address entities have to-one relationships. From CoreData's perspective, the one-to-one relationship will have inverses for both the student and address entities. Thus, any change in the address relationship from the student entity will also update the student relationship on the address entity. However, in a one-to-nil relationship, the address entity remains unaware of the student entity, and no updates occur.
Here's how it would appear in the persistent layer. The relationship information is stored as a property on either the student or address table, making it easy to understand how CoreData stores the data.
| One-to-one | One-to-nil |
 |  |
An example
How are relationships fetched with fetch requests? Let's examine the following example:
let fetchRequest = NSFetchRequest<Student>(entityName: "Student")
fetchRequest.returnsObjectsAsFaults = false
guard let student = try context.fetch(fetchRequest).first else { return }
print(student.address.name)
At line 3 we fetch the student objects and take the first one. All properties of student will be fetched except the address relationship. This is the fault mechanism of CoreData. The address property isn't fetched until we access it at line 4. At this point, CoreData performs another fetch to fulfill the address object. Therefore, in this block of code, two fetches actually occur.
- The first fetch is used for the student object
- The second fetch is used for the address object
This mechanism of CoreData is designed to optimize memory usage, but it may not offer optimal performance in some situations. We'll discuss this further in Section III.B.
B. The to-many relationships
| Many-to-one | Many-to-many | Many-to-nil |
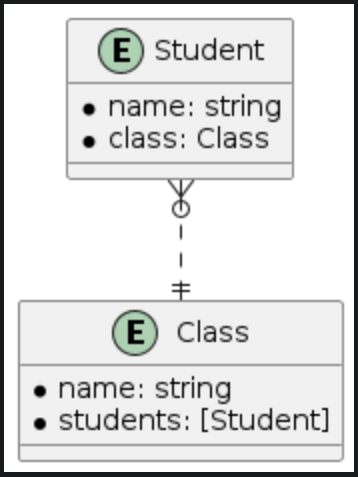 | 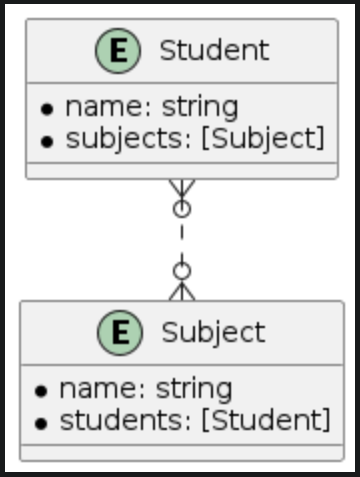 | 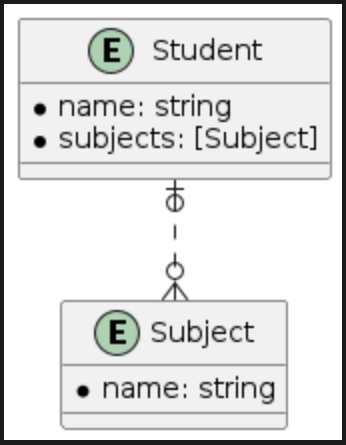 |
To understand the to-many relationship types let see the relationships between student, class and subject entities
- A student will belong to a class and a class will have many students. This is the many-to-one relationship type.
- A student will join many subjects and a subject might have many students so this is the many-to-many relationship type. In case we don't really need to manage students in each subject we can remove the students relationship on subject and then we have the many-to-nil relationship type (The to-many relationship without an inverse).
At the entity level, to-many relationships appear as a normal property - simply an array of items. Through the CoreData APIs, we can perform CRUD operations just as we would with a normal array. But is it truly that simple? Let's examine how the persistent layer stores information for it.
| Many-to-one | Many-to-many | Many-to-nil |
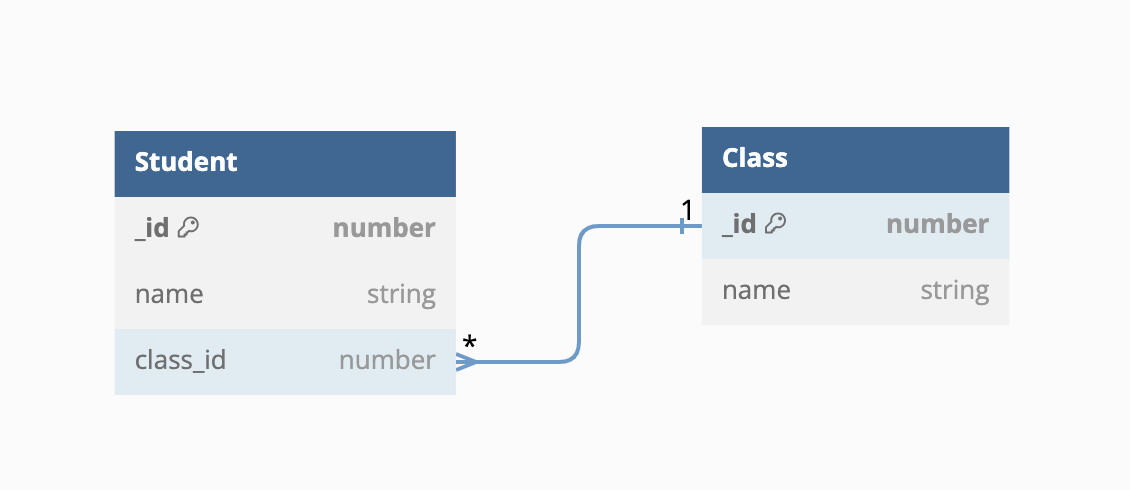 | 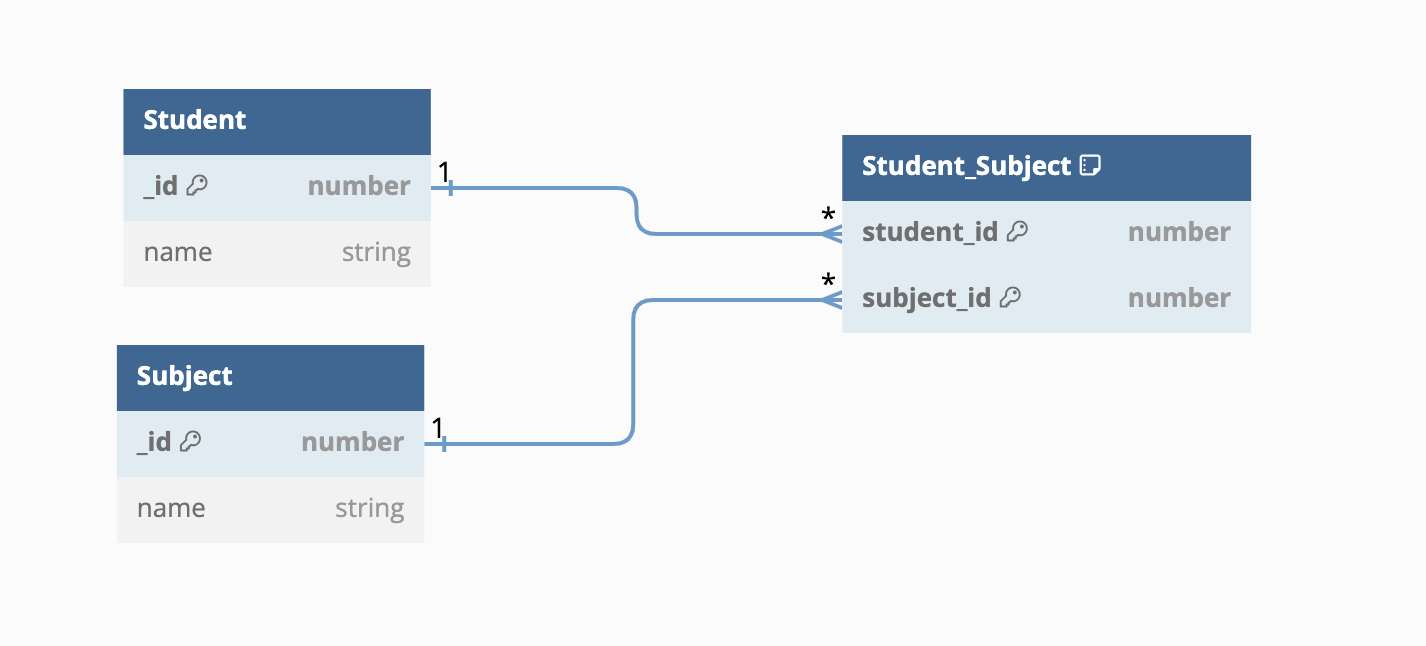 |  |
In the above figure, we see that many-to-one and many-to-nil share a very similar design for storing relationship data. They both store this data on the destination entity of the to-many relationship. For the many-to-many relationship type, the relationship data is stored in a separate table, in this case, student_subject. When we fulfill the to-many relationships, we'll look up this table.
To understand more clearly about how to-many relationships work in CoreData, let see this example:
let fetchRequest = NSFetchRequest<Student>(entityName: "Student")]
fetchRequest.returnsObjectsAsFaults = false
guard let student = try context.fetch(fetchRequest).first else { return }
print(student.subjects.first?.name)
Similar to the previous example in Section II.A, we fetch a student object at line 3 and then access the subjects relationship at line 4. Here's what happens from CoreData's perspective:
- Fetch Student objects and take the first item at line 3.
- Fetch subjects relationship at line 4. Some might think there is only one fetch here but actually there are two fetches.
- Fetch NSManagedObjectIDs of subject to fulfill the to-many relationship.
- Fetch the full information for the first subject item.
So, we have a total of three fetches in this block of code. While this works well, it's not optimized for performance. We have some methods to reduce the number of fetches, which we'll discuss in Section III.C.
An interesting point about many-to-nil relationships
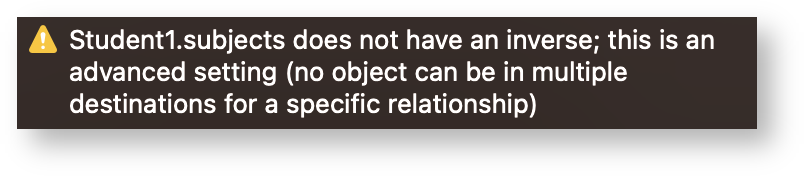
For the many-to-nil relationship, when we have duplicate items in the to-many relationship, saving data to the persistent store can lead to data loss. Xcode will display a warning for this issue, but if we're not aware of it, it could pose a significant problem for our data's consistency. Let's look at this sample code:
let subject1 = Subject(context: context, name: "Subject1")
let subject2 = Subject(context: context, name: "Subject2")
let student1 = Student(context: context, name: "Student1", subjects: [subject1])
let student2 = Student(context: context, name: "Student2", subjects: [subject1, subject2])

try? context.save()

print(student1.subjects) // [] <= data lost
print(student2.subjects) // [subject1, subject2]
In this case, we can see that after saving, student1 doesn't have any subjects, even though it should have subject1. If you examine the schema design of the many-to-nil relationship (Figure 6), you can identify the root cause of this issue. Therefore, in most cases, we should avoid using many-to-nil relationships to prevent data loss. If necessary, we could consider using the many-to-one relationship as a replacement, as it has a similar design.
In separate research, we investigated the performance of many-to-nil and many-to-one relationships. We tested with different data sets and measured the time taken for insertions and queries. The test results are depicted in the figure below.
| Insert test | Query test |
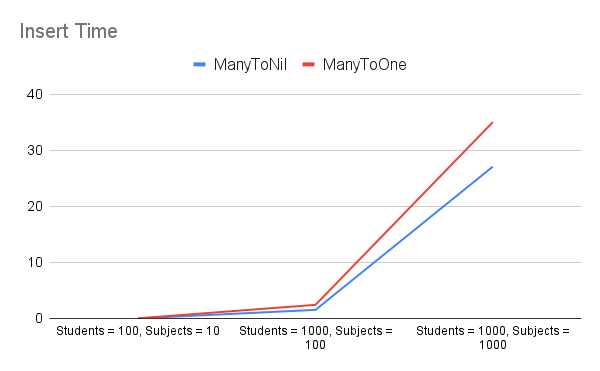 | 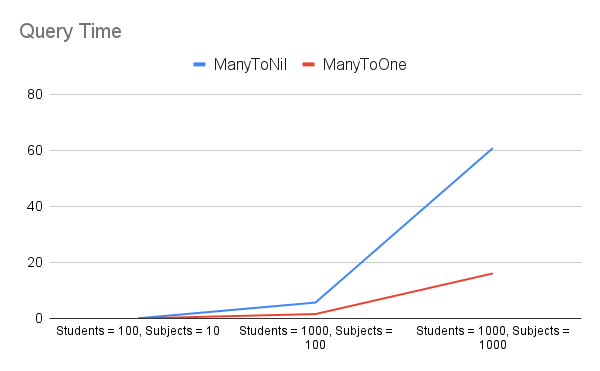 |
We found that there isn't much difference in insertion time between these relationships, with the many-to-nil relationship being slightly quicker. Regarding query time, the many-to-one relationship performs better than many-to-nil, especially with larger data sets. However, one consideration for many-to-one relationships is the inverses. When we update one side of the relationship, the inverse side also gets updated. This could cause memory issues if we're dealing with a very large data set.
We're not certain why Apple chose to implement many-to-nil relationships in this manner. However, if they modified the table design to mirror that of many-to-many relationships, it could resolve the issue. These are just our speculations, but we believe they made this choice for the following reasons:
- Reusing the implementation of many-to-one relationship when implementing CoreData.
- To discourage the use of many-to-nil relationships. During development, we should consider using many-to-one or many-to-many relationships as replacements.
In this section, we've discussed each relationship type and how they're implemented. We also highlighted a potential issue that could occur if these concepts are not clearly understood. In the next section, we'll delve into more specific cases and discuss best practices. These will not only pertain to relationships but also to common CoreData use cases.
III. Common mistakes and best practices
A. Ignoring inverse relationships
Inverse relationships in CoreData are relationships from one entity back to another entity. For instance, if a Class entity has a relationship to a Student entity (a student is in a class), there should be an inverse relationship from student back to Class (a class is joined by a student).
Ignoring inverse relationships is a common mistake made by developers when working with CoreData, and it can lead to inconsistencies and unexpected behavior in your data model.
Why are inverse relationships important? Here are a few reasons:
Data integrity: Inverse relationships help maintain data integrity by ensuring that changes made on one side of a relationship are reflected on the other side. For example, if you delete a Class object that has a student object, the inverse relationship ensures that the student object's class is set to nil.
Performance: CoreData uses inverse relationships to maintain graph consistency, which can improve performance. When you set one side of a relationship, CoreData automatically sets the inverse for you, which can save you from having to manually update the inverse side.
Validation: CoreData uses inverse relationships to perform relationship validation. If you don't set inverse relationships, CoreData might not be able to correctly validate your data.
Fetch requests: Inverse relationships can make fetch requests more efficient. For example, if you want to find all students belong to a particular class, having an inverse relationship from Class to student can make this task easier and more efficient.
Best practices
Maintaining inverse relationships in CoreData is crucial for data integrity, performance optimization, and efficient fetch requests. Here are some best practices for managing inverse relationships:
Define inverse relationships: When defining relationships in CoreData, it's generally recommended to also define the inverse relationships. This practice helps CoreData maintain data integrity and consistency in your object graph. However, it's important to note that it's not always necessary to create additional relationships solely for the purpose of defining inverse relationships, especially if a relationship only exists on one side of an entity.
Take, for instance, the relationship between a student and an Address entity. A student may have an address, thus establishing a to-one relationship with the Address entity. In this scenario, if there's no need to access the student from the Address entity (in other words, the address doesn't need to know which student it belongs to), there's no strict requirement to define this relationship and set the inverse.
Use correct delete rules: Depending on the nature of your relationship, set the appropriate delete rule. For instance, for a to-one relationship, you might want to choose Nullify so that when the source object is deleted, the destination object's reference is set to nil. For a To-Many relationship, Cascade might be more appropriate, which deletes all destination objects when the source object is deleted.
Update both sides of relationship: When you modify one side of a relationship, ensure that the inverse side is also updated. Although CoreData automatically maintains inverse relationships when you modify one side, it's a good practice to manually update both sides to make your intentions clear in the code.
Leverage inverse relationships in fetch requests: Use inverse relationships to make your fetch requests more efficient. For example, if you have a Class entity and a student entity with a defined inverse relationship, you can easily fetch all students belong to a class or find the class of a particular student.
Validate relationships: Ensure that your relationships (and inverse relationships) are valid when saving your managed object context. CoreData can throw errors if your relationships are not valid, so it's important to validate your data before saving. For example, if a relationship is marked as non-optional (in other words, it's required), but the relationship is null, CoreData will consider this invalid.
By adhering to these best practices, you can maintain inverse relationships effectively, ensuring data integrity, improving performance, and making fetch requests more efficient in your CoreData usage.
A real use case
In the LINE database, we have chat and message entities. A chat can contain many messages, and a message will belong to a chat. In this case, if we examine the relationship from the perspective of the Chat entity, we have a one-to-many relationship type. The relationship between them can be described in the following diagram.
| Chat - message relationship |
 |
Normally, when we want to delete a chat, we would need to perform extra deletions on messages, right? Instead of doing this manually, we use appropriate Delete Rules and set Inverses for each relationship. The messages relationship on the chat entity and the chat relationship on the message entity would have Cascade and Nullify delete rules, respectively. So, when we delete a chat, CoreData also performs deletions on messages, eliminating the need for us to do any extra work.
B. Not leveraging faulting
Faulting is a CoreData mechanism that helps manage memory usage by only loading objects into memory as needed. Not leveraging this mechanism is a common mistake that can lead to memory management issues.
For example, if you fetch a large number of objects without utilizing faulting, all these objects and their properties will be loaded into memory, which can lead to high memory usage and potential memory-related crashes.
Best practices
Leveraging faulting is a best practice when working with CoreData. Here's how you can do it:
- Batch fetching: Instead of fetching all objects at once, fetch them in batches. This allows CoreData to fault out objects that are not in the current batch, reducing memory usage.
- Prefetching: If you anticipate accessing an object's relationships, prefetch those relationships during the fetch request. This can prevent a large number of faults from firing simultaneously, thereby improving performance. From iOS 13 onwards, Apple added a new feature to CoreData called derived attributes, which provides an extremely helpful and effective way to prefetch the count of to-many relationships.
- Faulting and uniquing: Understand how faulting and uniquing work together. CoreData ensures that, for any given managed object context, there is never more than one managed object representing a specific record. This can help reduce memory usage. For more information, please check the document from Apple.
By leveraging faulting, you can manage memory usage more effectively and improve the performance of your CoreData operations. Understanding how and when to use faulting is a crucial skill when working with CoreData.
A real use case
On the chat list screen of the LINE application, when fetching chat items, we perform a fetch request to retrieve all chat items and display them in a UITableView. Without batch fetching, CoreData would move all chat items into the row cache. This not only consumes memory, but also takes time and energy. Therefore, in this case, we used batch fetching to optimize performance. Here is pseudocode of the fetch request:
let fetchRequest: NSFetchRequest<Chat> = NSFetchRequest<Chat>(entityName: "Chat")
fetchRequest.fetchBatchSize = <appropriate size>
fetchRequest.returnsObjectsAsFaults = false
Please note that when we are using batch fetching, we should set returnsObjectsAsFaults to false. Without this, the objects would be faults; data would only be pulled into the row cache, and it'd only subsequently be pulled into the context as each object's attributes are accessed.
Also, on the chat list screen, we previously didn't apply prefetching for relationships, which resulted in numerous fetches that impacted performance during the fetching of Chat entities.
| Screenshot | Sample chat - member relationship |
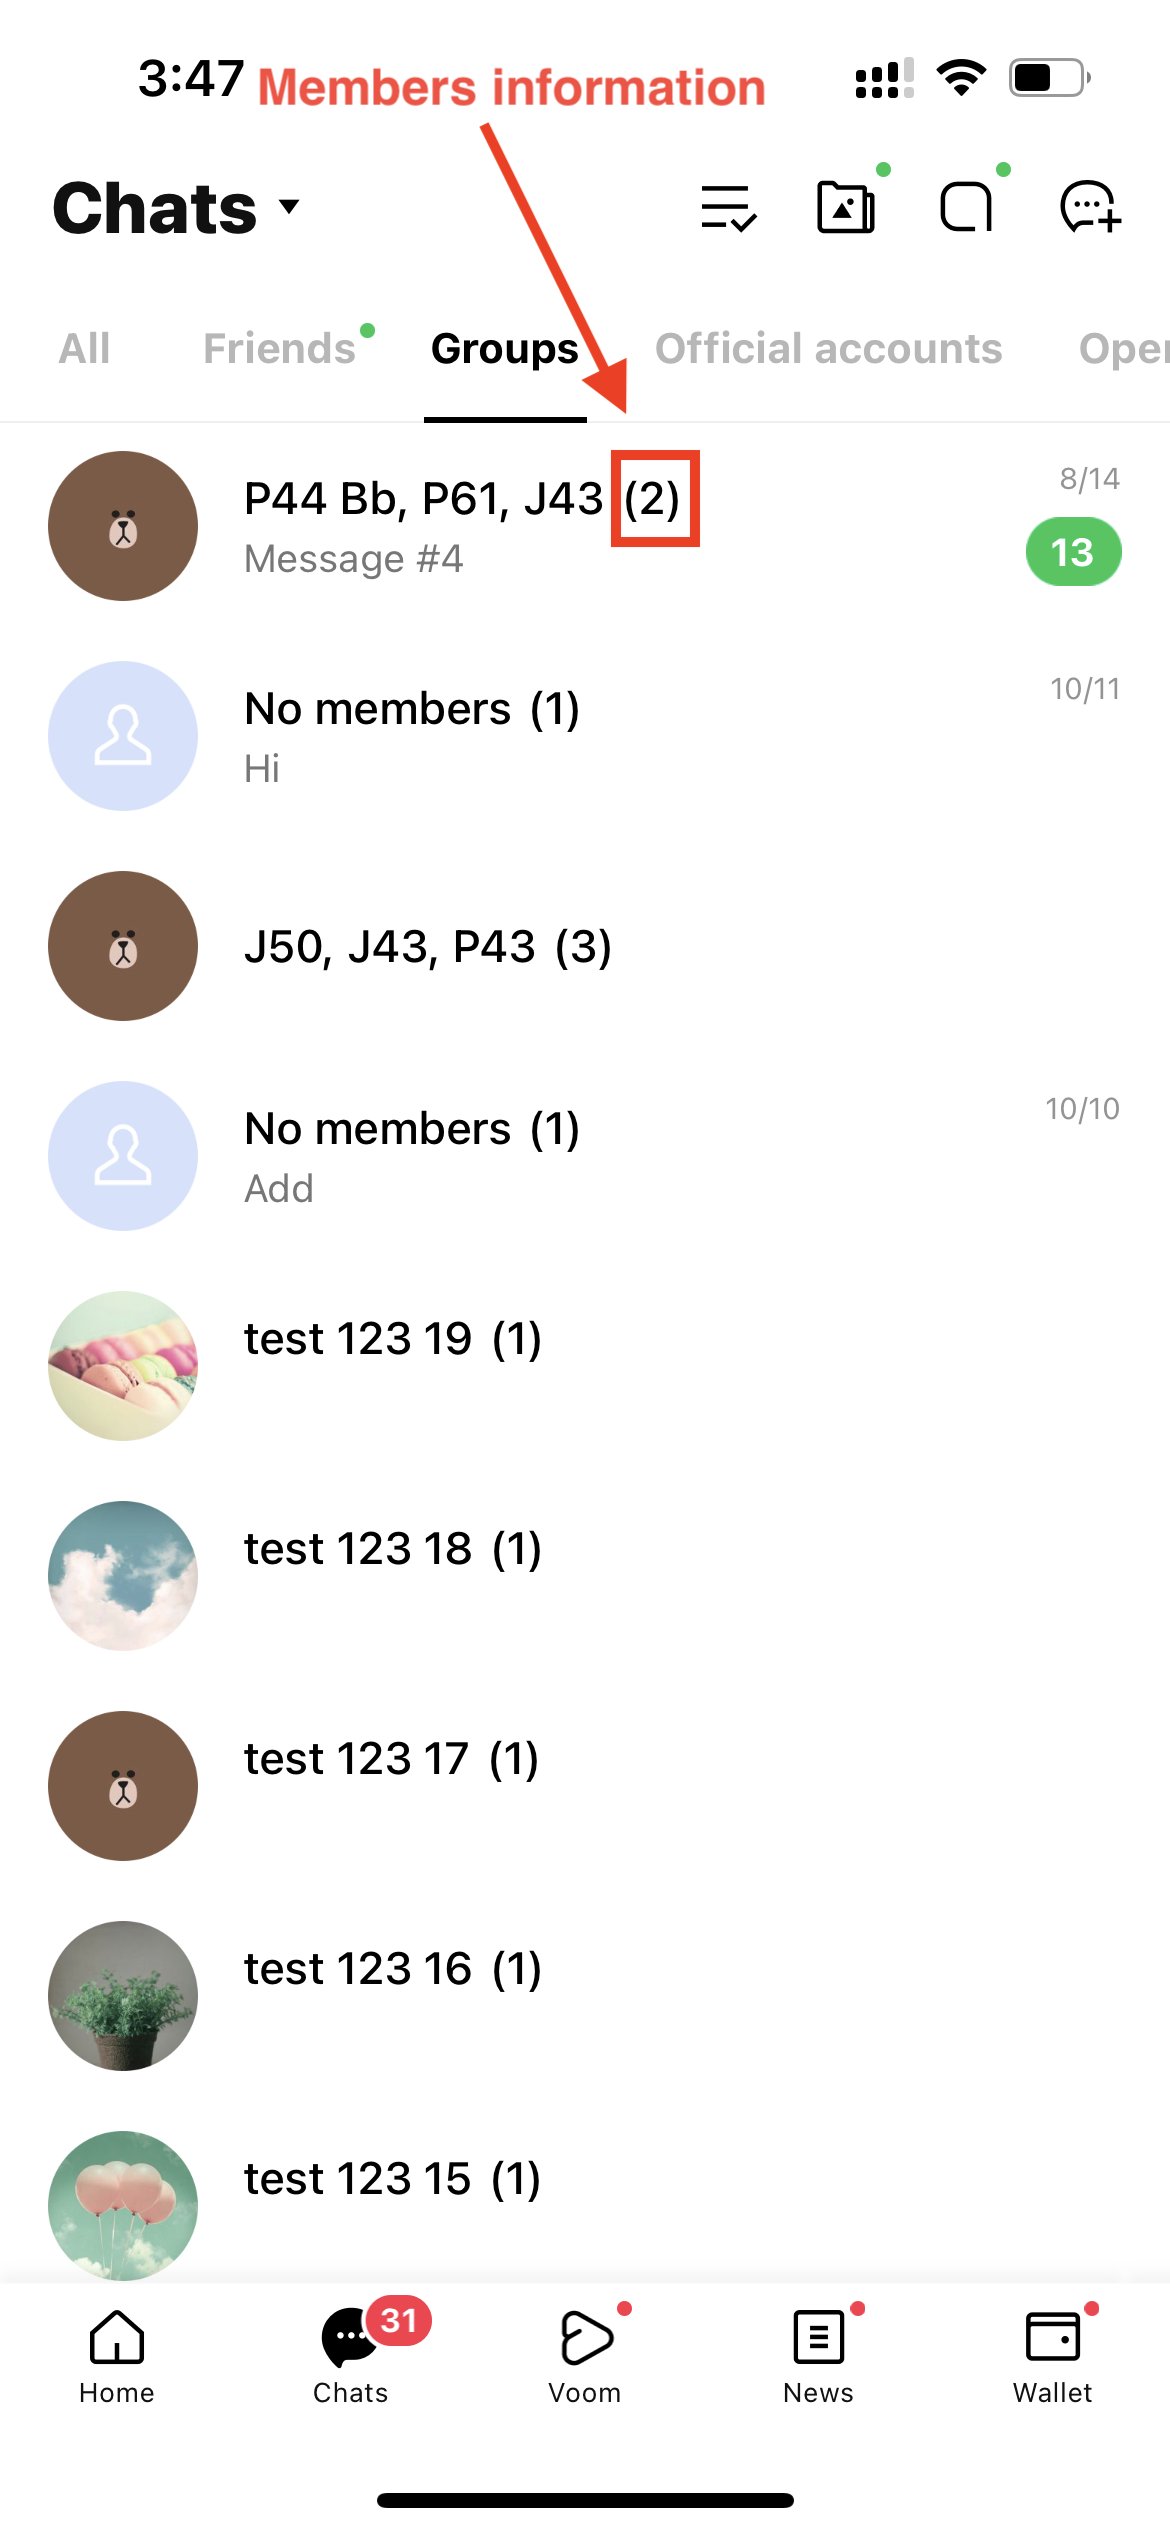 | 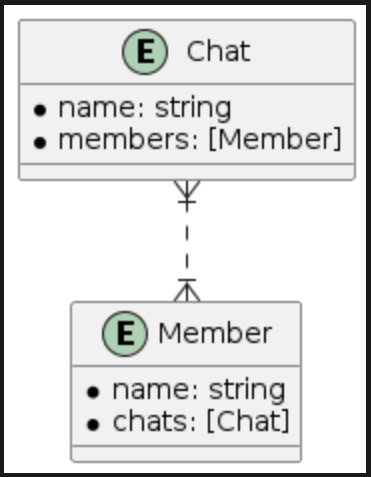 |
In this case, we have a chat entity and a member entity (a chat has many members). When displaying a chat item, we want to show the number of members, so we use the members relationship on the chat entity. This causes fetch faults for all members of a chat and significantly increases fetch time.
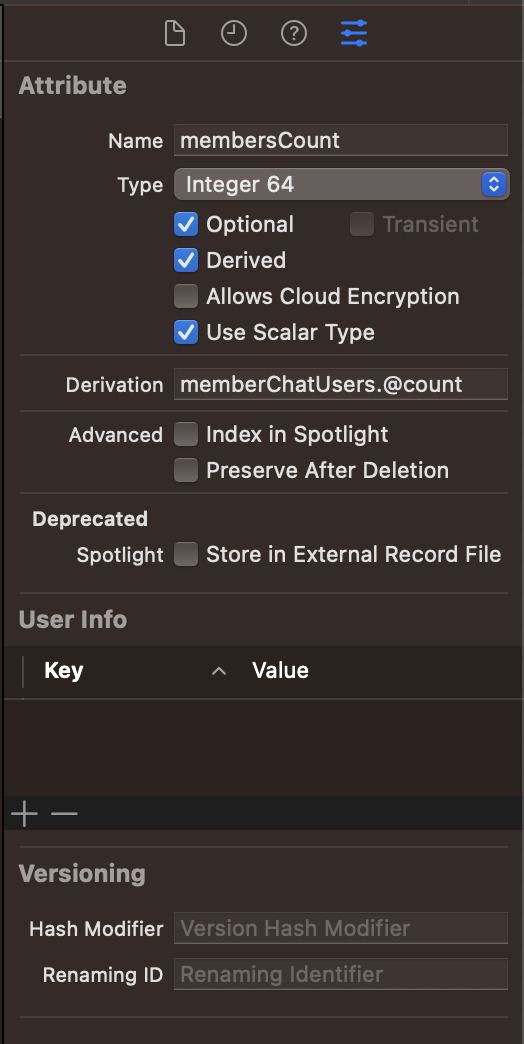
To reduce the number of fetch faults, we can apply the prefetching technique here by creating a derived attribute named membersCount on the chat entity. This allows CoreData to fetch the number of members when fetching a chat, saving us a significant amount of fetch time. Here's how we do it:
- Open xcdatamodel
- Select chat entity
- Create
membersCountattribute and set Integer 64 as its type - Open
membersCountattribute inspection - Set
Derived enable and Derivation = memberChatUsers.@countwherememberChatUsersis the to-many relationship
C. Overcomplicating fetch requests
Fetch requests are used in CoreData to retrieve data that matches certain conditions. A common mistake is overcomplicating these fetch requests, which can impact performance and make the code harder to understand and maintain.
For example, using complex predicates, fetching too much data at once, or not utilizing CoreData's features like batching and sorting can lead to inefficient fetch requests. This can result in slower performance and higher memory usage, especially when dealing with large amounts of data.
Best practices
Simplifying fetch requests is a best practice when working with CoreData. Here's how you can do it:
Use simple predicates: Keep your predicates as simple as possible. The more complex your predicates, the more work CoreData has to do to fetch the data.
Fetch only what you need: Instead of fetching all objects, only fetch the data you need. You can do this by setting a limit on your fetch request, or by using predicates to filter the data.
Use batching: If you're dealing with a lot of data, use batching to fetch data in small amounts. This can help manage memory usage and improve performance.
Use sorting: If you need your data in a specific order, use sorting descriptors in your fetch request. CoreData can often sort data more efficiently than doing it in memory after fetching.
By simplifying your fetch requests, you can improve performance, reduce memory usage, and make your CoreData code easier to understand and maintain.
An example
| Many-to-one |
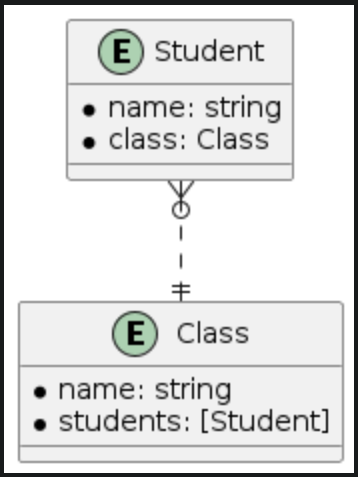 |
Lets go back to the many-to-one relationship of the student and class entity (Figure 5). If we want to find a student in a class with a specific name then we would have two options:
- Option 1: Use students property on the class object
-
The implementation would be as follows.
func findStudent(of class: Class, name: String) -> Student? { return class.students.first { $0.name == name } } - The fetch data flow would be as follows.

-
- Option 2: Perform a fetch request on the student entity
-
The implementation would be as follows.
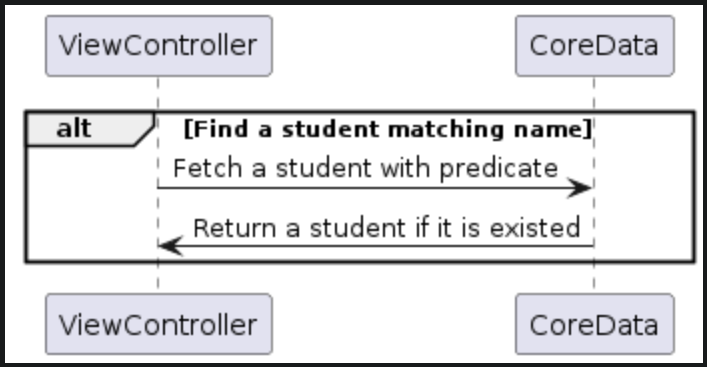
func findStudent(of class: Class, name: String) -> Student? { let fetchRequest = NSFetchRequest(entityName: "Student") fetchRequest.returnsObjectsAsFaults = false fetchRequest.fetchLimit = 1 fetchRequest.predicate = NSPredicate(format: "class = %@ AND name = %@", class, name) return try? class.managedObjectContext?.fetch(fetchRequest).first } - The fetch data flow would be as follows.
-
Option 1 triggers two fetch levels to fulfill faults. The first fetch level fulfills the students relationship, returning an array of fault student objects. The second fetch level fulfills each student object as we iterate through them and compare with the target name. Due to these fetches, there is considerable round-trip time between the ViewController and CoreData, resulting in a longer fetch time. In comparison, Option 2 only requires one fetch. Therefore, generally speaking, Option 2 would be the better choice for this case.
IV. Conclusion
In conclusion, CoreData is a powerful, comprehensive database framework that offers far more than just basic CRUD operations. Its advanced features, especially relationships, provide iOS developers with robust tools to handle complex data structures efficiently. However, to truly harness these capabilities, a deep understanding of CoreData relationships is crucial.
Throughout this exploration, we've delved into the intricacies of CoreData relationships, from basic concepts to advanced topics, common mistakes, and best practices. We've learned the importance of maintaining inverse relationships, understanding and applying delete rules, leveraging faulting for memory management, and simplifying fetch requests for performance optimization. We sincerely hope that these insights will prove valuable to you as well.
Happy coding!