Large-scale change (LSC) within software development often presents massive challenges. It's a scenario that needs careful planning to meet the need for stability. As DevOps philosophy evolves at a rapid pace, seamless implementation, testing, and release of these changes becomes necessary. This is why feature toggles emerge as a valuable tool, offering a variety of strategies to manage, test, and deploy large-scale changes effectively.
In this article, we will mainly describe how to develop, test, and release an LSC safely with feature toggles. Starting from the definition of LSC, why it needs help from feature toggle, and what kind of LSC can be covered. Next, we will introduce what kind of toggle we will use, and brief the migration schedule. Finally, we will show what to do with the code and toggle settings during the development, testing, and release stages with an easy demo. Let's begin!
Large-scale change
What's an LSC? According to the book Software Engineering at Google, an LSC is a change that logically should be a single commit but turns out to be many separate commits to the codebase due to constraints such as merge conflicts or testing resources. During the project lifecycle, we often encounter such changes, which might involve migrating from an old API vendor to a new one, upgrading the used library, or deprecating old paradigms to adopt new ones.
Most of these updates have a large impact, and may also include the critical user journey (CUJ) of the system. Since there might be a certain degree of uncertainty in the new version's logic, performance, and implementation details, it can lead to the need to spend more time doing research and testing before gaining enough confidence to deploy to the production environment. Or in the worst case, no one dares to make any changes. So, it's the time for feature toggle to help.
What kind of LSC can be covered?
First, we should categorize the LSC into two types: logic-level and compiler-level. The main distinction lies in whether we can include both versions of code in a single deployable artifact. For instance, a dependency version upgrade in a Java Maven Project is a compiler-level change, such as upgrading from Spring Boot 2.6 to Spring Boot 3.1. Conversely, migrating usage in the codebase from the Google Map API to another API vendor, or refactoring all String concatenation to use StringBuilder, are both logic-level changes. Therefore, for logic-level changes, we could apply some mechanisms using feature toggles to make the process easier and more confident. For compiler-level changes, we could use hardware-level deployment strategies like blue-green or shadowing deployments to make it safer.
How can feature toggles help LSC?
According to Martin Fowler, feature toggles can be categorized into four types: release, permission, ops, and experiment. Suppose we need to migrate all features from integrating with API vendor A to integrating with API vendor B. In this scenario, we would use three types of toggles to optimize the process of switching API vendors.
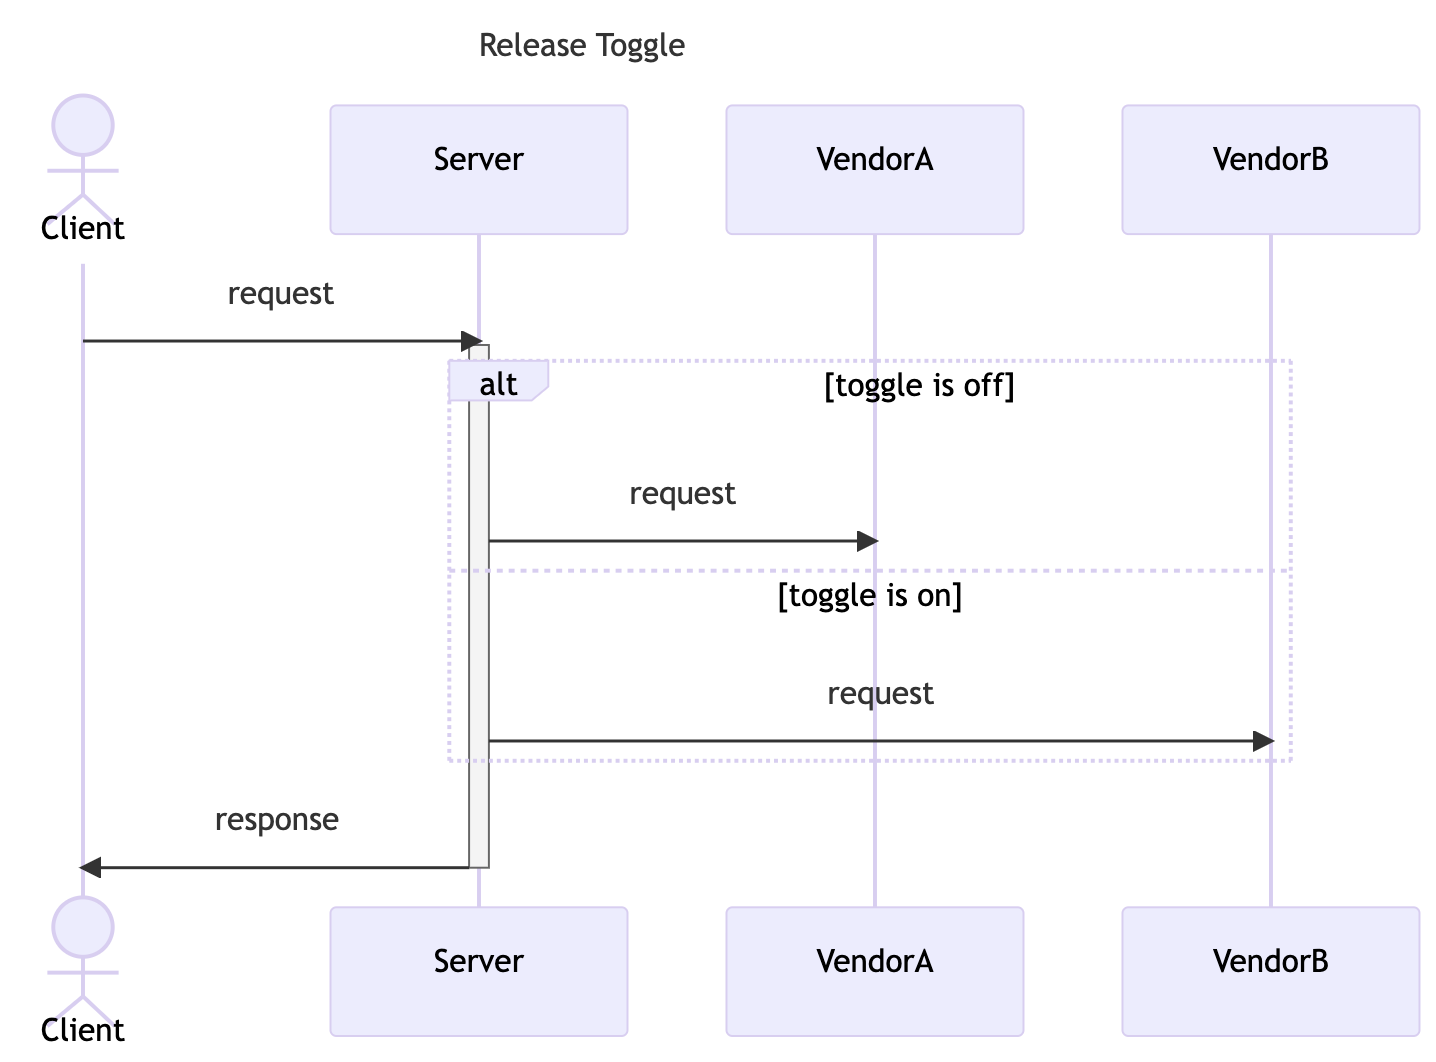
Release toggle
We use a release toggle to ensure that programs using vendor B's API will not be executed for all real cases, even if the code is merged into the main branch and deployed to production.
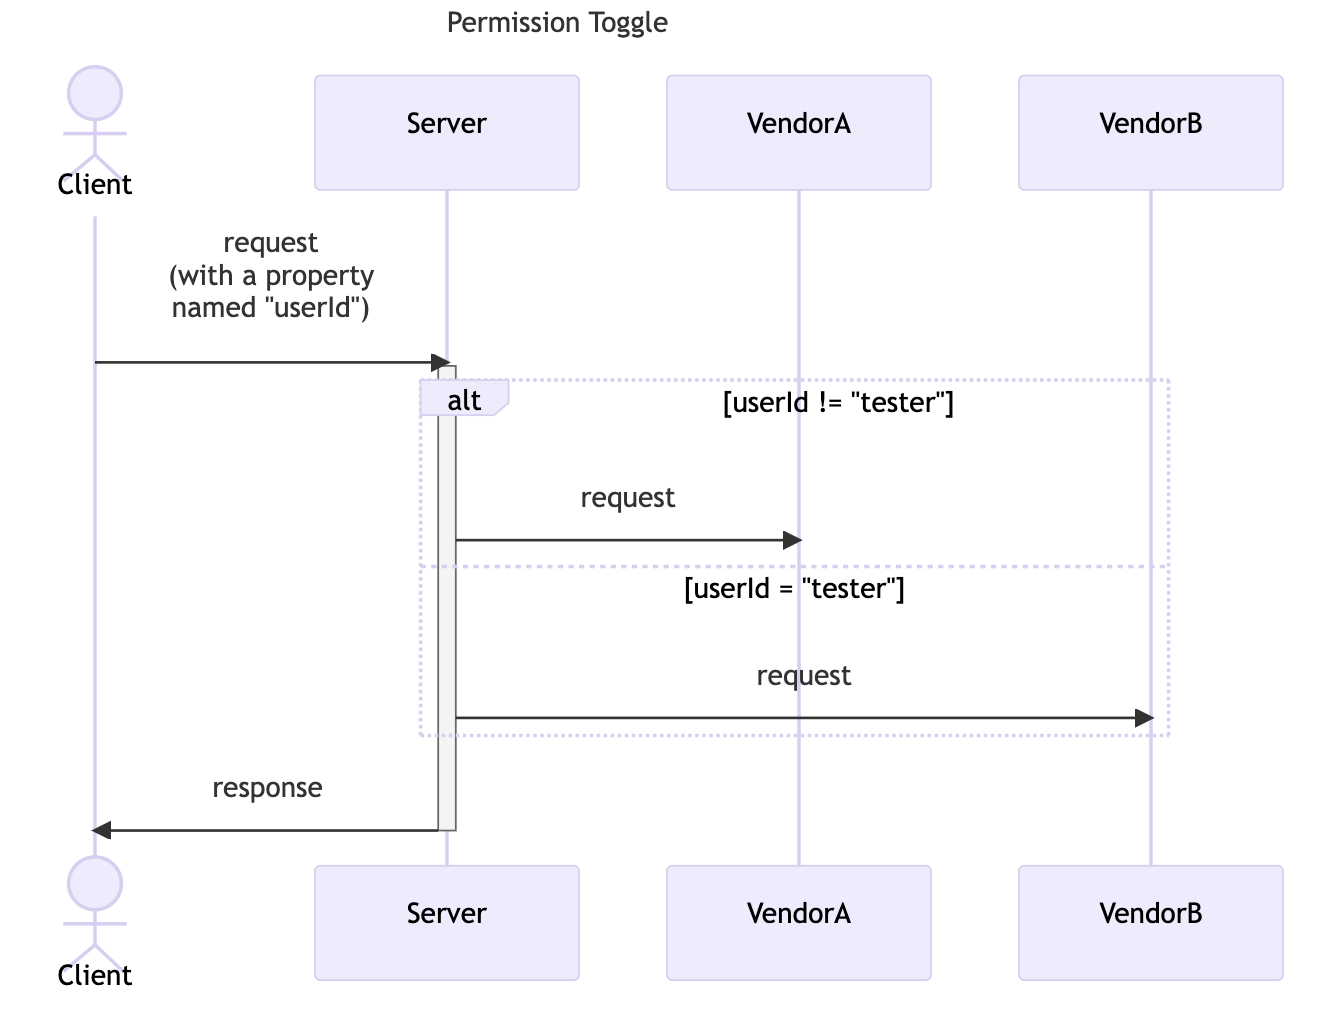
Permission toggle
Simultaneously, with a permission toggle, testers can check whether the features integrated with vendor B's API function well for a specific user, such as a test account.
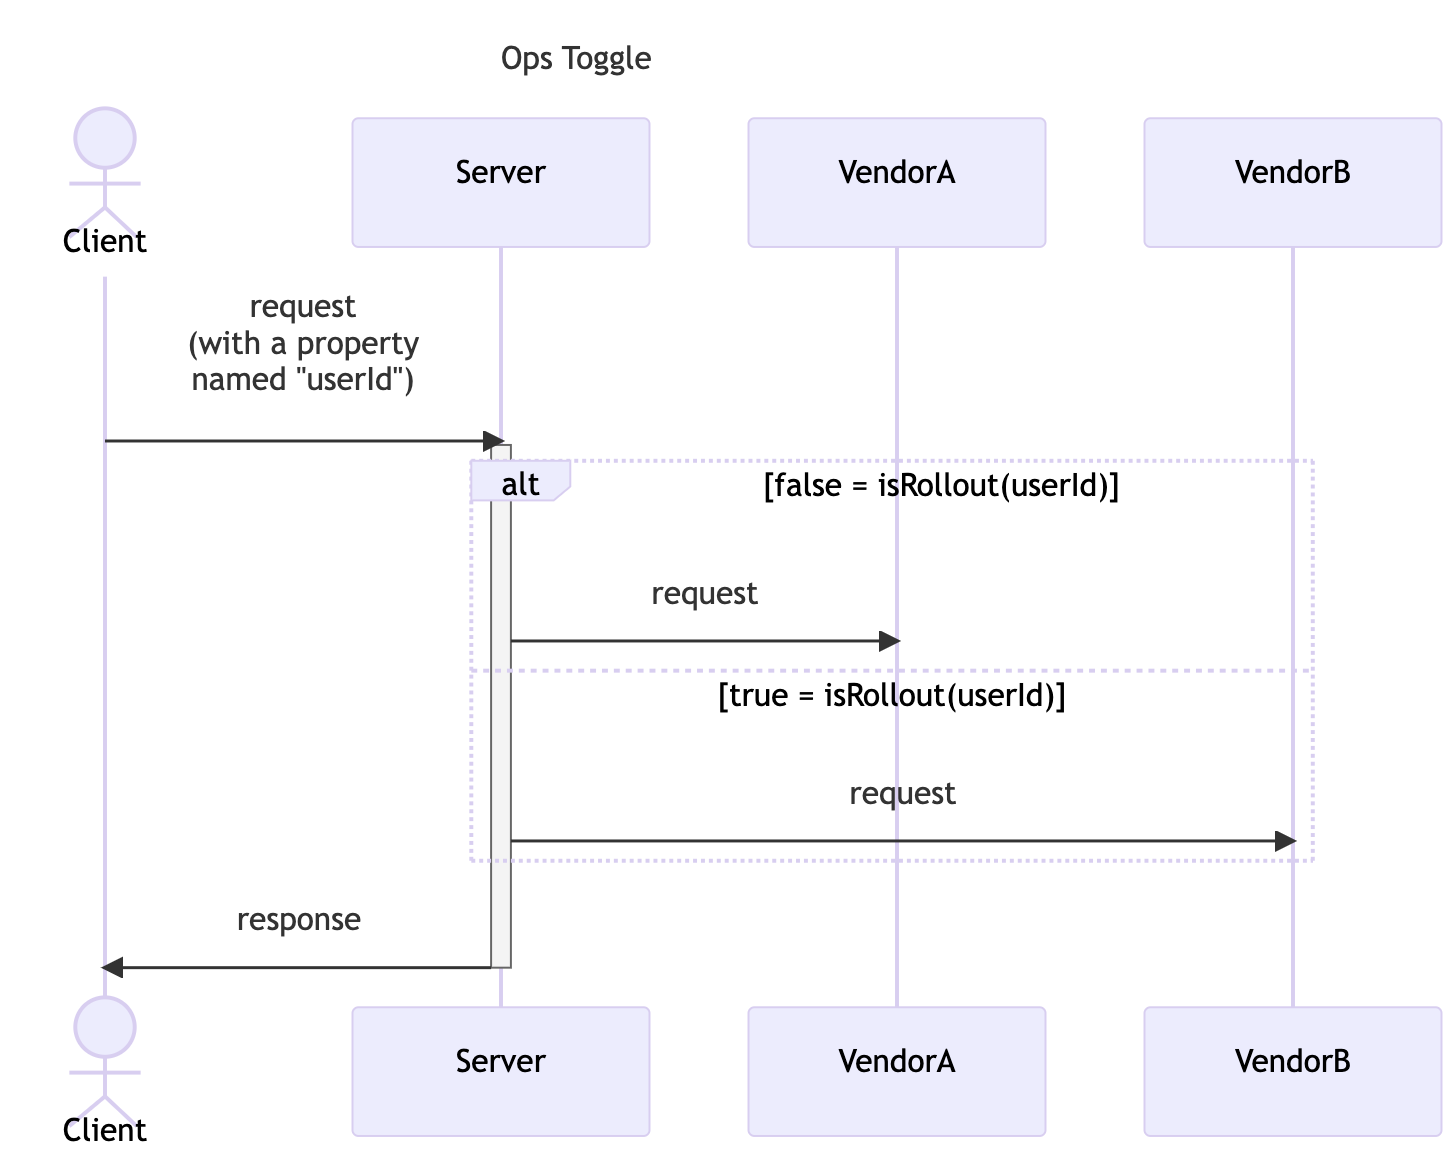
Ops toggle
We use an ops toggle to implement a canary release. This ensures that once all functions are completed, they will initially be available to a small percentage of real users. If there are no issues, we can gradually increase the percentage of users using the new function.
Migration and toggle schedule
With the three toggles mentioned above, we can outline the flow of an API vendor migration as follows: First PR merged, start testing, development completed, production testing completed, production stable, and removal of toggle code. We can then activate or deactivate the toggles to safely release the feature migration. The schedule would look something like this:
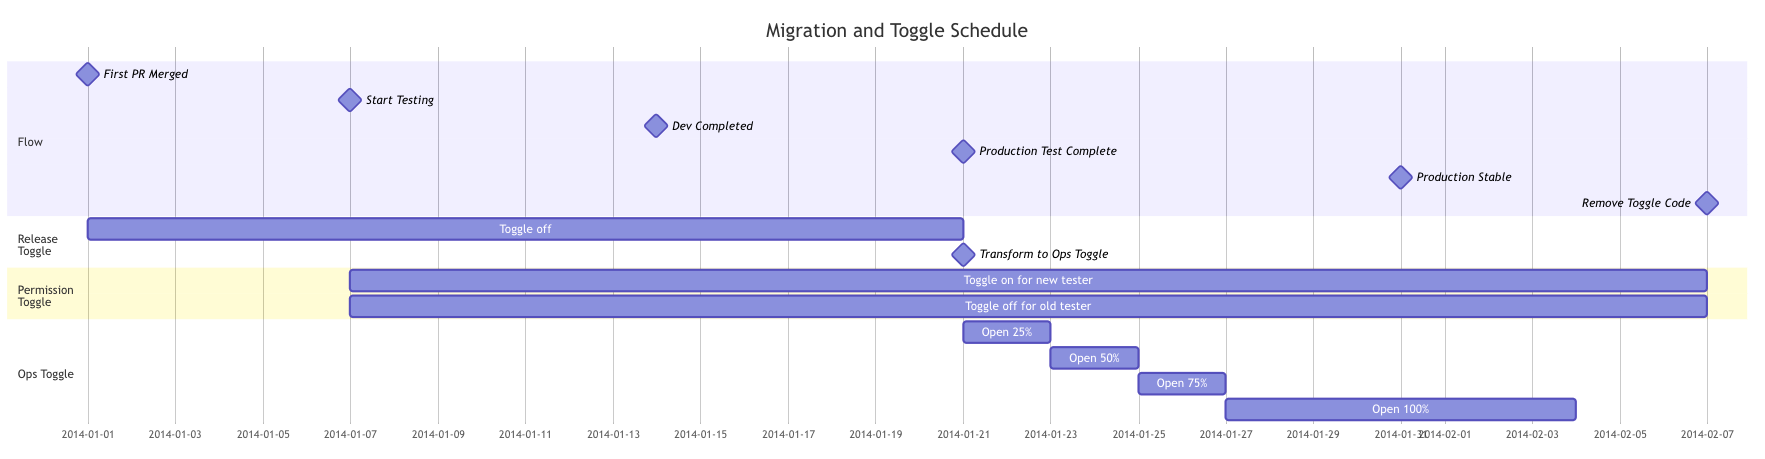
Here are some notable key points (assuming we have a fooService that will use both vendorAStrategy, integrated with vendor A's API, and vendorBStrategy, integrated with vendor B's API):
-
After merging the first PR containing
vendorBStrategy, we should use a release toggle to ensure all real traffic goes tovendorAStrategy, ensuring no real user is affected. -
When testers want to test the feature integrated with vendor B's API, we should set up a permissions toggle to make sure a specific user will trigger the
vendorBStrategy. -
For the regression or automatic test, we should add a permissions toggle to let a second user always trigger the
vendorAStrategy. This can ensure that thevendorAStrategyis working fine. -
After all features in
vendorAStrategyare completed and tested, we will change the release toggle to an Ops toggle to perform a canary release. -
Once the production runs stably, we should clean up the code containing the toggle logic to keep the codebase simple.
Implementation and demo
In this section, we'll demonstrate how I implemented the strategy pattern to manage multi-vendor logic, using toggles to help switch strategies at runtime and carry out the above migration plan. (You can get more details by checking my GitHub repository commit for this article)
Code before change
First, we have the base service named FooService, which would call VendorServiceFactory to get the correct strategy to execute each step's method.
@Service
@RequiredArgsConstructor
public class FooService {

  private final VendorServiceFactory vendorServiceFactory;

  public String step1(RequestModel request) {
    VendorService vendorService = vendorServiceFactory.findTargetVendor(request);
    try {
      return vendorService.step1() + " -> ";
    } catch (Exception e) {
      return "X -> ";
    }
  }
  ... other method (e.g. step2, step3).
}
Then, we need to introduce the interface VendorService, which has three methods, step1(), step2(), and step3().
public interface VendorService {
    boolean accept(RequestModel request);

    String step1();
    String step2();
    String step3();
}
For VendorServiceFactory we will inject all class that implements the VendorService interface. When every time we need to find the target vendor, we loop all of them to see whether each VendorStrategy implementation can handle the request. (Noted: the order in the list becomes important when there is any overlay in the accept logic between different strategies. please refer to this thread about the topic to handle the order issue).
@Service
@RequiredArgsConstructor
public class VendorServiceFactory {

    private final List<VendorService> vendorServices;

    VendorService findTargetVendor(RequestModel request) {
        for (VendorService strategy : vendorServices) {
            if (strategy.accept(request)) {
                return strategy;
            }
        }
        throw new RuntimeException("no match strategy");
    }
}
For the implementation of VendorService, we take VendorSV1ServiceImpl (given this is to handle the VIP users) for example,
@Service
public class VendorSV1ServiceImpl implements VendorService{
    @Override
    public boolean accept(RequestModel request) {
        return request.vendor().isVip();
    }

    @Override
    public String step1() {
        return PURPLE + "S1" + RESET;
    }

    @Override
    public String step2() {
        return PURPLE + "S2" + RESET;
    }

    @Override
    public String step3() {
        return PURPLE + "S3" + RESET;
    }
}
And for the main character of this article, the VendorAV1ServiceImpl looked like this before making any change, and will take care of normal users for the FooService.
@Service
@RequiredArgsConstructor
public class VendorAV1ServiceImpl implements VendorService {

    private final FeatureToggleApiProvider featureToggleApiProvider;

    @Override
    public boolean accept(RequestModel request) {
        return request.vendor().isNormal();
    }

    @Override
    public String step1() {
        return BLUE + "A1" + RESET;
    }

    @Override
    public String step2() {
        return BLUE + "A2" + RESET;
    }

    @Override
    public String step3() {
        return BLUE + "A3" + RESET;
    }
}
Code Change & Toggle Settings
Here, we will show the code changes in the old VendorAV1ServiceImpl and the new strategy VendorBV1ServiceImpl during the migration process. They both serve the "normal" user for FooService. Let's start!
First PR merged
In this stage, We first modify the accept method of VendorAV1ServiceImpl to below:
public class VendorAV1ServiceImpl implements VendorService {

  private final FeatureToggleApiProvider featureToggleApiProvider;

  @Override
  public boolean accept(RequestModel request) {
    Client client = featureToggleApiProvider.getFlagrApiClient();
    MutableContext evaluationContext = new MutableContext(request.userId());
    evaluationContext.add(USER_ID_KEY, request.userId());

    boolean isToggleOn = client.getBooleanValue(FLAG_KEY, false, evaluationContext);

    return !isToggleOn && request.vendor().isNormal();
  }
  ... // other methods
}
We also implement VendorBV1ServiceImpl similar to VendorAV1ServiceImpl except the accept logic is only when isToggleOn is true and the user is normal. Here, given the logic of each step is complex in this strategy, we can just implement step1 and release this version to production as follows:
@Service
@RequiredArgsConstructor
public class VendorBV1ServiceImpl implements VendorService {
private final FeatureToggleApiProvider featureToggleApiProvider;
@Override
public boolean accept(RequestModel request) {
Client client = featureToggleApiProvider.getFlagrApiClient();
MutableContext evaluationContext = new MutableContext(request.userId());
evaluationContext.add(USER_ID_KEY, request.userId());
boolean isToggleOn = client.getBooleanValue(FLAG_KEY, false, evaluationContext);
return isToggleOn && request.vendor().isNormal();
}
@Override
public String step1() {
return GREEN + "B1" + RESET;
}
@Override
public String step2() {
throw new UnsupportedOperationException("not implements yes");
}
@Override
public String step3() {
throw new UnsupportedOperationException("not implements yes");
}
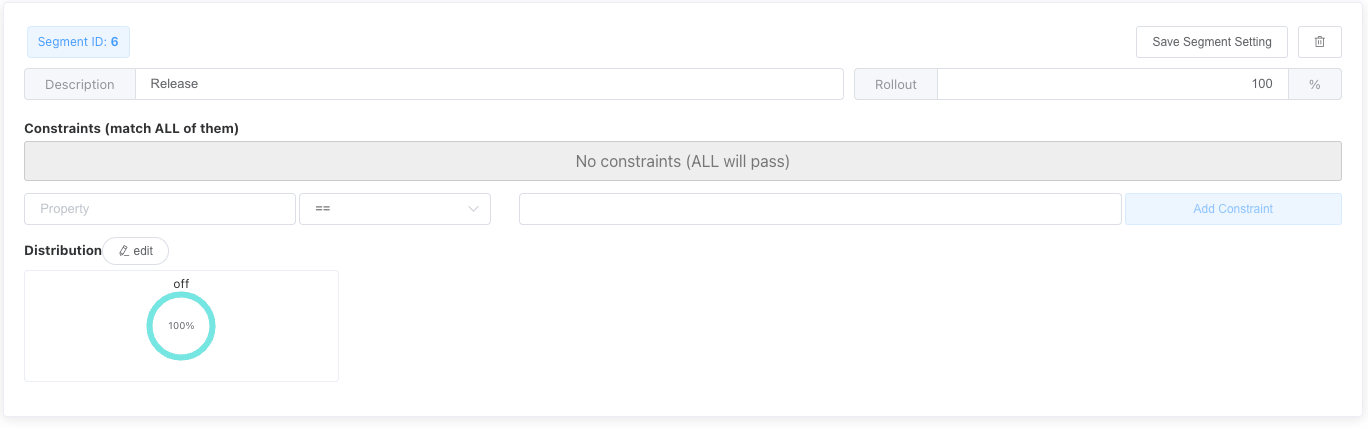
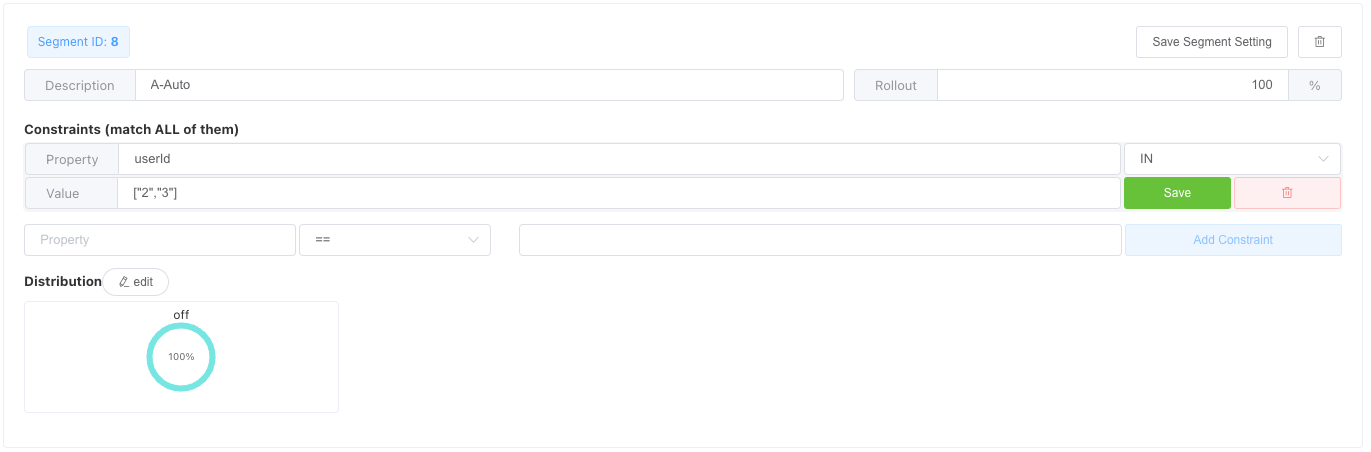
}Meanwhile, we use the toggle system (here we use OpenFlagr) to set up a toggle that always returns off.
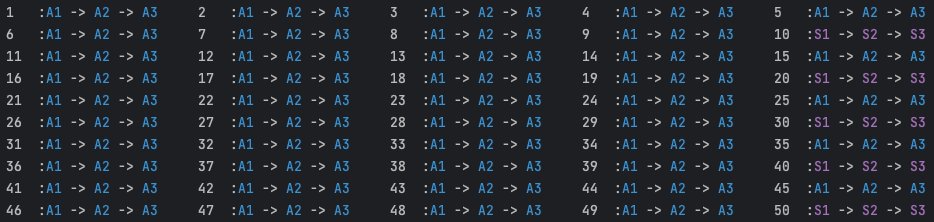
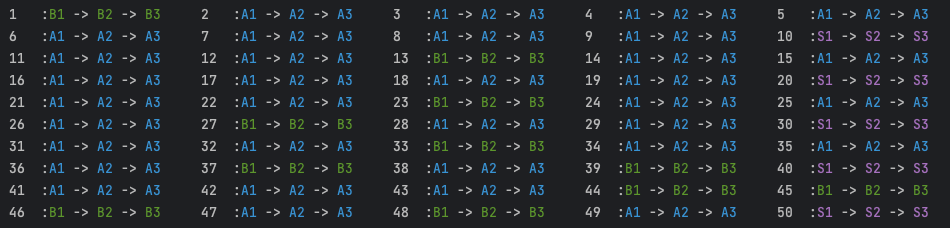
Then, we can have 50 users (where id % 10 == 0 denotes VIP users, which would print a purple string) call all the steps in fooService. All the normal users would use vendorAV1Strategy, which prints a blue string in the console.
Start testing
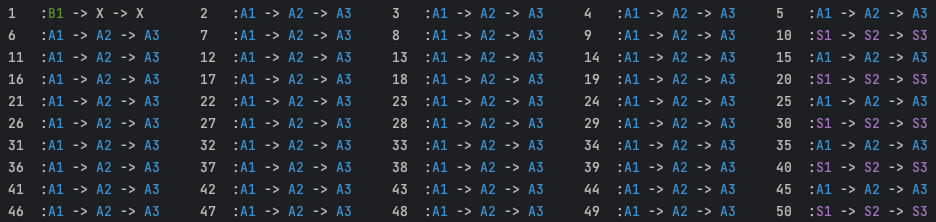
When the testers want to test if VendorBV1ServiceImpl is working well, we won't need to change any code but only add a permission toggle that enables VendorBV1ServiceImpl for some specific pilot users (use userId = 1 for example). Noted this toggle should be evaluated before the release toggle.
When we run the demo program, we can see that it prints a green B1 followed by two white X symbols (indicating that only step1 is implemented) on the console for user1, while the output for other users remains the same.
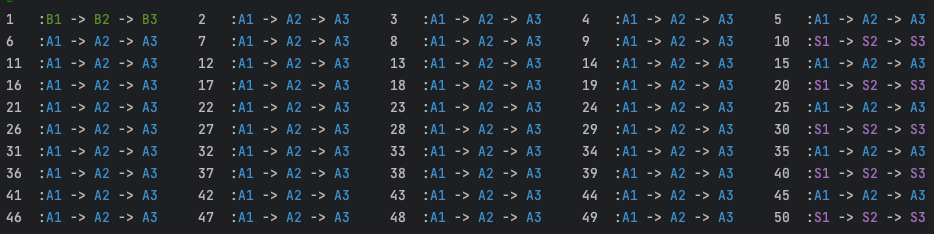
Dev completed
During this stage, we will implement step2 and step3 in VendorBV1ServiceImpl, so we can see a complete green string for user1.
Production test complete
The same toggle setting can be set on the toggle system in production, for testers to perform a pilot test. In this stage, it's important to make sure that real users won't execute VendorBV1ServiceImpl methods. For the automation test and regression test, we might also set specific users to always run VendorAV1ServiceImpl.
After the test is complete and the bugs are fixed, we can start the canary release by removing the release toggle and turning it to an ops toggle (it should still be evaluated after all permission toggles).
Production stable
First, we set the rollout percentage to 25%.
If no problems are found, we then increase to 50%, 75%, and 100%. (read more about performing canary releases by feature toggles on the post I've made on my personal blog)
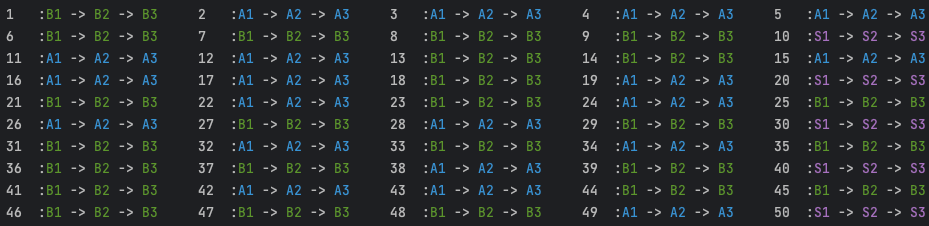
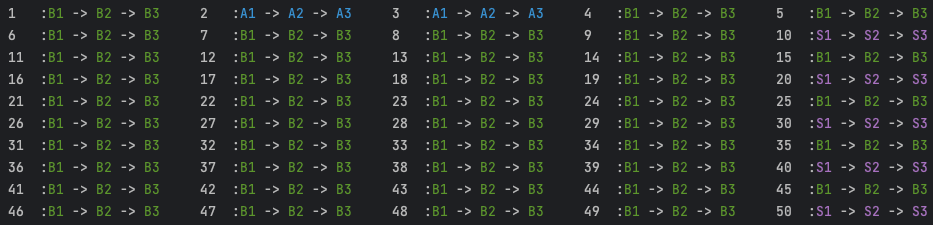
After keeping the canary ops toggle as 100% rollout for a while, we can say that VendorBV1ServiceImpl is stable enough.
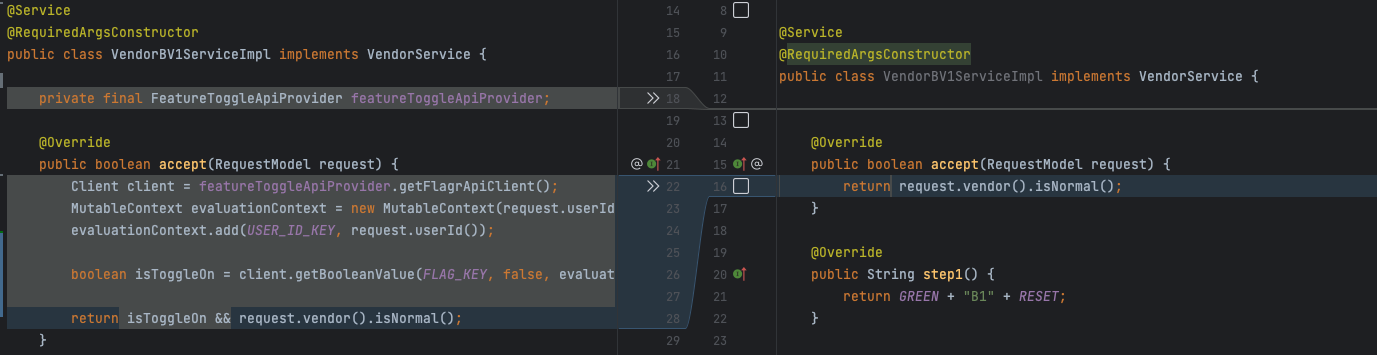
Remove toggle code
Once VendorBV1ServiceImpl is stable enough, we can start to remove the related code to keep the codebase clean. First, we can remove the entire VendorAV1ServiceImpl.java file, and then modify VendorBV1ServiceImpl as follows:
After this version is deployed in production, we can also remove the toggle setting in the toggle system.
Summary
In this article, we proposed a migration schedule using three types of toggles to manage everything from development to testing and release. Ultimately, we can see the power of feature toggles in making LSC easier and more flexible. One notable point is that once the feature development work is complete, we won't need to change any code but can still manage feature execution for testing and canary releases.