前言
就在 20250410 的凌晨, Google 就宣佈了 ADK (Google Agent SDK) 的發佈。
本篇文章將介紹如何透過 Google Agent SDK (ADK) 來打造一個最簡單的 LINE Bot 功能,作為之後 MCP 與其他功能的起始專案。 (想不到才沒隔多久,就可以換成 Google ADK XD)
範例程式碼: https://github.com/kkdai/linebot-adk
快速簡介 Google ADK
Repo: https://github.com/google/adk-python
Google 推出的Agent Development Kit (ADK),這是一個開源框架,旨在簡化智能多代理系統的開發。以下是內容的重點:
- ADK是一個開源框架,專為開發多代理系統而設計,提供從構建到部署的全方位支持。
- 它支持模組化和可擴展的應用程序開發,允許多個專業代理的協作。
功能特點:
- 內建串流:支持雙向音頻和視頻串流,提供自然的人機互動。
- 靈活的編排:支持工作流代理和LLM驅動的動態路由。
- 集成開發者體驗:提供強大的CLI和可視化Web UI,便於開發、測試和調試。
- 內建評估:系統性地評估代理性能。
- 簡易部署:支持容器化部署。
支援視覺化測試 WebUI
(Refer: https://google.github.io/adk-docs/get-started/quickstart/#run-your-agent))
可以在本地端透過 WebUI 來做一些快速的測試,快速部署到 Google Cloud 。 相關的功能也會在後續的文章中陸續提到。
整合 LINE Bot SDK 需要注意的事項:
接下來跟大家講一下,要加上 LINE Bot SDK 有哪一些需要注意的地方。
範例程式碼: https://github.com/kkdai/linebot-adk
Agent 起始的流程
目前是放在 Services 啟動的時候,就將 Agent 初始化。
# Initialize ADK client
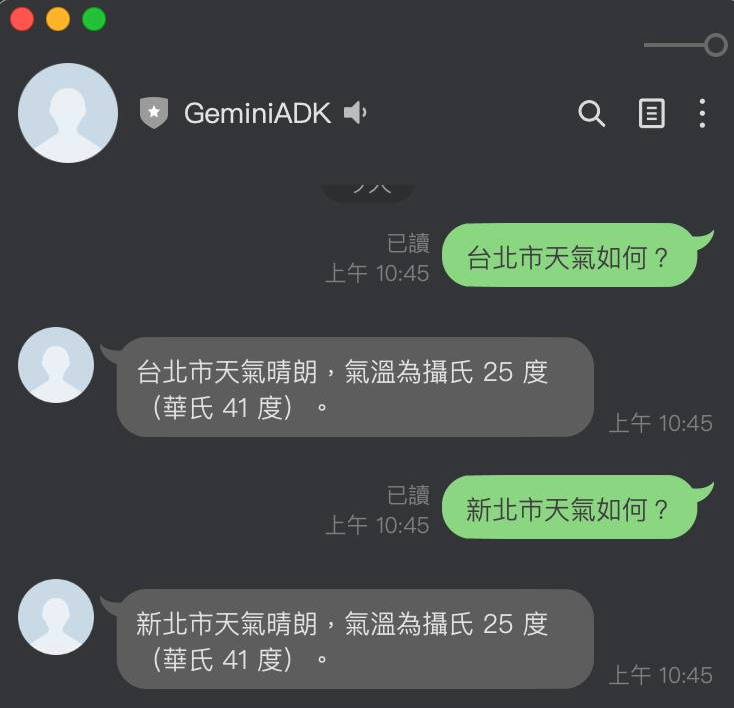
root_agent = Agent(
name="weather_time_agent",
model="gemini-2.0-flash-exp",
description=(
"Agent to answer questions about the time and weather in a city."
),
instruction=(
"I can answer your questions about the time and weather in a city."
),
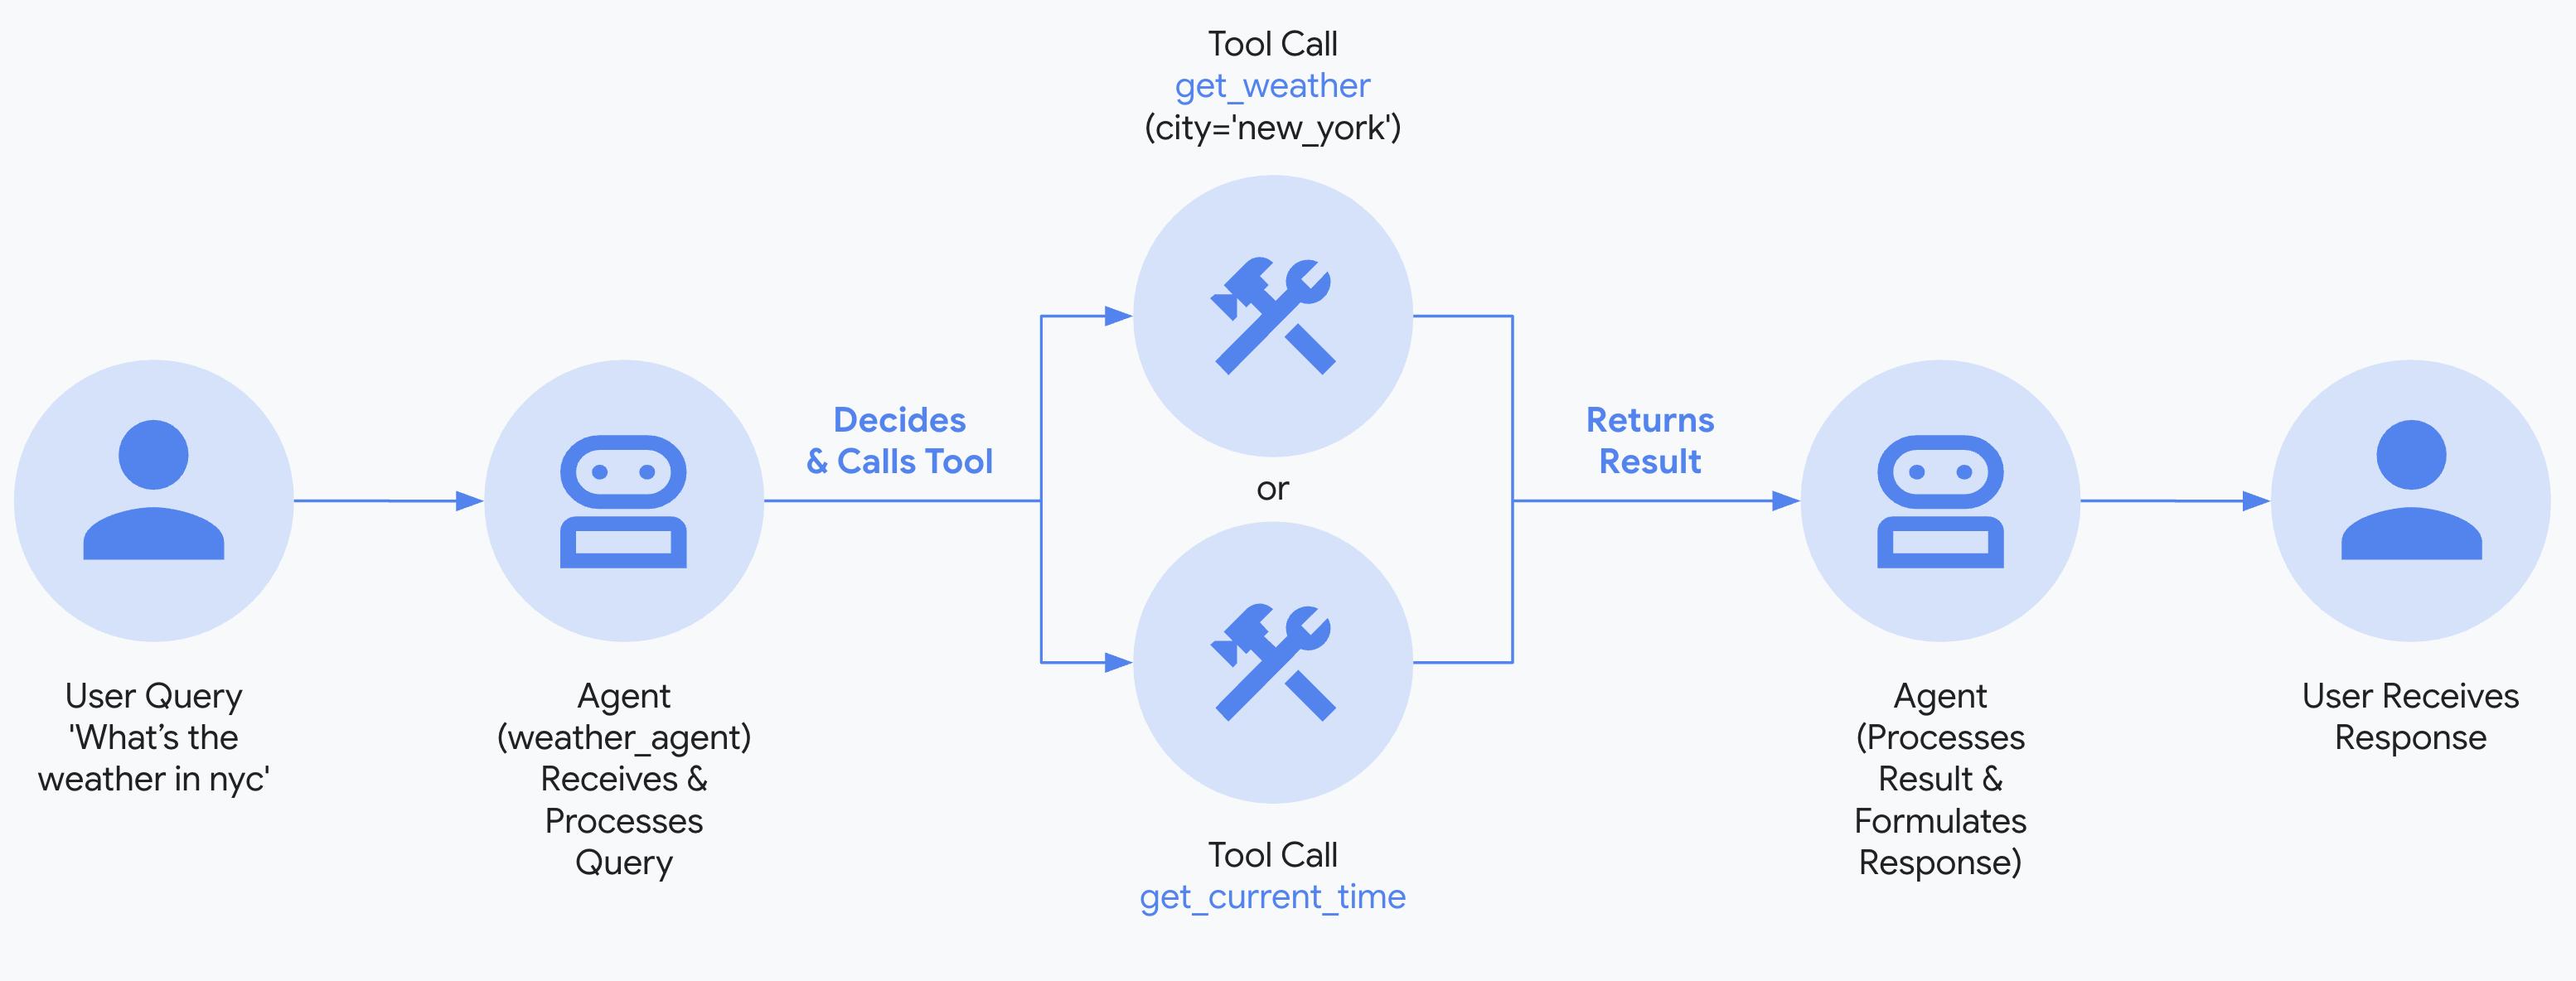
tools=[get_weather, get_current_time],
)
print(f"Agent '{root_agent.name}' created.")
建立 Agent 之後,接下來要準備好 Runner 來執行 Agent 溝通的工作。
# Key Concept: Runner orchestrates the agent execution loop.
runner = Runner(
    agent=root_agent,  # The agent we want to run
    app_name=APP_NAME,   # Associates runs with our app
    session_service=session_service  # Uses our session manager
)
這樣之後就可以透過 async 來呼叫這個 runner 來取的 agent 的結果。(後續會提到)
針對不同使用者,使用記憶體來記憶對話

在 ADK 中,有蠻多相關的 Memory Services 可以使用 :
InMemoryMemoryService- 使用 Serives 的記憶體來儲存,可以作為基本的儲存方式。但是如果使用 CloudRun ,當服務重啟就會消失掉。
VertexAiRagMemoryService- 使用 VertexAI 的 RAG 服務,這邊可能會有額外的儲存空間的費用會產生。
接下來分享一下,如何使用 InMemoryMemoryService 來儲存不同用戶的對話記憶。
async def get_or_create_session(user_id):
if user_id not in active_sessions:
# Create a new session for this user
session_id = f"session_{user_id}"
session = await session_service.create_session(
app_name=APP_NAME,
user_id=user_id,
session_id=session_id
)
active_sessions[user_id] = session_id
print(
f"New session created: App='{APP_NAME}', User='{user_id}', Session='{session.id}'")
else:
# Use existing session
session_id = active_sessions[user_id]
print(
f"Using existing session: App='{APP_NAME}', User='{user_id}', Session='{session_id}'")
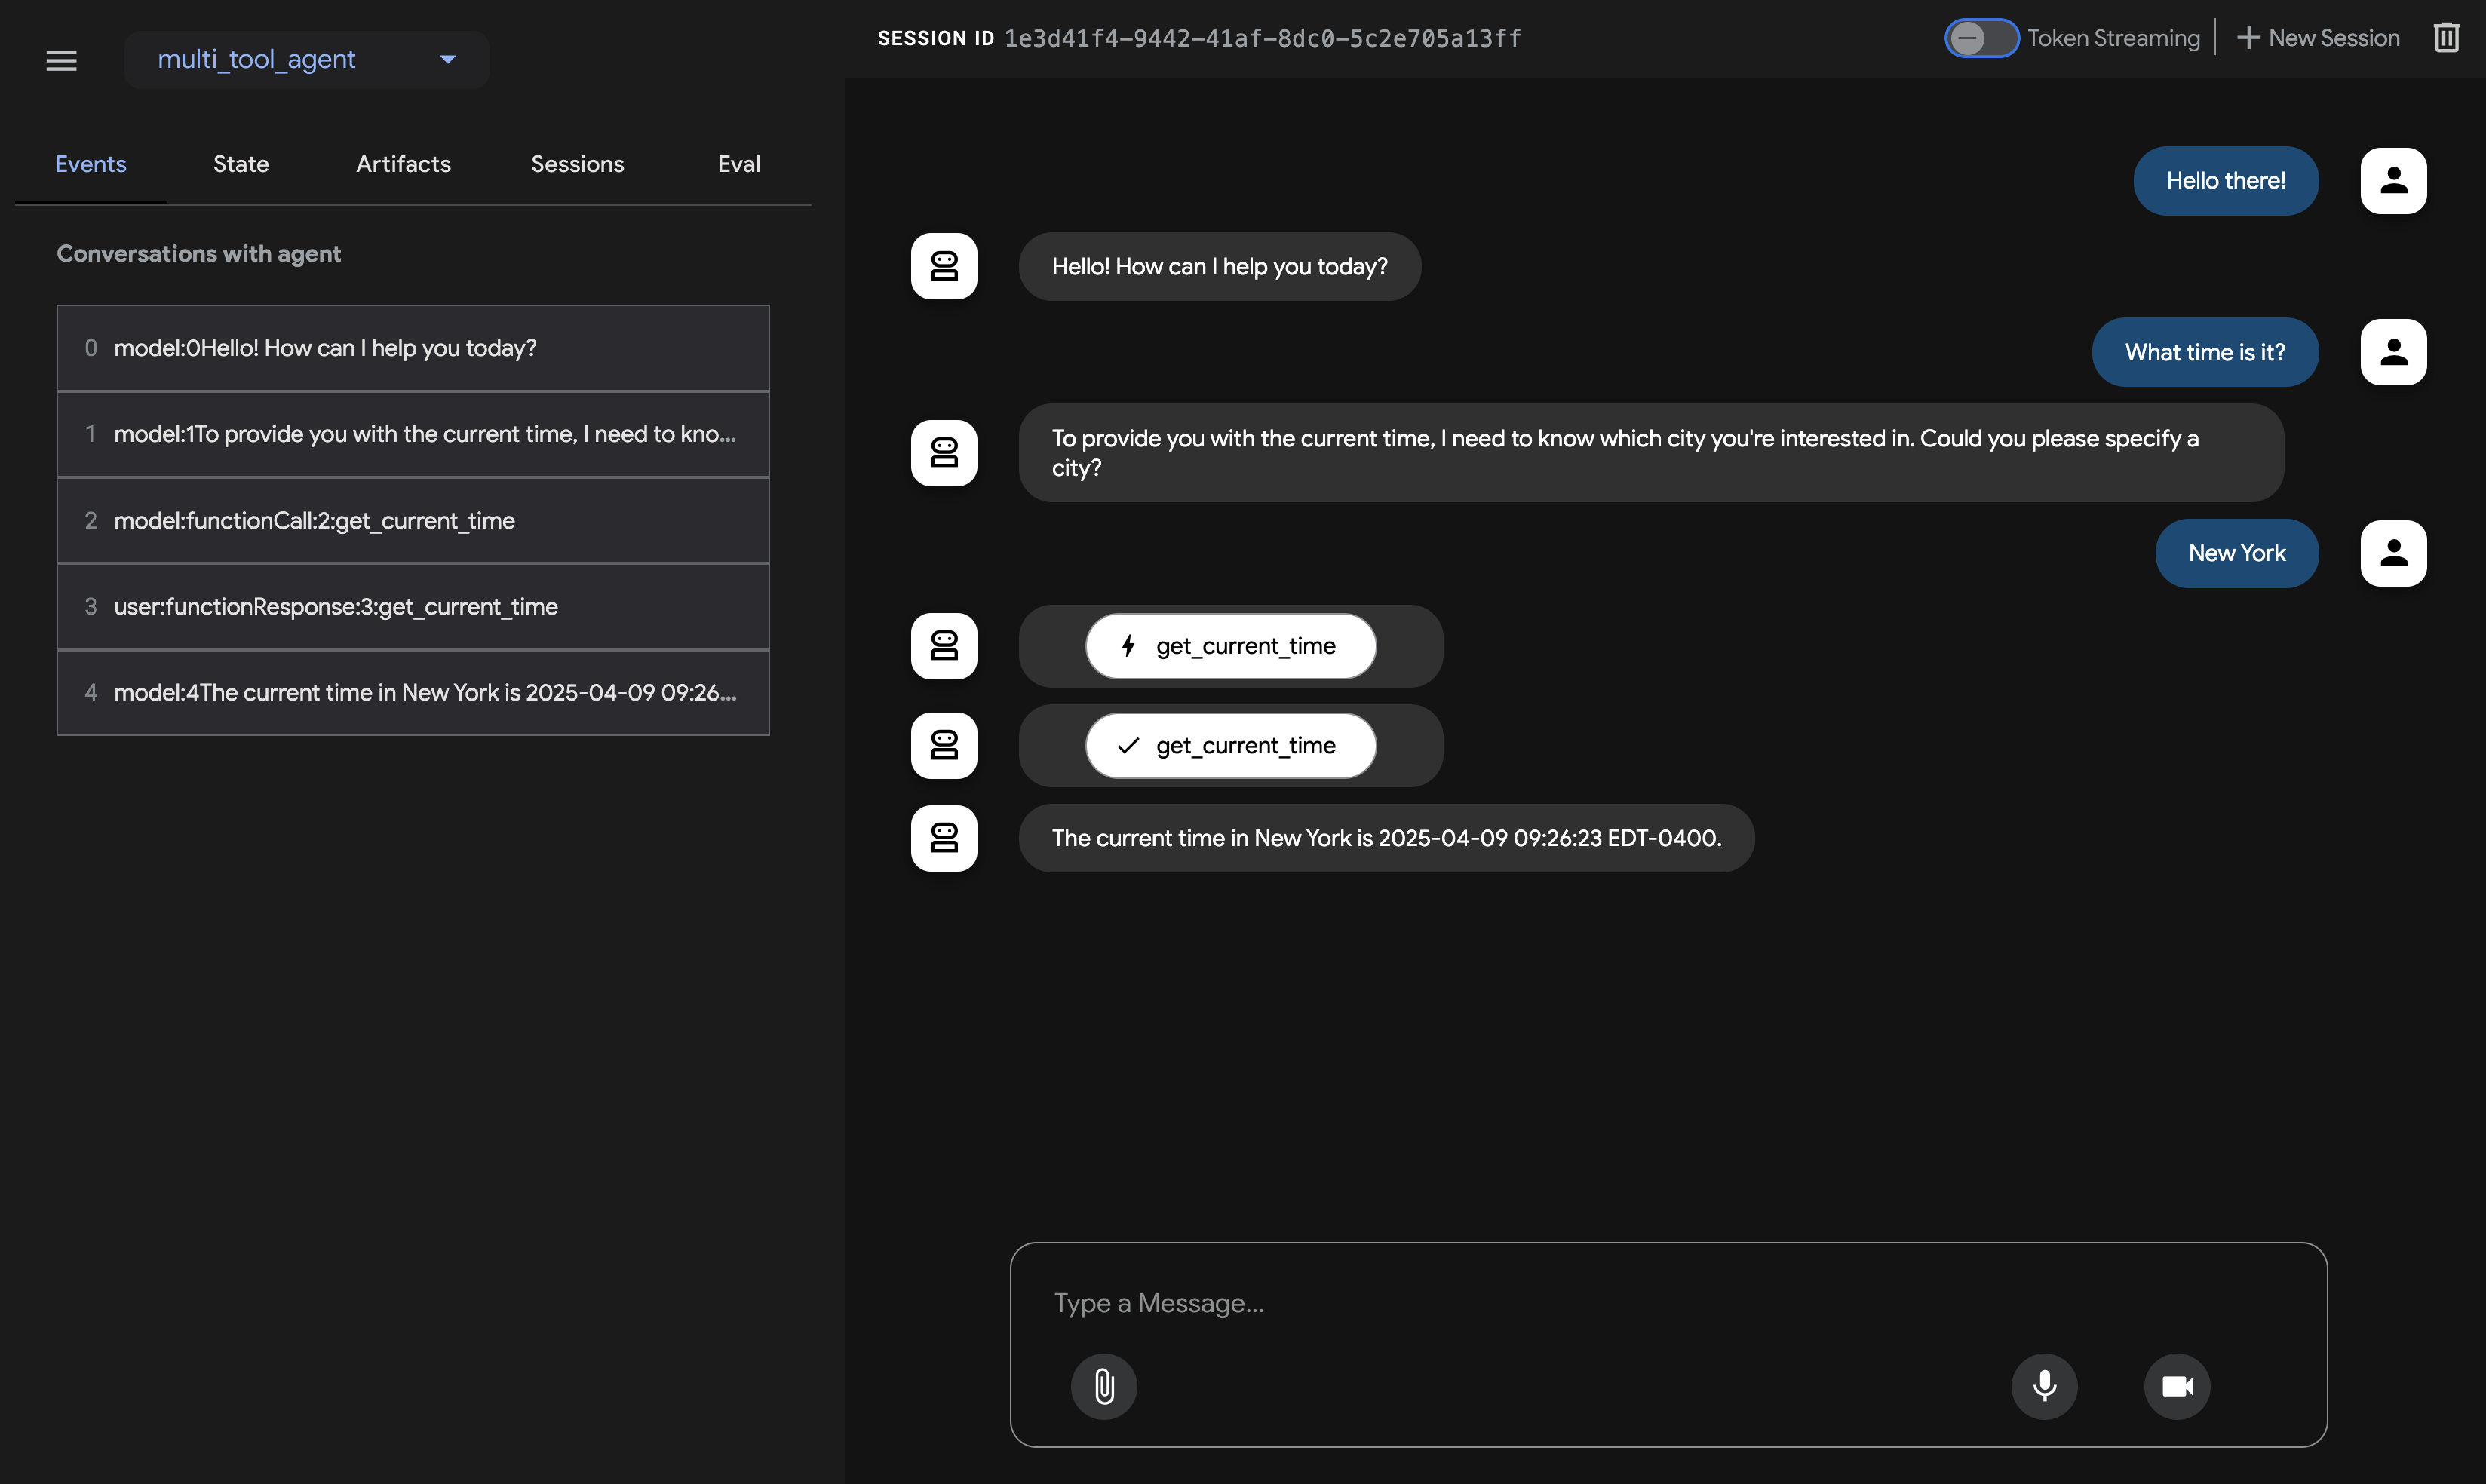
return session_id首先以上 get_or_create_session() 可以透過 user_id 來建立或是取得使用者的 Session ID。這樣可以讓 ADK 透過正確的 Session ID 來繼續相關的對話。
async def call_agent_async(query: str, user_id: str) -> str:
    """Sends a query to the agent and prints the final response."""
    print(f"\n>>> User Query: {query}")

    # Get or create a session for this user
    session_id = await get_or_create_session(user_id)

    # Prepare the user's message in ADK format
    content = types.Content(role='user', parts=[types.Part(text=query)])

    final_response_text = "Agent did not produce a final response."  # Default

    try:
        # Key Concept: run_async executes the agent logic and yields Events.
        # We iterate through events to find the final answer.
        async for event in runner.run_async(user_id=user_id, session_id=session_id, new_message=content):
            # Key Concept: is_final_response() marks the concluding message for the turn.
            if event.is_final_response():
                if event.content and event.content.parts:
                    # Assuming text response in the first part
                    final_response_text = event.content.parts[0].text
                elif event.actions and event.actions.escalate:  # Handle potential errors/escalations
                    final_response_text = f"Agent escalated: {event.error_message or 'No specific message.'}"
                # Add more checks here if needed (e.g., specific error codes)
                break  # Stop processing events once the final response is found
    except ValueError as e:
        # Handle errors, especially session not found
        print(f"Error processing request: {str(e)}")
        # Recreate session if it was lost
        if "Session not found" in str(e):
            active_sessions.pop(user_id, None)  # Remove the invalid session
            session_id = await get_or_create_session(user_id)  # Create a new one
            # Try again with the new session
            try:
                async for event in runner.run_async(user_id=user_id, session_id=session_id, new_message=content):
                    # Same event handling code as above
                    if event.is_final_response():
                        if event.content and event.content.parts:
                            final_response_text = event.content.parts[0].text
                        elif event.actions and event.actions.escalate:
                            final_response_text = f"Agent escalated: {event.error_message or 'No specific message.'}"
                        break
            except Exception as e2:
                final_response_text = f"Sorry, I encountered an error: {str(e2)}"
        else:
            final_response_text = f"Sorry, I encountered an error: {str(e)}"

    print(f"<<< Agent Response: {final_response_text}")
    return final_response_text
透過以上的程式碼,每一次使用者的資訊 (Query, User_ID). 傳入後,透過不同用戶的 user_id 來建立(或取得)不同溝通的紀錄(Session) 。
再來透過不同的 Session 來跑 ADK 的功能查詢。 (主要是透過 async for event in runner.run_async(user_id=user_id, session_id=session_id, new_message=content): )
這樣就可以達成不同使用者,有不同的記憶內容。也不用另外來呼叫相關記憶體相關的 Function 。
快速總結與未來發展
但是由於 Agent SDK 內建許多有用的 WebUI 還有已經打包好許多的工具。 讓未來的開發上不會有後顧之憂,接下來也會將 MCP Server,語音或是多模態相關的應用整理近 ADK 來跟大家分享,敬請期待。
![[Agent LINEBot 系列] 第二篇: 輕鬆升級!從 Function Call 轉換為 Agent 模式的 ADK 實作指南](/static/93cde8b7038076ff59cd257ea57852c5/d990e/b50dd7ab39e1433395c9f0c82af5061b.png)