The size of an iOS app can grow with every release: a new SDK, higher-resolution images, or content for an offline feature. Over time, these additions can lead to longer downloads and more storage space being used on users' devices.
Finding the right place to optimize starts with measurement. Assets may dominate one app, while compiled code or bundled dependencies account for most of another. The size of a local build also doesn't tell the whole story of what users download and store on their devices.
In this article, we'll use Xcode and App Store Connect to measure app size, identify its largest contributors, and verify the results of individual changes. We'll explore improvements to assets, code, dependencies, and content delivery, along with their trade-offs. Let's start with what "app size" actually means.
Understanding app size metrics
The four metrics
These metrics overlap, but they are not interchangeable. When reporting an app-size improvement in a pull request (PR) description, benchmark report, or team update, specify which metric changed and where you measured it.
| Metric | What it measures | How this guide evaluates it |
|---|---|---|
| App Store download size | The compressed app payload delivered for a fresh installation; essential content also contributes to the initial download | Compressed App Thinning report values for the app bundle, followed by App Store Connect and essential-content metadata |
| Initial installed footprint | Storage occupied by the installed app and content downloaded before first launch | Uncompressed App Thinning report values for the app bundle, followed by processed install-size estimates and on-device storage checks |
| Update delivery size | Changed content delivered when moving from an installed version to a newer one | Bundle differences for diagnosis; processed update size when available for measurement |
| Post-use storage growth | Caches, databases, logs, extracted files, and downloaded content created after launch | Representative usage followed by a writable-container or iPhone Storage inspection |
One change can move these metrics differently. Deferring optional content can reduce the initial download and installed footprint, but that content eventually occupies device storage when the user downloads it.
Background Assets can also arrive before first launch. Record essential packs and any prefetched content separately from the app bundle, and use the same download state when comparing installations. A smaller app bundle alone does not establish a smaller total installation cost.
Users can inspect storage size directly. The App Store product page's Information → Size field reports install size, while iPhone Storage separates App Size from Documents & Data. Use App Store Connect to compare compressed download size with install size. See Apple's file-size definitions.
For apps using Apple-hosted essential asset packs, the product page can show an "Up to" size that includes essential content. Apple documents how this is calculated in Apple-hosted asset pack size limits.
| App Store listed install size | On-device app size and Documents & Data |
|---|---|
|
|
|
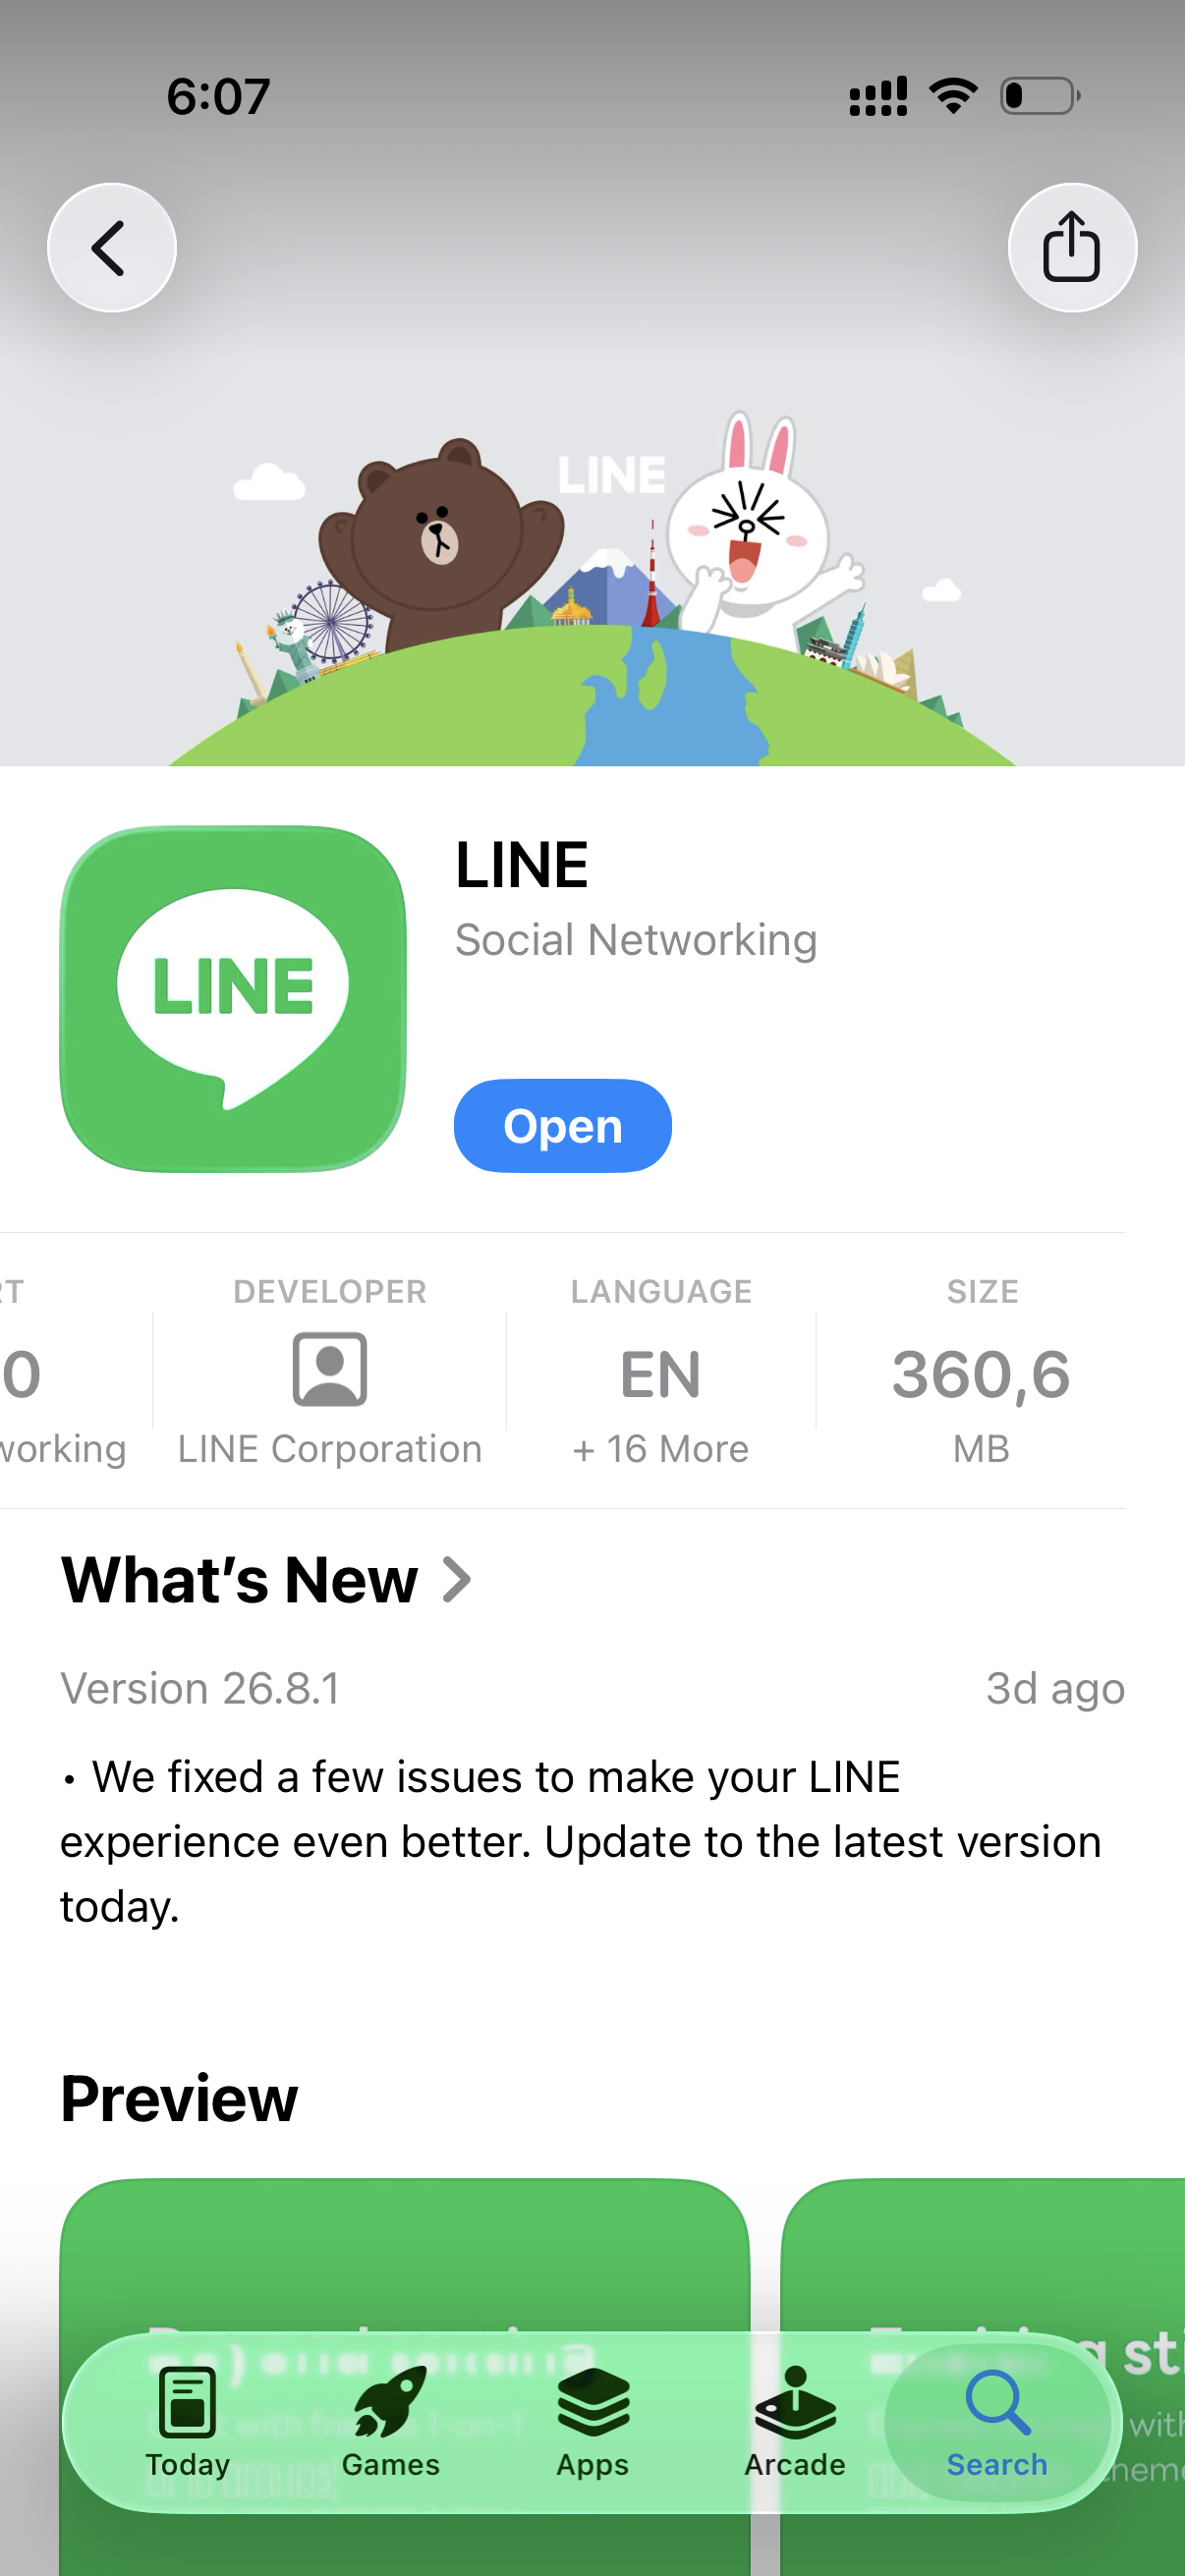
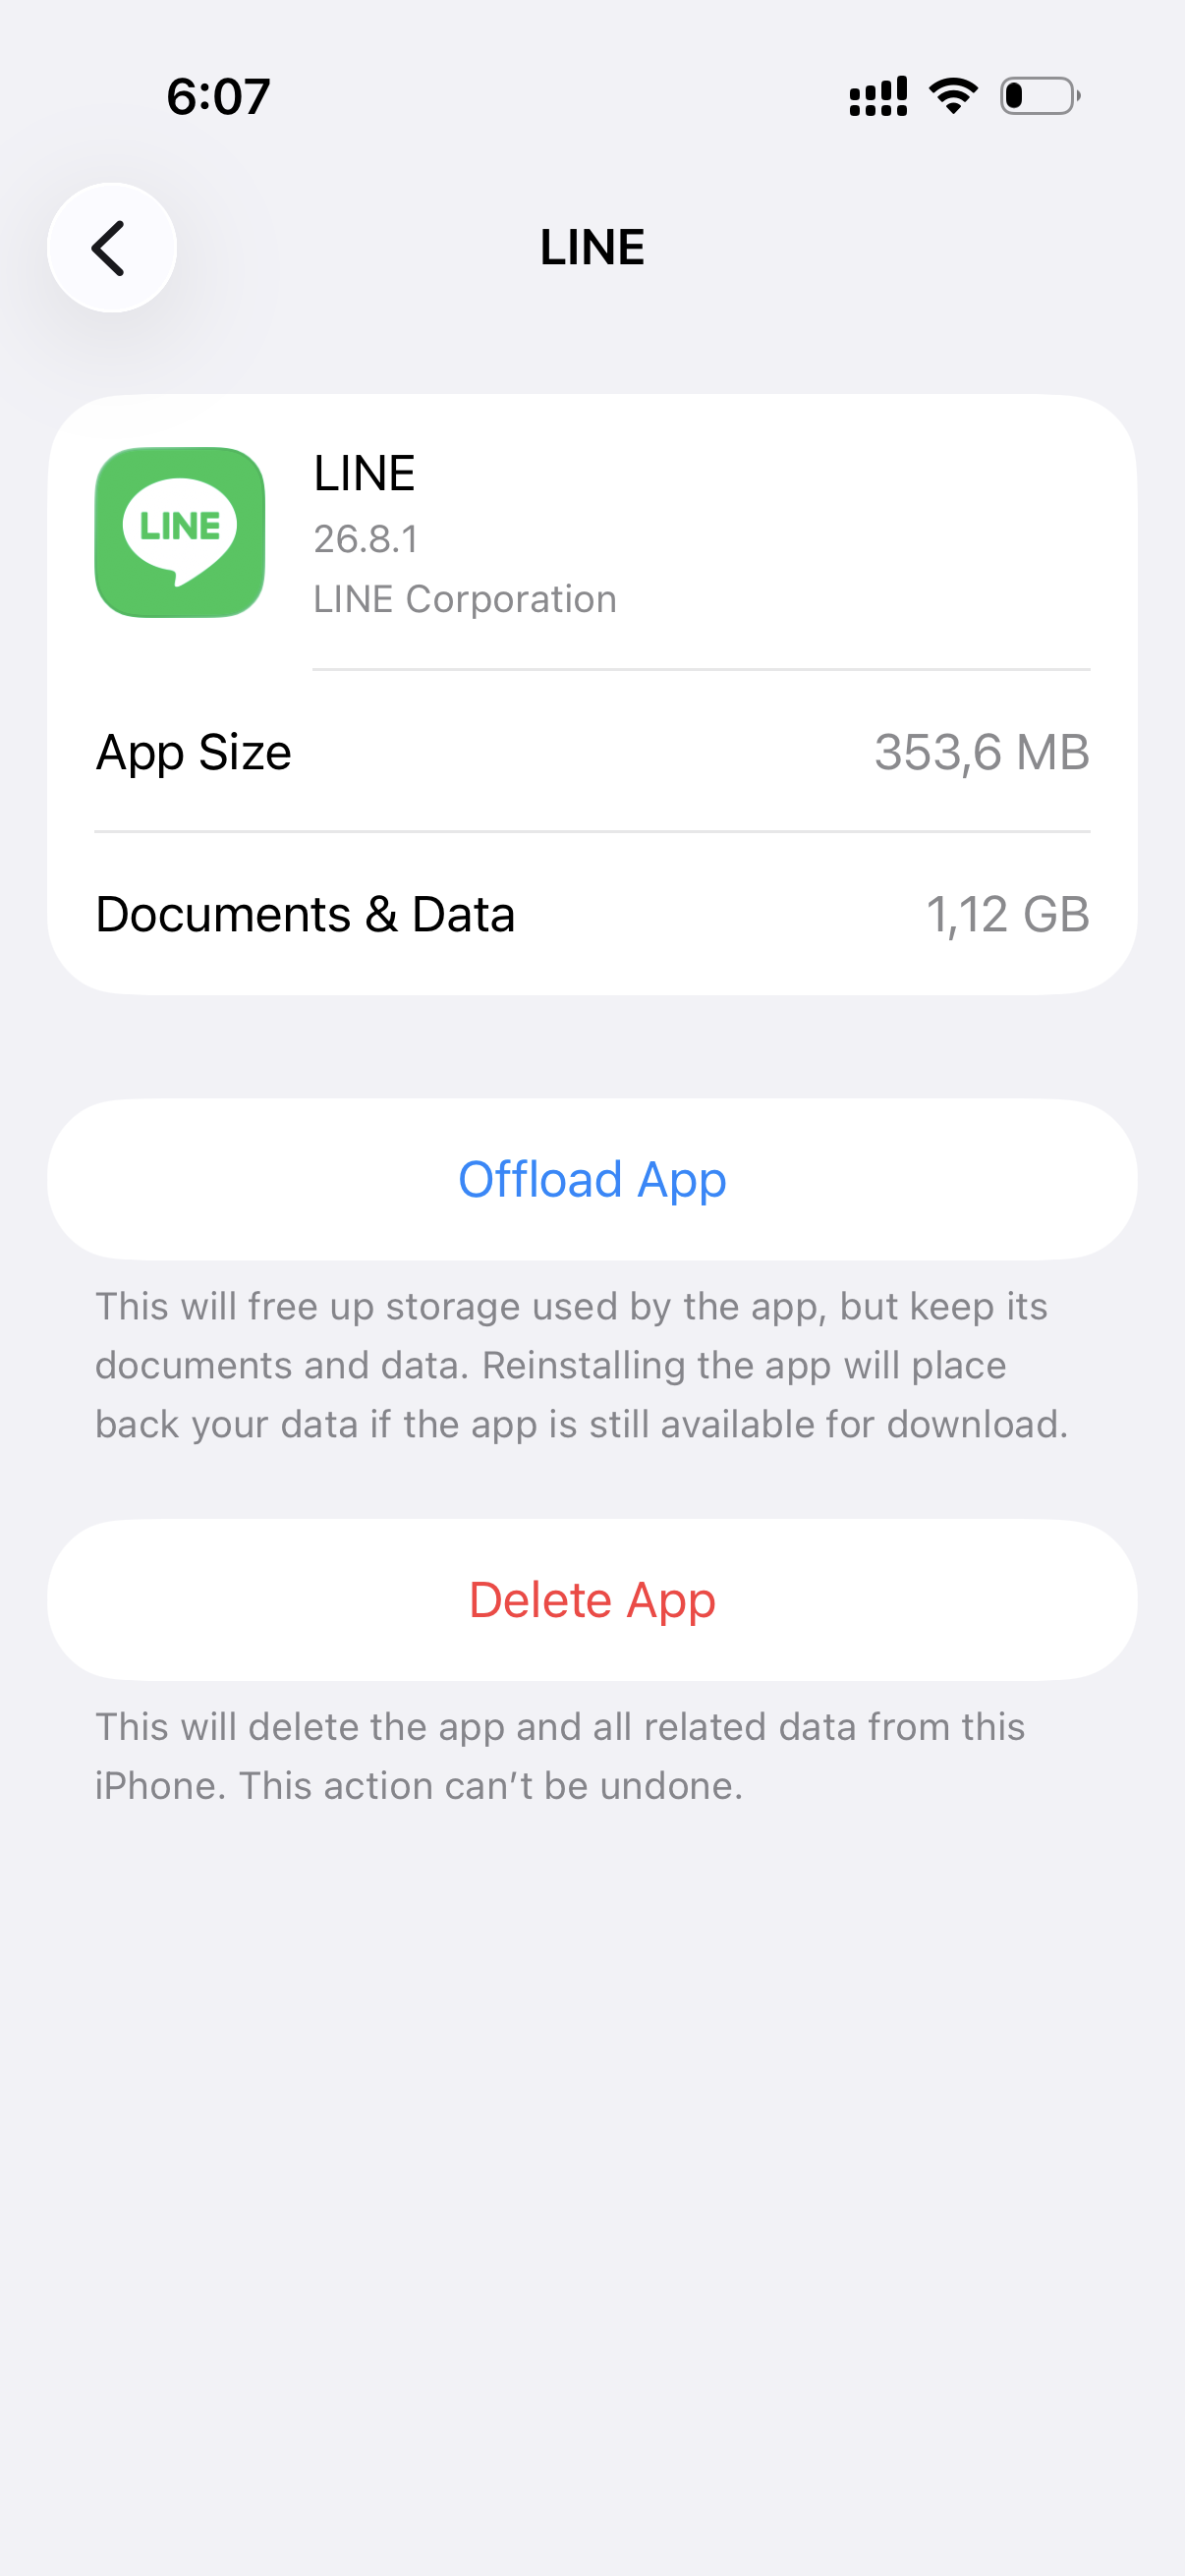
The App Store product page lists install size. iPhone Storage shows App Size and Documents & Data, including storage accumulated through downloads and use.
Measuring app size
Local artifacts such as APP, XCARCHIVE, and IPA files help diagnose size, but their file sizes are not interchangeable with App Store delivery measurements. An archive can contain debug symbols and other build artifacts. A universal IPA file can contain resources for multiple devices. For an exported thinned variant, the App Thinning Size Report estimates the app bundle's download and installed sizes for the corresponding device configuration. Apple's final processing can still change these sizes.
Generate the App Thinning Size Report
Create a Release archive, then export it using these ExportOptions.plist settings:
| Key | Value |
|---|---|
method | debugging (Development) |
destination | export |
thinning | <thin-for-all-variants> |
stripSwiftSymbols | true |
For manual signing, also provide signingStyle=manual, your teamID, and a provisioningProfiles mapping for each app or extension.
xcodebuild -exportArchive \
  -archivePath "MyApp.xcarchive" \
  -exportPath "SizeReport" \
  -exportOptionsPlist "ExportOptions.plist"
Open SizeReport/App Thinning Size Report.txt for the device-specific size estimates.
A report entry looks like this:
App Thinning Size Report for All Variants of MyApp

Variant: MyApp-device-variant.ipa
Supported variant descriptors:
[device: <device-model>, os-version: <os-version>]

App size: 112 MB compressed, 260 MB uncompressed
Use the compressed value to estimate the app bundle's download size and the uncompressed value to estimate its installed size. Track separately delivered Background Assets alongside these values, including essential packs and any content prefetched before first launch. If a variant is unexpectedly large, inspect its asset catalogs, target membership, bundled resources, and linked frameworks.
To inspect the bundle, choose a thinned IPA file using the report's variant descriptors. The export can also include a universal IPA file, so check the descriptors rather than choosing by filename alone. Extract the selected variant into a fresh directory:
VARIANT_IPA_PATH="/path/to/SizeReport/MyApp-device-variant.ipa"
EXTRACT_PATH="$(mktemp -d)"

ditto -x -k "$VARIANT_IPA_PATH" "$EXTRACT_PATH"
find "$EXTRACT_PATH/Payload" -maxdepth 1 -type d -name '*.app' -print
Use the printed APP file path as APP_BUNDLE_PATH in the bundle-inventory command in the next section.
Verify app thinning
App thinning is mostly automatic for App Store and TestFlight distribution, but verify it instead of inferring it from a local .ipa. In the App Thinning Size Report, compare variants that are expected to contain different binary or asset slices.
Similar sizes do not necessarily indicate a problem when most content is shared. If device-specific assets appear in every variant, check their asset catalog settings and look for loose files outside asset catalogs. Record representative device and OS variants as the baseline. For every comparison, use the same release configuration, Xcode version, signing method, export method, and variant descriptors. Repeat the comparison with processed App Store Connect values.
The local report helps catch size issues before upload, but it is still an estimate. After Apple processes the build and applies app thinning, confirm the processed size in App Store Connect:
- Open Apps → your app → TestFlight → platform.
- Expand the version and select the target build.
- Open Build Metadata → General Information → App File Sizes.
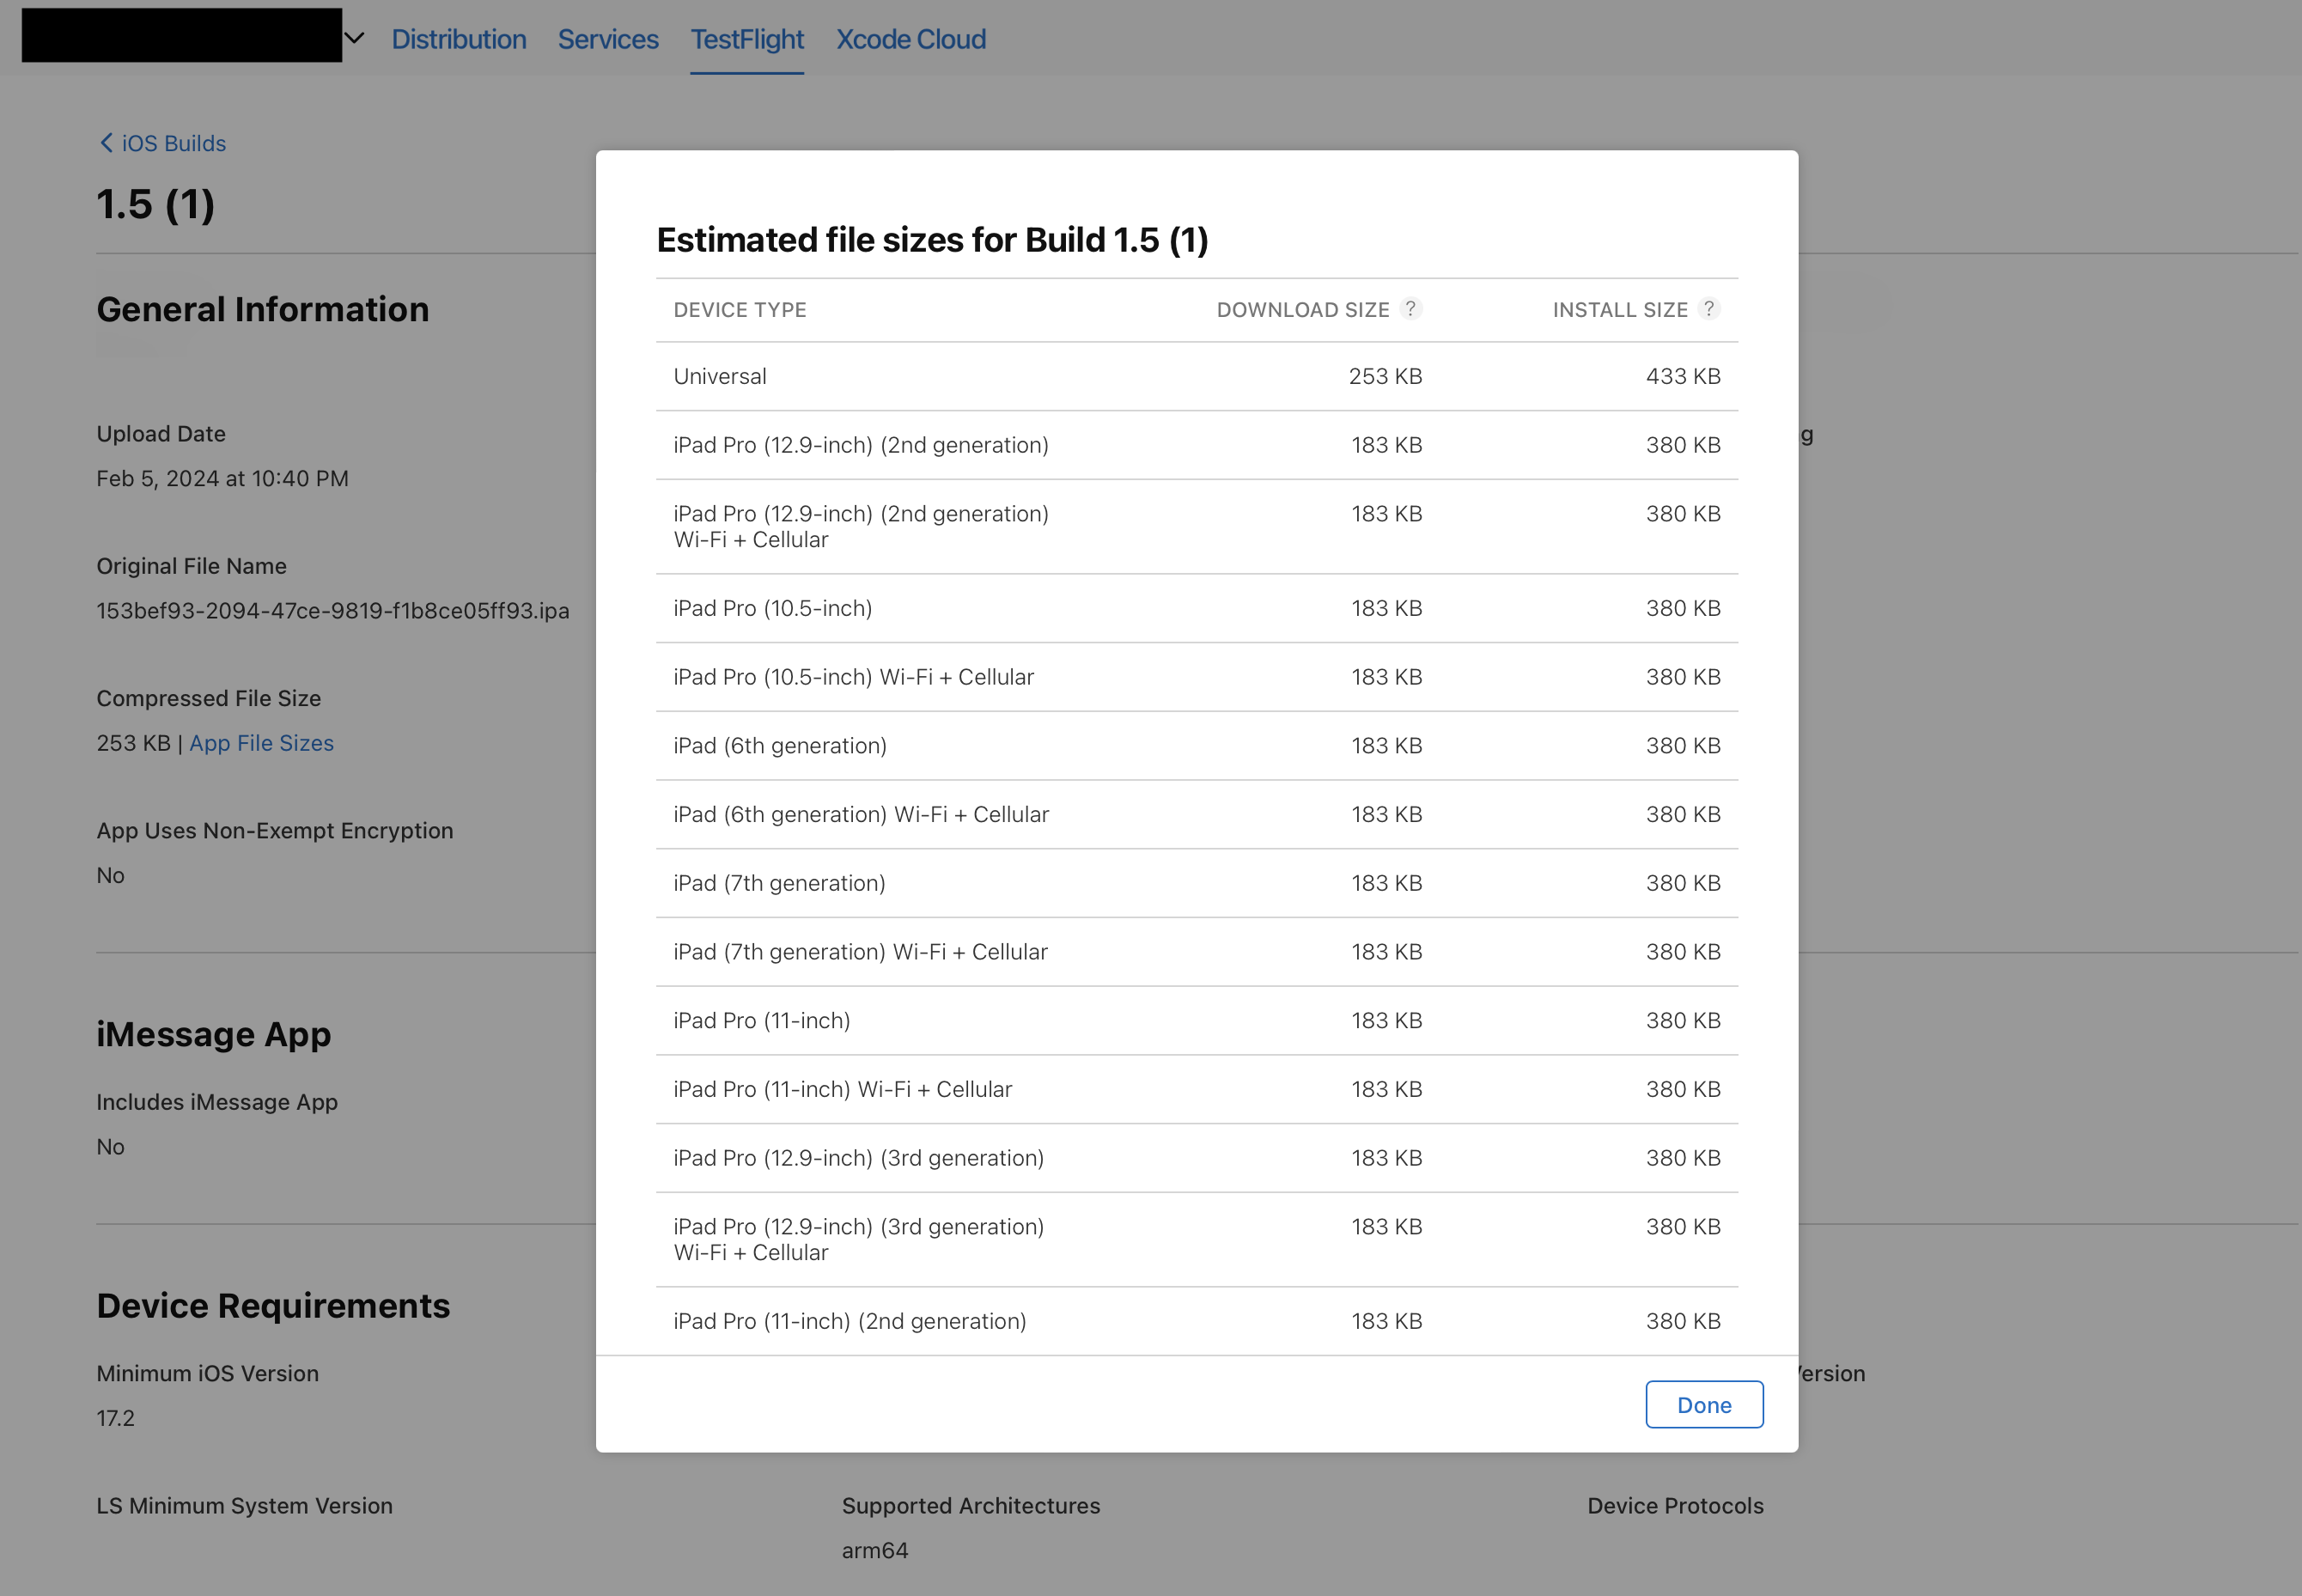
These App Store Connect values provide the most representative estimates available in the development workflow. They are still estimates: Apple can add digital rights management (DRM) and recompress the app before distribution, and observed TestFlight sizes can differ from App Store delivery. For Background Assets, also check the build's essential-content metadata and measure the relevant content on-device.
See Apple's app-size measurement workflow and App Store Connect file-size guidance.
Analyze bundle and binary contributors
Start with the exported thinned .app and inventory the whole bundle before focusing on symbols. Group the largest items into the main executable, Frameworks, PlugIns, asset catalogs and loose resources, localized content, media, databases, and machine learning (ML) models.
On macOS, choose Show Package Contents in Finder, or list the largest files from Terminal:
APP_BUNDLE_PATH="/path/to/MyApp.app"
find "$APP_BUNDLE_PATH" -type f -print0 |
  xargs -0 stat -f '%z %N' |
  sort -n |
  tail -30
This bundle-level view shows whether the largest contributor is code or content. The command reports logical, uncompressed file sizes, so treat them as diagnostic signals rather than download-size estimates; compression and App Store processing can change their impact.
If the main executable or another target's binary is a meaningful contributor, use a link map file for that target. A link map shows which object files and symbols were linked into the final executable, making it useful for finding large generated files, static libraries, C++ templates, or third-party SDKs.
Enable it for a Release build:
Xcode → [Your Target] → Build Settings → search "link map"
├── Write Link Map File (LD_GENERATE_MAP_FILE): Yes
└── Path to Link Map File (LD_MAP_FILE_PATH): default is usually fine
Then build the app and inspect the generated .txt file under DerivedData. A raw link map does not provide a ready-made size summary. To make it useful, parse the # Symbols section, group symbol sizes by file index, then resolve each index using the # Object files section.
Conceptual link map excerpt: This illustrates how live symbols map to object files.
# Object files:
[ 12] /MyApp/Build/Objects-normal/arm64/ProfileViewModel.o
[ 48] /MyApp/Build/Objects-normal/arm64/GeneratedAPIModels.o
[ 91] /Pods/AnalyticsSDK/libAnalyticsSDK.a(EventSerializer.o)
[126] /Pods/MapSDK/libMapSDK.a(RouteRenderer.o)

# Symbols:
# Address      Size        File  Name
0x100A01000    0x00003000  [12]  _$s5MyApp16ProfileViewModel...
0x100A12000    0x00002F40  [48]  _$s5MyApp18GeneratedAPIModels...
0x100A14F40    0x000031A0  [48]  _$s5MyApp20GeneratedUserResponse...
0x100B01000    0x00018400  [91]  _AnalyticsSerializeEventBatch
0x100C22000    0x0000F800  [126] _MapSDKRouteRendererDrawPolyline
Interpretation: Treat link map symbol sizes as attribution, not full binary accounting. Summed # Symbols entries do not equal the final Mach-O or App Store size: headers, linker-generated data, alignment and padding, stripping, code signatures, and other unattributed bytes are not fully represented, while inlining, whole-module optimization, and link-time optimization can blur object-file ownership. Exclude # Dead Stripped Symbols from live-size attribution; generate a link map for every binary target and architecture, then verify the final thinned bundle and size report.
Worked example: Measure one change at a time
Illustrative case — synthetic data: The app, files, report values, and savings below are fabricated to demonstrate the workflow. They are not measurements from LINE or any production app, and readers should not expect the same savings.
Use the same Release configuration, Xcode version, signing method, export method, and exact device/OS variant for every comparison. The baseline App Thinning report for MyApp shows 112 MB compressed and 260 MB uncompressed.
Inventorying the exported thinned app identifies where that uncompressed footprint comes from:
| Contributor | Logical size |
|---|---|
| Main executable | 55 MB |
| Frameworks | 41 MB |
| Asset catalogs and loose media | 78 MB |
| Optional tutorial pack | 32 MB |
| Core ML model | 26 MB |
| Other bundled content | 28 MB |
| Total | 260 MB |
Assets and optional content dominate, so this example does not begin by restructuring code or replacing dependencies. Apply one change, rebuild, and regenerate the report for the same variant after every step:
| Build | Single change | Compressed | Uncompressed | Change from prior build |
|---|---|---|---|---|
| Baseline | None | 112 MB | 260 MB | — |
| A | Remove confirmed-unused resource candidates | 109 MB | 256 MB | −3 MB / −4 MB |
| B | Resize and re-encode oversized media | 96 MB | 234 MB | −13 MB / −22 MB |
| C | Move the 32 MB optional tutorial pack to nonessential on-demand delivery | 81 MB | 202 MB | −15 MB / −32 MB |
The synthetic local estimate falls by 31 MB compressed (about 28%) and 58 MB uncompressed (about 22%). A separately processed App Store Connect check for the same synthetic variant reports 80 MB download size and 200 MB install size.
The source-file reductions do not map one-to-one to report values because asset compilation, slicing, compression, alignment, signing, and metadata also contribute. The remote tutorial is deferred, not eliminated: after a user downloads it, post-use storage grows by roughly 32 MB again and may temporarily include both the archive and extracted files. Test its offline, retry, purge, and re-download paths, and measure update delivery separately because the full-install compressed value is not a delta-update estimate.
Effective strategies for reducing app size
The techniques below are grouped by the problem they primarily solve. Several improve more than one metric—for example, smaller assets can reduce both download and installed size—but this structure helps you start from the user impact you want to change.
| Metric to reduce | Recommended sections | Related sections |
|---|---|---|
| App Store download size | Manage assets efficiently; Adopt deferred content loading | Reduce dependency libraries; Choose the right framework type |
| Initial installed footprint | Tune compiler optimization levels; Reduce dependency libraries; Choose the right framework type | Manage assets efficiently; Optimize bundled data and ML models |
| Update delivery size | Reduce app update size | Package small files |
| Post-use storage growth | Control post-use storage growth | Adopt deferred content loading (increases this metric) |
Reduce initial download size
Reduce what the App Store needs to deliver at installation time, or defer optional content until it is needed.
Manage assets efficiently
Assets — images, media, localized files, and bundled data — often account for more of the download size than code does. This section covers techniques for organizing, compressing, sharing, and cleaning up assets to reduce what ships to users.
Asset catalogs
Store bundled image resources in asset catalogs (.xcassets) so Xcode can compile their variants and app thinning can select appropriate resources for each device.
Practical tips in Xcode:
-
Match pixels to display size. In
Assets.xcassets, create an Image Set and configure its scale slots in the Attributes inspector. For a raster icon displayed at 24 × 24 points, use a 48 × 48-pixel image for2xand a 72 × 72-pixel image for3x. Resize the source files before adding them. -
Share artwork when possible. Use Universal when the same artwork works across supported devices. Add device-specific or color-gamut variants only when needed, and avoid creating separate named image sets with identical content.
-
Remove duplicate loose files. After moving an image into a catalog, update its loading code to use the asset name—for example,
UIImage(named: "toolbar_search")for an image in the main bundle. Check Build Phases → Copy Bundle Resources and the exported app for original loose copies, then remove them once all consumers use the catalog. -
Verify the delivered size. Compare the same device variant in the App Thinning Size Report before and after the change. Catalog compilation, compression, and slicing affect the result, so source-file savings do not necessarily equal download-size savings.
For icons and symbols, prefer system-provided SF Symbols when the design and deployment target allow. Because the operating system supplies these symbols, they do not add image files to the app bundle. Check symbol availability for supported OS versions and provide a fallback when needed; custom symbols are bundled with the app and do add size.
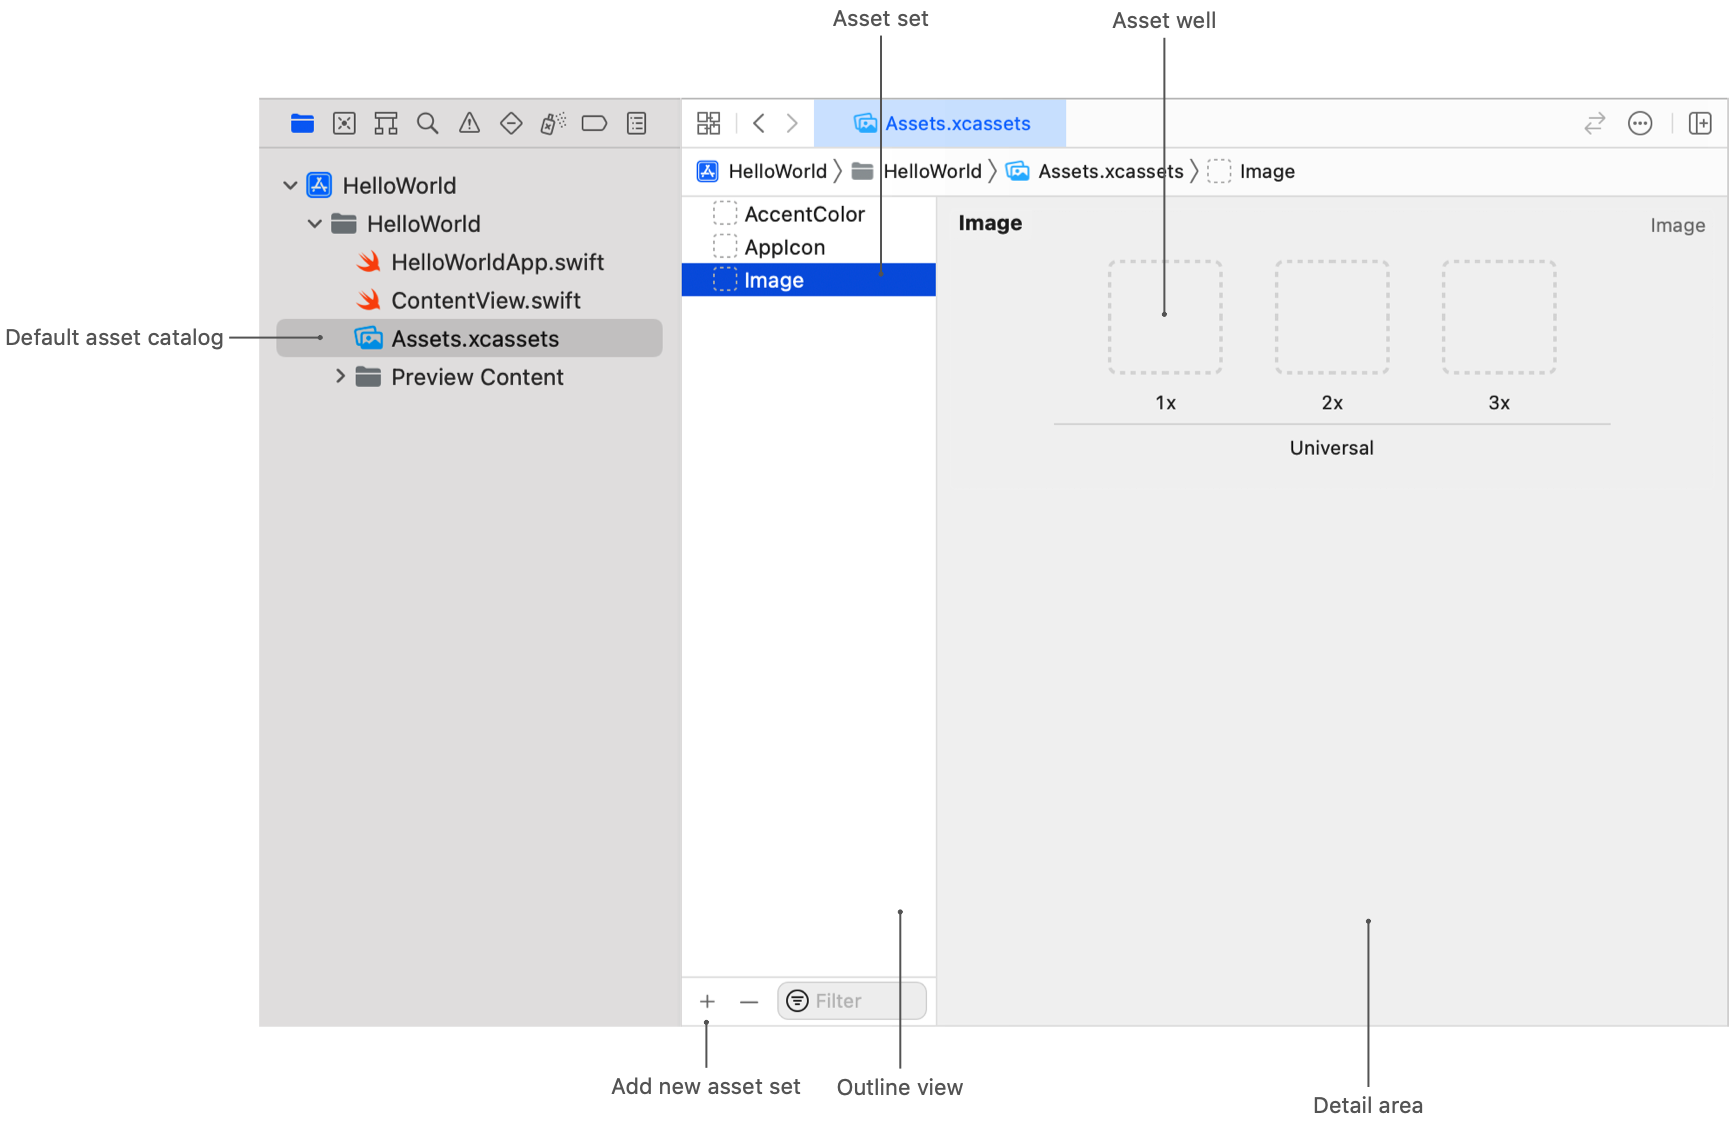
The Xcode Asset Catalog editor—an image set can hold scale-specific variants such as 1x, 2x, and 3x. App thinning delivers the appropriate variant for the user's device.
Package small files
Shipping hundreds of small files can add filesystem, bundle metadata, and code-signing overhead. Measure this overhead before optimizing. When it is meaningful, consider combining related records into a database, archive, or generated binary container; converting image resources into an asset catalog or texture atlas; or moving optional collections to deferred delivery. Choose an approach that fits the app's access patterns, and account for decompression time, temporary storage, random-access requirements, installed size, and update churn. The App Store can generate updates from changed portions of files, so changing one item does not automatically resend an entire container. However, recompressing, reordering, or nondeterministically regenerating a packed file can turn a small logical change into widespread byte changes. Measure this trade-off as described in Reduce app update size.
Illustrative example — before: Ship many individual animation files.
Animations/
├── onboarding_step1.json       // 3 KB
├── onboarding_step2.json       // 4 KB
├── empty_state_chat.json       // 5 KB
├── empty_state_inbox.json      // 4 KB
├── loading_spinner.json        // 2 KB
└── ... 50+ files, ~250 KB raw
After packaging: Combine related assets when the size benefit justifies the runtime trade-offs.
Animations/
└── animations.dat             // 180 KB generated container
These values are illustrative; compression can change their effect on App Store download size.
Media formats
Compress data and use efficient media formats before shipping. HEIF often provides better compression than the JPEG for photographic images. For raster icons and illustrations that require lossless pixels or broad tooling compatibility, optimized PNG remains a reliable choice. ImageOptim can apply lossless optimization, while pngquant reduces PNG size through lossy palette quantization and therefore requires visual-quality checks. For video, HEVC (H.265) is often more space-efficient than H.264, and audio can frequently use a lower bitrate without a noticeable quality loss.
Don't: Ship assets at a higher resolution, quality, or bitrate than the app requires.
Assets/ ├── hero_banner.png // 2.4 MB, uncompressed export ├── promo_video.mp4 // 18 MB, H.264, high bitrate └── background.jpg // 8.6 MB, 4000×3000, quality 100%Do: Choose the appropriate format and settings for each asset, then validate its visual quality and size.
Assets/
├── hero_banner.heif        // 380 KB after conversion
├── promo_video.mp4         // 6.2 MB after HEVC and bitrate tuning
└── background.jpg          // 620 KB after resizing and quality tuning
These values are illustrative; actual savings depend on the content and encoder settings.
Be careful: HEIF and HEVC are supported on iOS 11 and later, but verify integrations with servers, third-party SDKs, and older systems that may still require JPEG or H.264.
Optimize bundled data and ML models
Not all large resources are images or videos. Seed databases, JSON files, rule sets, offline content, and Core ML models can also dominate app size. Before bundling them, remove test data, compact databases, minify or compress static JSON, and split optional datasets so they can be downloaded later.
For ML models, check whether the model can be quantized, pruned, or replaced with a smaller variant without hurting product quality. If a model is only needed by an optional feature, consider delivering it through Background Assets instead of shipping it in the initial app bundle. Background Assets lets the system download and manage large optional files outside the app bundle, which is useful for content that is valuable after install but not required for first launch. For setup details and trade-offs, see Adopt deferred content loading below.
Illustrative example: Treat bundled data like assets: ship only what first launch needs, then move optional datasets or large models outside the initial bundle.
Don't: Bundle every offline dataset and model in the app.
AppBundle/
├── seed.sqlite                 // 180 MB, includes test rows and old indexes
├── places.json                 // 45 MB, full offline data for all regions
├── recommendations.mlmodelc    // 90 MB, used only by optional feature
└── tutorial_content/           // 60 MB, not needed on first launch
Do: Keep only startup-critical data bundled, compact it, and defer optional content.
AppBundle/
├── seed.sqlite                 // 42 MB after compacting and removing test data
└── places.index.json           // 2 MB lightweight index for first launch

Background Assets / CDN
├── places-full-region.zip
├── recommendations-small.mlmodel.zip
└── tutorial_content.zip
These values are illustrative; the actual reduction depends on the processed bundle and App Store compression.
Duplicate resources
When the same asset belongs to the app and one or more extension targets, Xcode may package a separate copy in each bundle. Inspect the archived .app and nested .appex bundles first to confirm the duplication. If the duplicated assets are large enough to matter, consider moving them into an app-extension-safe dynamic framework shared by those targets.
Expose the framework's bundle through a public accessor, then load assets from it.
// SharedUI.framework
private final class ResourceMarker {}

public extension Bundle {
    static let sharedUI = Bundle(for: ResourceMarker.self)
}
Call sites in the app and its extensions then use that accessor:
let icon = UIImage(named: "send_icon", in: .sharedUI, compatibleWith: nil)This pattern is most useful when the app and its extensions already link the same app-extension-safe dynamic framework and the archived product embeds that framework only once under the containing app's Frameworks directory. Moving duplicated assets into that framework's bundle then adds little incremental overhead.
Unused resources
Image files left behind after a feature removal or redesign still ship if they remain in a target. FengNiao, an open-source tool developed by our colleague onevcat, can scan an Xcode project for image resources that appear unused.
Run it from the project root:
$ fengniao --project . --exclude Pods Carthage

12 unused files are found. Total Size: 3.8 MB
What do you want to do with them? (l)ist|(d)elete|(i)gnore l

1.2 MB  Assets.xcassets/promo_holiday_2023.imageset
680 KB  Assets.xcassets/old_onboarding_bg.imageset
92 KB   Assets.xcassets/placeholder_avatar_v1.imageset
84 KB   Assets.xcassets/icon_feature_x.imageset
...

What do you want to do with them? (l)ist|(d)elete|(i)gnore d
Deleting unused files...
12 unused files are deleted.
Review every result before choosing delete. FengNiao relies on name matching, so resources loaded through dynamically constructed names or custom lookup code may appear unused. Audit unused localization keys separately because FengNiao does not check them.
Adopt deferred content loading
Not every resource needs to ship inside the app bundle. Large optional content, such as sticker packs, ML models, creator tools, tutorials, or premium media can often be downloaded after installation. This reduces initial download size and improves the first-time install experience.
A simple deferred-loading flow starts with the content itself.
First, move large optional content out of the bundle. Good candidates are resources that are large, optional, or only needed after the user uses a specific feature. Avoid deferring content that is required to render the first screen or complete basic app setup.
Next, decide when the content should arrive. The timing should match how critical the content is:
- Essential: Download during install or update only when the app cannot operate without the content. Users cannot launch the app until an essential download finishes, so reserve it for truly required bootstrap data and keep the payload within the configured allowances.
- Prefetch: Download opportunistically without blocking launch. Use this for content the user is likely to need soon.
- On demand: Download only when the user uses the feature that needs the content. This gives the smallest initial download and is usually best for optional features.
Size guidance: For app-size work, default to on-demand delivery unless the content is required for launch or very likely to be used immediately.
Finally, pick the delivery path. Choose the API model that matches your deployment target and content structure:
| Path | Use when | How it works |
|---|---|---|
Path 1: Background Assets with BAURLDownload | You target iOS 16.1 or later and want direct control over individual downloads. | The app or downloader extension schedules individual HTTPS downloads, then moves completed files into app-managed storage. |
| Path 2: Managed Background Assets with asset packs | Your deployment target can require iOS 26 or later, and the content can be grouped into versioned packs. | The app declares asset packs in a manifest. The system manages download, update, and compression; your app removes packs it no longer needs. |
Path 3: Background URLSession | Background Assets do not fit your hosting, scheduling, or storage model. | Your app owns the download queue, persistence, cleanup, and retry behavior. |
Path 1 gives the app direct control over individual URL downloads. The core flow is to create a BAURLDownload, start it now or schedule it for later, and move the completed file out of its temporary location. The example below intentionally shows only the request and start call.
Runtime requirement: The size-aware
BAURLDownload(identifier:request:fileSize:applicationGroupIdentifier:)initializer requires iOS 16.4 or later, which is why the function is annotated@available(iOS 16.4, *). Background Assets itself is available from iOS 16.1. An OS availability annotation does not make a newer API overload available to an older SDK.
import BackgroundAssets
import Foundation

@available(iOS 16.4, *)
func startStickerPackDownload(using manager: BADownloadManager) async throws {
    let download = BAURLDownload(
        identifier: "sticker-pack",
        request: URLRequest(url: URL(string: "https://cdn.example.com/sticker-pack.zip")!),
        fileSize: 5_200_000,
        applicationGroupIdentifier: "group.com.example.app"
    )

    try await manager.withExclusiveControl {
        try manager.startForegroundDownload(download)
        // For prefetch, use scheduleDownload(_:) instead.
    }
}
Use startForegroundDownload only while the app is active and the user is waiting. For opportunistic prefetch, call scheduleDownload instead. The download manager is shared between your app and its downloader extension, so take exclusive control before scheduling downloads or inspecting the queue. Without it, the app and extension can race.
fileSizemust be exact. Apple requires this value to match the file the server returns; a mismatch fails the download rather than degrading gracefully. Avoid hardcoding it beside a CDN asset you expect to re-encode — read it from your manifest or publish it with the asset.
Path 2 is a better fit when content can be grouped into versioned asset packs. The system then manages downloading, updating, and compressing those packs, and keeps them current in the background. It does not reclaim them for you: call remove(assetPackWithID:) when the user no longer needs a pack. checkForUpdates() removes only packs that became obsolete server-side. Use StoreDownloaderExtension (from StoreKit) for Apple-hosted packs or ManagedDownloaderExtension for self-hosted packs.
Apple-Hosted Background Assets can host up to 200 GB of compressed assets on all platforms except watchOS. Per-pack limits are documented separately in Apple-hosted asset pack size limits.
The example below is annotated
@available(iOS 26.4, *)becauseensureLocalAvailability(of:requireLatestVersion:)requires iOS 26.4 or later; the rest of the flow is available from iOS 26.0. See Apple'sAssetPackManagerAPI reference for current availability and deprecation details.
@available(iOS 26.4, *)
func loadTutorialIntro() async throws -> Data {
    let manager = AssetPackManager.shared
    let pack = try await manager.assetPack(withID: "tutorial-content")
    try await manager.ensureLocalAvailability(of: pack, requireLatestVersion: false)
    return try manager.contents(
        at: "tutorial/intro.json",
        searchingInAssetPackWithID: pack.id
    )
}

@available(iOS 26.0, *)
func discardTutorialContent() async throws {
    try await AssetPackManager.shared.remove(assetPackWithID: "tutorial-content")
}
Pair every ensureLocalAvailability call with a removal path. Call remove(assetPackWithID:) when the user finishes the feature, and call ensureLocalAvailability again if they return to it.
Path 3 is the fallback when Background Assets do not fit. Use background URLSession downloads with your own hosting, scheduling, storage, cleanup, and retry behavior.
NSBundleResourceRequest, the On-Demand Resources API, was introduced in iOS 9.0 and is deprecated starting in iOS 27.0. Deprecation does not mean removal. Plan migration for existing implementations and prefer Background Assets for new work where it fits.
Reduce installed footprint
Reduce compiled code, bundled dependencies, and duplicated framework content that remains on the device after installation. These changes often reduce download size as well.
Tune compiler optimization levels
The optimization level in Xcode determines how aggressively the compiler optimizes code for speed, size, and debuggability. Xcode has two main compilers to consider: Apple Clang, which compiles C, C++, Objective-C, and Objective-C++, and the Swift compiler, which compiles Swift files.
- Apple Clang levels:
None (-O0): disables most optimization for easier debugging.Fast (-O1): applies light optimization.Faster (-O2): balances runtime performance and code size.Fastest (-O3): applies more aggressive performance optimizations and may increase code size.Fastest, Smallest (-Os): optimizes for size while retaining most-O2optimizations.Fastest, Aggressive (-Ofast): combines-O3with non-standard fast-math behavior; deprecated since Clang 19.Smallest, Aggressive (-Oz): optimizes more aggressively for size than-Os.
- Swift compiler levels:
No Optimization (-Onone): preserves debuggability.Optimize for Speed (-O): prioritizes runtime performance.Optimize for Size (-Osize): prioritizes smaller generated code.
Choose levels based on your build configuration. During active development, unoptimized builds are usually the right choice because they preserve debuggability and produce more predictable stepping behavior. As you approach release, switch to the Release configuration to evaluate the size of the app you will actually ship. For a release build where size is the priority, -Os for Clang and -Osize for Swift are the recommended starting point. To apply these, select your target in Xcode, open Build Settings, and search for optimization:
Xcode → [Your Target] → Build Settings → search "optimization"
├── Apple Clang - Code Generation
│   └── Optimization Level  (GCC_OPTIMIZATION_LEVEL)
│       ├── Debug:   None [-O0]                 ← default
│       └── Release: Fastest, Smallest [-Os]    ← recommended for size
└── Swift Compiler - Code Generation
    └── Optimization Level  (SWIFT_OPTIMIZATION_LEVEL)
        ├── Debug:   No Optimization [-Onone]   ← default
        └── Release: Optimize for Size [-Osize] ← recommended for size
Watch out: More aggressive size optimization can reduce runtime performance.
-Ozis more aggressive than-Os, while Swift's-Osizeprioritizes smaller generated code over speed. Profile the Release build before shipping, and consult the Xcode Build Settings Reference for the authoritative description of each level.Worth noting: Two other binary-size settings are easy to overlook.
DEAD_CODE_STRIPPINGtells the linker to remove unreachable functions and data at link time.STRIP_INSTALLED_PRODUCTstrips symbols from the shipped binary as part of deployment postprocessing, while Xcode can keep debug information separately in a.dSYMfile for crash symbolication. In standard Release templates these are often already configured sensibly, but do not assume that is true in custom build configurations or cloned targets — verify them explicitly.Also check: Review
Other Linker Flagsin Release. Flags such as-ObjC,-all_load, and-force_loadcan force the linker to pull more code from static libraries than expected. This can reduce the benefit of dead-code stripping, especially with older Objective-C SDKs or large static libraries. Keep only the flags that are required, then verify the app still links and runs correctly.Inlining and size: Avoid using
@inline(__always)as a general size optimization. Inlining can increase binary size by duplicating function bodies, but it can also enable constant folding and dead-code elimination that reduce size. Leave inlining decisions to the optimizer unless measurements justify an override, then compare Release binary size and runtime performance.
Optimize your code
Architecture
Architecture decisions can influence binary size when they cause more code or resources to be linked. Common warning signs include:
-
Similar implementations compiled separately across features or targets.
-
Generic-heavy abstractions or generated code producing many specialized implementations.
-
Removed feature code and resources remaining referenced, preventing them from being stripped.
-
Small targets, such as extensions, depending on large app-level modules for only a few APIs.
These are investigation signals, not proof of bloat. Use a link map and compare the final app bundle before restructuring the architecture.
Unused code
Release builds can remove code that the compiler and linker can prove is unreachable, particularly when DEAD_CODE_STRIPPING is enabled. However, code exposed through public interfaces, dynamic dispatch, reflection, Objective-C runtime behavior, string-based lookup, or certain library boundaries may remain because it cannot safely be identified as unused.
-
For Objective-C, compiler warnings can catch some unused local variables and static functions, while Xcode's Product → Analyze can identify potential bugs such as dead stores. OCLint provides additional lint checks. These tools do not reliably identify unused methods or classes across the project; review suspected-unused code against call sites and runtime usage before removing it.
-
For Swift, the compiler catches local issues such as unused variables and unreachable statements, but it cannot reliably identify unused types, methods, imports, or public APIs across modules. Use Periphery for a project-wide scan.
How to use Periphery: Run the scan, review each finding, then delete what is confirmed dead:
$ periphery scan

/App/Tracking/LegacyAnalytics.swift:3:7   - class 'LegacyAnalytics' is unused
/App/Utils/DateFormatterV1.swift:12:6     - func 'formatDateLegacy' is unused
/App/Models/OnboardingStep.swift:5:8      - enum 'OnboardingStep' is unused
Be careful: Static analyzers may incorrectly report code reached through
performSelector, reflection, Objective-C runtime lookup, or string-based indirection as unused. Treat findings as candidates, not proof, and verify them before deleting code.
String management
Use String Catalogs (.xcstrings) to manage and audit localized resources, but do not assume that replacing repeated string literals with a catalog key will reduce binary size. The compiler and linker may already pool identical literals, while catalogs add localization data. For app-size work, focus on removing confirmed-unused keys, obsolete feature-specific strings, stale translations, and languages the app no longer supports.
Size-focused audit: Review catalogs after removing a feature or supported language, trace each candidate key to its call sites, and delete only entries confirmed unused. Treat centralization as a maintainability and localization improvement unless measurement also shows a size reduction.
Conditional compilation
#if DEBUG excludes the enclosed code whenever the DEBUG compilation condition is not defined. Standard Xcode configurations normally define it for Debug but not Release; verify this for custom configurations. It is useful for logging, network inspection, mock data, test helpers, and debug overlays.
Example: Guard a debug-only call site:
func request(_ urlRequest: URLRequest) async throws -> Data {
    let (data, _) = try await URLSession.shared.data(for: urlRequest)
    #if DEBUG
    NetworkInspector.log(urlRequest, data: data)
    #endif
    return data
}
This removes the
NetworkInspector.logcall from Release builds, but it does not guarantee that theNetworkInspectorimplementation is absent. If it must never ship, guard its declaration too or build it only into a debug-only module.Common mistake: A misplaced
#if DEBUGguard can exclude production error handling or retry logic. Confirm that everything inside the guard is genuinely debug-only.
Reduce dependency libraries
A third-party library can save development time while bringing in code and resources your app never uses. Before removing it, check how much it contributes to the shipped app and which features your app actually needs.
The flow below helps you decide whether to keep the library, trim its features, or replace it.
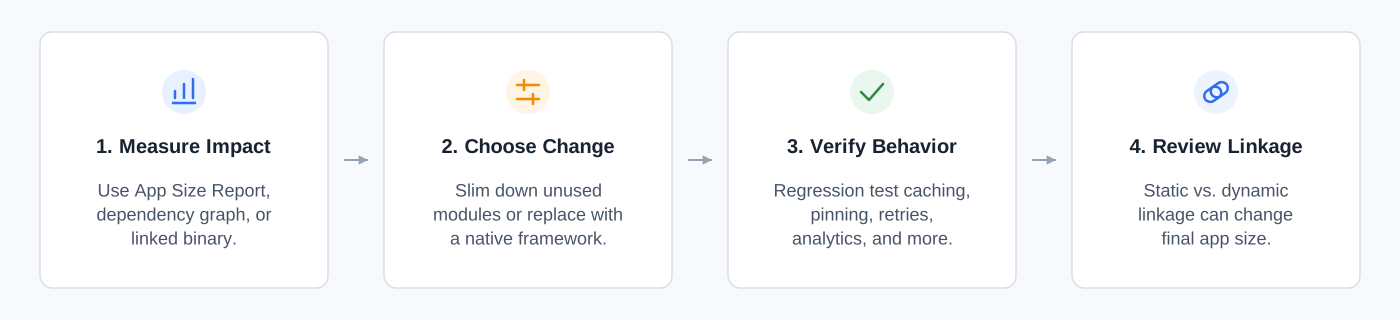
Tools to inspect and measure dependencies
Start with the dependency graph to understand why a library is included, then use build analysis to find where its size comes from. The following tools make that investigation easier:
| Tool | How it helps |
|---|---|
| Swift Package Manager / CocoaPods | Use swift package show-dependencies for a package with a Package.swift manifest, or inspect Podfile.lock for CocoaPods. Both help trace direct and transitive dependencies. |
| Xcode link map | Use the link map workflow above to attribute linked symbols to static libraries and object files. Check embedded dynamic frameworks and resource bundles separately. |
| Periphery | Find unused Swift declarations that may reveal obsolete features keeping a dependency alive. Review all consuming targets and runtime references before deleting candidates. |
| Sentry Size Analysis | Compare uploaded Release builds to see which frameworks and resources changed size, and track regressions in CI. |
Once you identify a candidate, try the smallest change first. Selecting fewer package products or CocoaPods subspecs may remove unused features without requiring a rewrite. Update the relevant manifest or target settings, then rebuild affected app and extension targets.
Native alternatives to consider
If your app only needs a small part of a library, an Apple API may already cover that use case. For example, URLSession and Codable can handle straightforward HTTP requests and JSON mapping. Core Data or SwiftData (iOS 17 and above) may cover local persistence, while Logger from OSLog (iOS 14 and above) can replace a library used only for local diagnostics.
Check the behavior behind each API before replacing it. Networking libraries may provide authentication, retries, or caching, and a persistence change may require data migration. Logger does not replace remote analytics or crash reporting.
System frameworks are supplied by the OS, but the savings depend on the code you remove and the replacement you write. Test affected features and compare the same Release device variant in the App Thinning report, then confirm processed sizes in App Store Connect.
Even when a library remains necessary, how it is linked can change its size contribution. The next section looks at the trade-offs between static and dynamic frameworks.
Choose the right framework type
When shared code moves into frameworks, app size changes based on where the compiled code ends up. A framework can appear once as a bundled dynamic framework, or its code can be copied into one or more target executables through static linking. The smaller result depends on how much code is shared, how much each target actually uses, and how many targets include it.
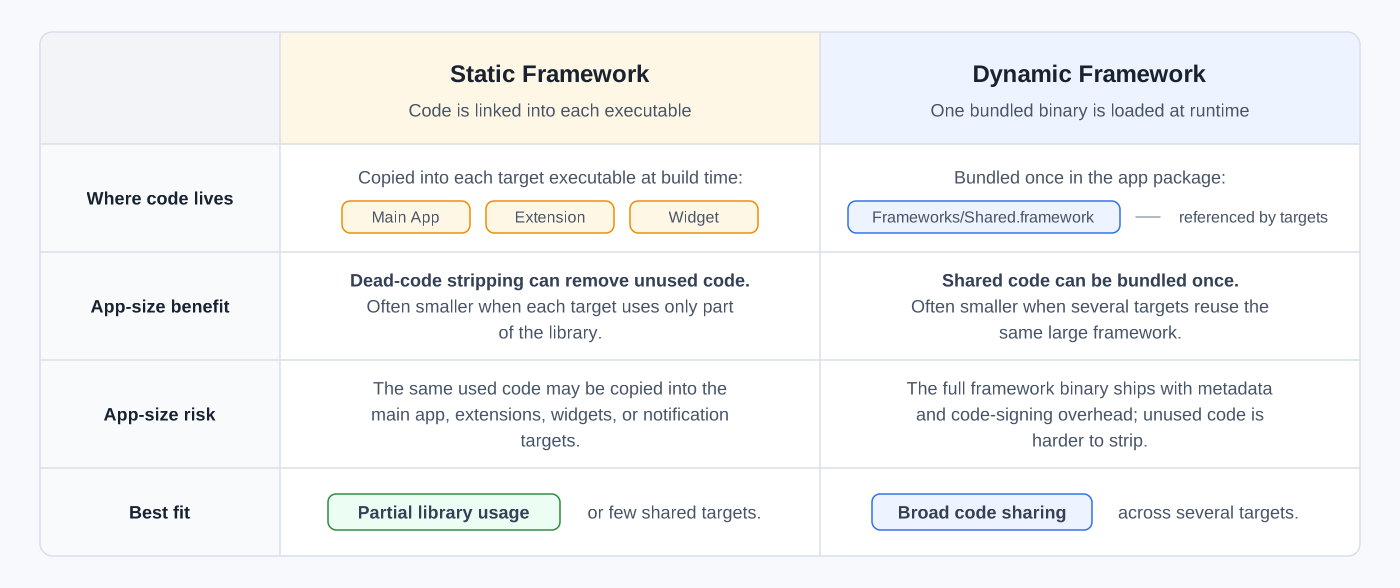
For app-size work, do not choose static or dynamic by rule of thumb. Static linking may shrink one target through dead-code stripping, while dynamic linking may be smaller overall when the same large shared code is reused across multiple targets. Measure the final app bundle, not just one executable.
App extensions deserve extra attention. Share extensions, notification extensions, widgets, and intent extensions are separate targets, so each one can bring its own linked frameworks, resources, and dependencies. A common mistake is linking a large shared module into a small extension when the extension only needs one or two APIs.
Keep extension dependency graphs narrow. Move only the minimal shared code into extension-safe modules, avoid linking full app-level frameworks, and check each extension's final bundle size separately. This is especially important when an app has multiple extensions that all depend on the same large internal framework or third-party SDK.
Worth noting: Too many small dynamic frameworks can also increase launch time, but for app-size work the main concern is the extra bundled framework overhead.
Reduce app update size
Limit unnecessary bundle churn so small product changes do not produce disproportionately large updates.
The App Store compares a new version with one or more previous versions and creates optimized update packages containing only changed content. This comparison covers the entire application bundle, including executables, storyboards, nibs, localizations, and other assets.
To keep update packages small:
- Compare the previous and current
.appbundles withdiffor another directory comparison tool, then investigate unexpected content changes. - The App Store can generate updates from changed portions of files, so a change does not automatically resend an entire container. Keep stable and frequently changing content separate when compression, reordering, or regeneration causes a small logical edit to change many bytes.
- Avoid regenerating bundled files when their effective content has not changed.
Important: App Store update generation is content-based, so filesystem creation and modification dates alone do not affect update packages. Embedding a timestamp inside a file changes its content and can increase the update size.
See Apple's Reduce the size of app updates.
Control post-use storage growth
A small download can quietly become a large storage footprint after regular use. Caches, logs, databases, extracted files, and downloads grow outside the signed app bundle, so app thinning cannot reduce them. Deferred delivery only postpones that cost.
Put each file in the right place
The rule is simple: durable data should persist, reproducible data should have limits, and temporary data should disappear after use. Follow Apple's Files and directories guidance and store each file according to its lifetime:
| Data | Location | Cleanup policy |
|---|---|---|
| User-created or irreplaceable data | Documents | Retain until the user deletes it or the product's documented retention policy applies |
| App-managed persistent data | Library/Application Support | Remove obsolete content and compact its storage when worthwhile |
| Re-creatable files, caches, and logs | Library/Caches | Enforce age and size limits; tolerate system purging |
| Extraction and staging files | FileManager.temporaryDirectory | Delete immediately after use |
Backup policy:
DocumentsandLibrary/Application Supportare backed up by default. Keep re-creatable data inLibrary/Cacheswhen system purging is acceptable, and exclude re-downloadable Application Support content from backup. Never exclude user-created or irreplaceable data.
Give every download an exit plan
Before writing a file, decide who owns it, how large or old it may become, when the app removes it, and how the app retrieves it again. Then enforce that policy:
- Cap caches by both age and total size.
- Remove archives and staging files after success or failure.
- Evict complete files or packs, never partial installations.
- Remove managed asset packs explicitly. The system will not reclaim them while your app is installed.
- Let users remove large optional downloads and fetch them again later.
Finish by exercising representative usage and checking Documents & Data in iPhone Storage. A small install that grows without limits is still a large app.
Timing app size optimization
App size is easier to control when it is measured throughout development, not only after creating a release branch. Generate an App Thinning Size Report from regular Release builds, track the results in continuous integration (CI), and investigate significant regressions while the responsible changes are still recent.
During release stabilization, focus on low-risk cleanup such as removing confirmed unused resources or adjusting asset compression. Plan larger changes—including dependency replacement, framework-linkage changes, and deferred content delivery—earlier because they require broader testing and can affect runtime behavior.
Final verification checklist
Run this checklist after each optimization instead of repeating the same verification steps in every technique:
- Record a baseline: Use the same Release configuration, Xcode version, and representative device variants.
- Change one variable: Keep the comparison attributable to a single compiler, code, dependency, packaging, or delivery change.
- Compare delivery metrics: Check compressed and uncompressed values for the same variants in the App Thinning Size Report, then confirm processed estimates in App Store Connect. Track essential and prefetched Background Assets separately so moving content outside the app bundle does not hide installation costs.
- Inspect bundle composition: Confirm that the expected binary, framework, resource, model, or localization contribution actually changed and that no new duplication appeared.
- Check update impact: Compare the previous and current app bundles, especially when consolidating frequently changing files.
- Test runtime behavior: Recheck launch time, performance, extensions, dynamic resource lookup, and the feature paths affected by the change.
- Test storage lifecycle: Record the storage footprint before first launch and after representative use, noting which packs have downloaded. Exercise offline use, cache limits, explicit pack removal, cleanup, purging where supported, and re-download behavior.
- Record the result: Keep the accepted baseline in CI and investigate significant regressions while the responsible changes are recent.
Conclusion
App size optimization is a measurement problem before it is a cleanup problem. Establish a processed-build baseline, identify the largest contributor, choose the technique that targets that metric, and verify one change at a time.
Choose the next optimization based on the largest measured contributor and your product constraints. Record the accepted baseline in CI and use the final verification checklist to catch regressions early. The goal is not the smallest possible bundle at any cost, but the smallest reliable experience for the users and devices you support.