Following the merger of LINE Corporation and Yahoo! Japan Corporation, we launched a subscription-based membership called LYP Premium. LYP Premium offers not only the benefits previously provided by Yahoo! Premium, but also new LINE-specific benefits. One feature of LYP Premium is the "members-only font" function, which allows users to change the display font in the LINE app to their preferred font. When implementing this feature, we had three main requirements:
- Show a list of fonts to the user.
- Dynamically download the font chosen by the user.
- Apply the downloaded font across the entire app.
In this article, I'm going to share our experiences dealing with the second and third requirements.
How to apply fonts in Android
To understand how to apply fonts in Android, you first need to know the definitions and differences of the following three terms:
- Font file: This is a file that collects information (
style,weight,size) used to display characters on the screen. - FontFamily: This is a collection of fonts defined by
styleandweight. - Typeface: This is a class that allows you to load a font into memory and apply it as a system resource.
Using these terms, we can redefine our requirements as "dynamically downloading a font file from the server" and "loading it into the Typeface class to apply it to the view".
Now, let's look at both static and dynamic ways to apply fonts in Android.
Static font application method
The most basic way to apply a font in Android is to add the font file to the app resources and define it as a style resource to use where needed. The font defined as a style can be applied uniformly throughout the app by specifying it as a theme. However, this method has the following two drawbacks:
- All font lists are included in the app bundle, unnecessarily increasing the size of the app.
- Font updates are not possible until the app is updated.
Dynamic font application method - downloadable fonts
To overcome the drawbacks of the static font method, Android offers a dynamic font system called downloadable fonts. This allows you to use fonts without adding the font file to the app resources, unlike the static method. Let's take a look at how this feature works and how to use it.
Dynamically fetching the font selected by the user with the downloadable fonts feature
Let's understand how the dynamic font system of Android, known as the downloadable fonts feature, works. We'll do this by exploring how to fetch fonts from Google Fonts using this feature.
Fetching fonts from Google Fonts with the downloadable fonts feature
The image below shows how the downloadable fonts feature works.
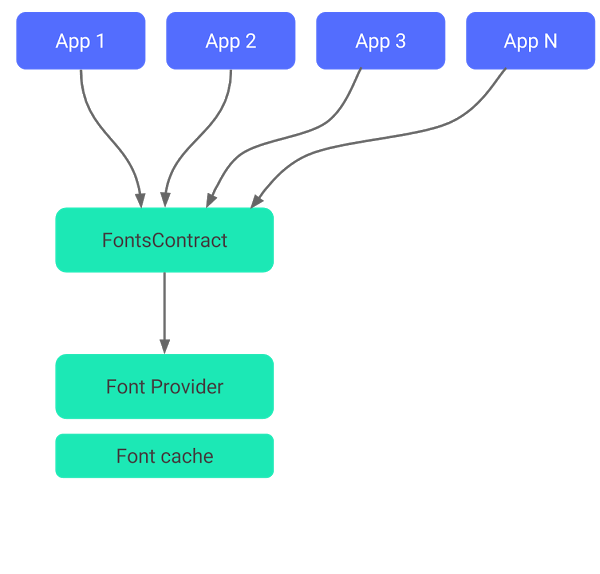
Let's assume that App1 wants to use a specific font file. When App1 requests the desired font information through FontsContract, FontProvider downloads the font file from the network or returns a cached file. Once a font is downloaded, it's managed at the OS level, and if another app requests the same font, the previously downloaded font file is reused. This saves network usage and disk space.
Here, the FontProvider downloads the font file from Google Fonts, a font provider. Google Fonts is an open-source library that provides fonts through an API. Android allows various fonts to be shared and used across different apps on a single device using Google Fonts.
Let's look at how the downloadable fonts feature works in a bit more detail.
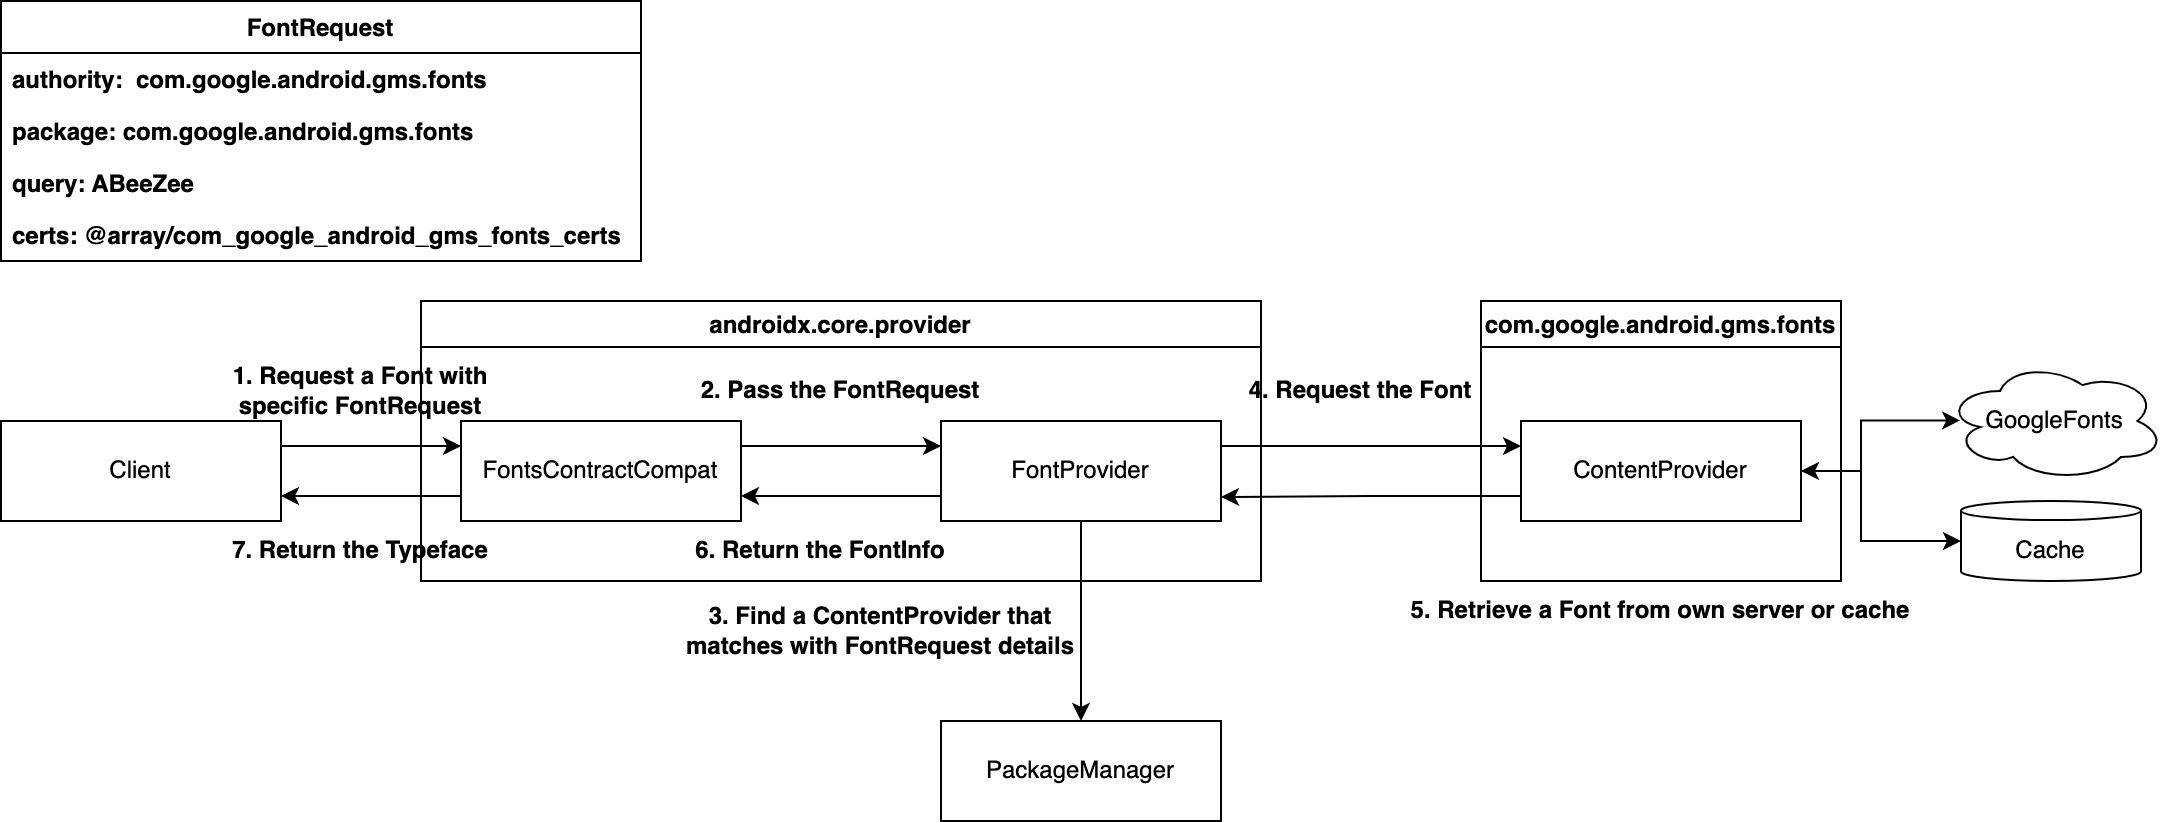
- The client that wants to use a new font sends a request to
FontsContractCompatwith aFontRequestclass that includes the specifications of theContentProvider(authority,package,cert) and what font it wants (query). FontsContractCompatpasses theFontRequestsent by the client to theFontProvider.- The
FontProviderfinds theContentProviderthat matches the specifications through thePackageManager(in this example, Google Fonts'ContentProvideris returned). - The
FontProviderrequests the font from theContentProviderusingFontRequest#Query. - The
ContentProviderfirst looks for the corresponding font in the cache, and if it's not there, it downloads it from the server. - The font received from the
ContentProvideris put into theFontInfoand returned. - Finally,
FontsContractCompatloads theFontInfointo theTypefaceand returns it.
Below is an example code. As shown below, you can request a font programmatically through FontsContractCompat by putting information into a FontRequest, and use the returned Typeface.
class FontRepository {

	fun getTypeFace(): TypeFace {

		val request = FontRequest(

			"com.google.android.gms.fonts",

			"com.google.android.gms",

			"ABeeZee",

			R.array.com_google_android_gms_fonts_certs"

		)

		return suspendCancellableCoroutine { continuation ->

			val callback = object : FontsContractCompat.FontRequestCallback() {

	            override fun onTypefaceRetrieved(typeface: Typeface?) {

    	            continuation.resume(typeface)

        	    }


            	override fun onTypefaceRequestFailed(reason: Int) {

                	continuation.resume(null)

	            }

    	    }

			FontsContractCompat.requestFont(context, request, callback, handler)

		}

	}

}
Also, you can access the font resources in XML and use it as the fontFamily of a TextView.
[res/font/abeeZee.xml]

<?xml version="1.0" encoding="utf-8"?>

<font-family xmlns:app="http://schemas.android.com/apk/res-auto"

    app:fontProviderAuthority="com.google.android.gms.fonts"

    app:fontProviderPackage="com.google.android.gms"

    app:fontProviderQuery="ABeeZee"

    app:fontProviderCerts="@array/com_google_android_gms_fonts_certs" />

---

[main_activity.xml]

<LinearLayout...>

	<TextView

		android:id="@+id/text_view"

        android:layout_width="wrap_content"

        android:layout_height="wrap_content"

        android:fontFamily="@font/abeezee" />

<LinearLayout/>
Although the explanation of how it works is complex, when you actually use it, as shown in the code above, you can easily get the desired font from Google Fonts as long as you properly request it with the information in the FontRequest.
However, the fonts used in the LINE app are those for which LINE has obtained usage licenses. It can't be obtained through Google Fonts, nor can it be shared with other apps. So, how can we fetch fonts from LINE's server instead of Google Fonts?
Fetching fonts from LINE's server with the downloadable fonts feature
As we saw earlier, when a request is made with FontRequest, this FontRequest is passed to the FontProvider, and the FontProvider finds the ContentProvider that matches the specifications of the FontRequest. Therefore, we determined that if we customize the ContentProvider and request it with matching specifications, we can fetch the font that can be used in the LINE app.
We implemented it in the way that configures a ContentProvider to fetch fonts from LINE's server and delivers a FontRequest tailored to the specifications of that ContentProvider, as shown in the image below.

The actual code would look something like this:
- LineFontProvider
pakcage com.example.line.font


class LineFontProvider: ContentProvider() {

	override fun query(...): Cursor? {

		// Checks if this ContentProvider can handle the URI.

		if (uri is LineContentUri) return MatrixCursor(...)

		else return null

	}


	override fun openFile(uri: Uri, mode: Mode): ParcelFileDescriptor {

		// Fetches the font file from the LINE server or local cache.

		val file = LineFontRepository.getFontFile(uri)

		return ParcelFileDescriptor.open(fontFile, MODE_READ_ONLY)

	}

}- custom_font.xml
<font-family xmlns:app="http://schemas.android.com/apk/res-auto"

        app:fontProviderAuthority="com.example.line.font"

        app:fontProviderPackage="com.example.line"

        app:fontProviderQuery="LineFont"

        app:fontProviderCerts="@array/line_fonts_certs">

</font-family>
When a request is made to FontsContractCompat in this way, the FontProvider requests a font from the LineFontProvider implemented by LINE and then returns it as a Typeface.
Dynamically applying the downloaded font to the LINE app
So far, we've looked at how to fetch the font we want from the LINE app using the downloadable fonts feature and get it as a Typeface. There are several ways to apply this fetched Typeface to the entire LINE app. Let's find out which method is most efficient.
Applying it to each view individually
There are three methods to apply it to each view: the static method, the programmatic method, and the custom view method with the font pre-applied. Let's look at how to use each method and their pros and cons.
| Static method |
|
| Programmatic method |
|
| Pre-applied custom view method |
|
Because the LINE app is so vast, using the view-based response method as described above would require a lot of work. In order to find a more efficient way to solve the problem, we did more research and came up with the method of setting the font style as a theme, which I mentioned at the beginning of the post.
Setting the downloadable fonts feature as a theme
Setting the font style as a theme was a method we had ruled out because you need to be able to predefine the font resources in XML in order to reference them as a style. However, we found out that we could dynamically fetch fonts from the LINE server using the downloadable fonts feature, and also confirmed that it could be referenced and applied in the XML layout. Therefore, we determined that it was a method that could be sufficiently used. The application method is as follows:
- Specify the
@font/custom_fontresource as a style resource.
<?xml version="1.0" encoding="utf-8"?> <resources> <style name="default_font"> <item name="fontFamily" /> </style> <style name="custom_font"> <item name="fontFamily">@font/custom_font</item> </style> </resources> - Set the style resource as a theme when each activity is created (
onCreate) usingApplication#ActivityLifecycleCallbacks.
class CustomFontThemeApplier : Application.ActivityLifecycleCallbacks {


		override fun onActivityCreated(activity: Activity, savedInstanceState: Bundle?) {

			if (needToApplyCustomFont) {

				activity.setTheme(customFontStyle)

			}

		}

		...

	}
By using the method of setting the downloadable fonts feature as a theme, we were able to apply the desired font to all places in the LINE app where text is displayed. Each service doesn't need to respond separately to apply the font, and only needs to handle cases where it should be excluded according to the intention, which greatly reduced the amount of work needed to apply the feature.
Conclusion
While implementing the members-only font feature, we used a method of dynamically fetching and applying fonts as a theme, which brought many benefits. However, there are still areas we want to improve.
- Restart issue: When the font that needs to be applied changes, the app needs to be restarted because the style resources need to be reloaded.
- Loading delay issue: On some devices, there's a delay in dynamically loading the font, causing the default font to be briefly displayed.
We are researching and trying various measures such as changing the query method of FontRequest or using preload in the splash screen to solve these issues.
References
- Android Developers - Font Resource
- Android Developers - Fonts in XML
- Android Developers - downloadable font
Portions of this page are reproduced from work created and shared by the Android Open Source Project and used according to terms described in the Creative Commons 2.5 Attribution License.